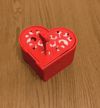
Heart Shaped Lock Box - Gear Lock System with Key


Print Profile(2)

Description
Membership
Commercial Membership / Tip Me
Boost Me (for free)
Did you like this Model ? Boost me now.
🛑 Commercial Use Notice:
If you wish to sell prints of this model (or any of my other designs), please make sure to purchase the commercial license by clicking on the license option above. Unauthorized commercial use is strictly prohibited, and action may be taken against anyone found selling my work without a proper license.
Support creators—don’t steal designs. 💙
Thank you!
-----------------------------------------------------------------------------------------------
Heart Shaped Lock Box – Unique Gear Lock System with Key
Featuring a gear lock mechanism, this design makes it perfect for storing small treasures, love notes, or meaningful gifts. Ideal for Valentine’s Day, anniversaries, or any special occasion.
ATTENTION:
This design requires attention to be assembled. read below the step-by-step tutorial for the assembly process before you start printing it.
Step 1
Start printing Plate 1 — this is the first plate you'll need.
DO NOT PRINT THE SECOND PLATE FIRST.

Step 2
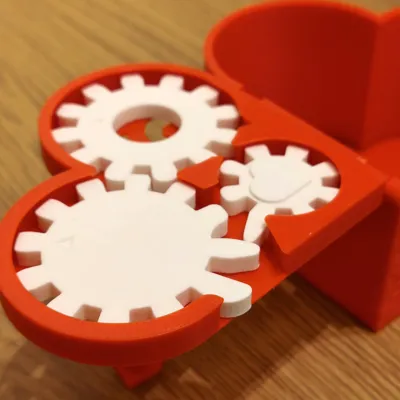
Once Plate 1 is printed, notice both top gears have an arrow on the top. Keep this in mind for the following steps.
Remove the gears from the plate and remove the support from the bottom gear.


Step 3
Start printing Plate 2.
Your print will include the key; if you’ve already printed the key, you can skip it.

Step 4
The printer will pause around layer 36 — this is normal.
DO NOT CONTINUE THE PRINT. Proceed to the next step.

Step 5
Take the gears printed on Plate 1 and place them as shown.
Ensure the arrows point up, and the bottom gear’s heart embossing faces up.
Make sure everything aligns exactly as shown — it will not be possible to adjust once the print continues.

Step 6
Once everything is in place, resume the print and let it finish.
Step 7
When the print finishes, the box lid should look like this.
The gears will now be locked in place and will not fall or move.

Step 8
Remove the supports from the indicated spots.


Step 9
Now it's time to lock the lid to the box.
This will act as the hinge. You’ll need some force to lock it in place.
Be careful not to break the lid during this step.

Step 10
Your box is now ready for use.
Simply use the key to open and close the box.


----------------------------------------------------------------------------------------------------------------------------------------------------------------------------------------------
Either as decoration or as a gift for your loved one, enjoy and don’t forget to share your photo of the creation!!!
----------------------------------------------------------------------------------------------------------------------------------------------------------------------------------------------
Obs.: This creation was inspired by existing 3D models with a similar concept, however the entire file was designed from scratch by me to ensure a unique and personal touch.
Boost Me (for free)
Did you like this Model ? Boost me now.
Membership
Commercial Membership / Tip Me
☕ Enjoy my work? Consider offering me a coffee:
https://buymeacoffee.com/zenitstudio
💼 Join my Patreon:
https://patreon.com/ZenitStudio
📸 Follow my work and new designs on Instagram:
https://www.instagram.com/zenit_studio_oficial/
License
You shall not share, sub-license, sell, rent, host, transfer, or distribute in any way the digital or 3D printed versions of this object, nor any other derivative work of this object in its digital or physical format (including - but not limited to - remixes of this object, and hosting on other digital platforms). The objects may not be used without permission in any way whatsoever in which you charge money, or collect fees.
Comment & Rating (40)