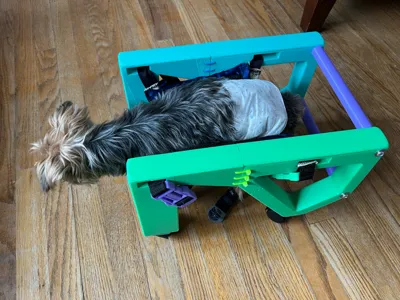
Small Dog Wheelchair


Print Profile(1)

Description
Boost Me (for free)
Hello! If you enjoy my designs and have a spare boost, I'd greatly appreciate your support as it helps me continue creating models for free on this platform! Thanks!
This is a remix of GAB-3D's “Pug Wheels,” a wheelchair for small dogs. So thankful that they were able to provide the base for this project!
Things that I remixed from version 1 to 2:
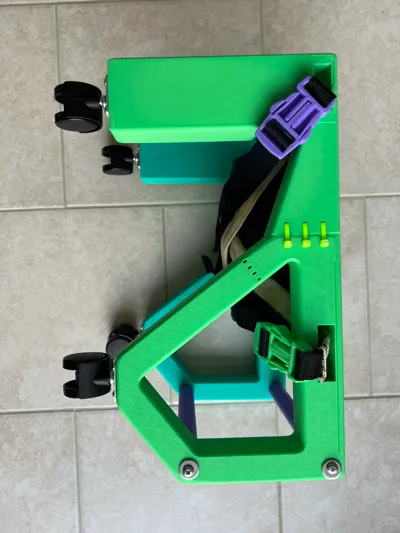
- Added a section for front wheels
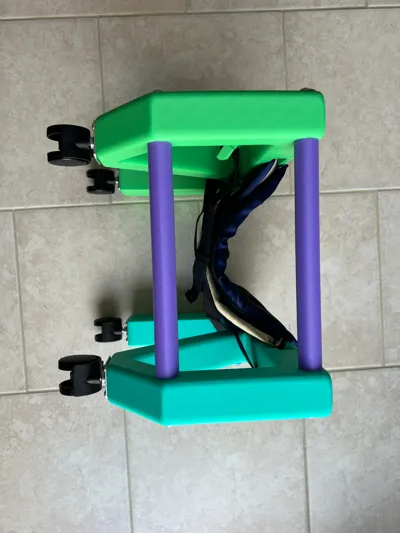
- Enlarged the entire model to fit non-3D-printed wheels
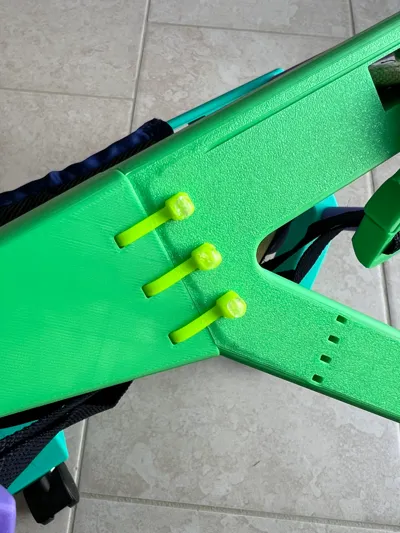
- Added screw holes at the base for wheels and screw holes in the back connectors (purple)
- Covered up holes that were not necessary for my model
- Created holes that were necessary for my model
Version 1: GAB-3D's model with additions


- I tried the print for just his back legs but found his front legs were too weak to pull the entire contraption and it tired him out easily.
- I created front wheels to help stabilize him, which worked better. No more face planting.
- Due to the front legs, the cushion had to sit much more forward so he was dragging the wheelchair.
- Rectangle hole on side was too long for my purposes, cushion kept sliding.
- The wheels I 3D printed did not have much flexibility and only went straight and so he was unable to turn/we had to turn him.
- I also didn't have TPU so I used a glue gun to put on treads for the wheels, but it sometimes got stuck as the treads were not uniform.
- The screws kept breaking for the back stick connectors. I used 100% infill and that helped.

Version 2: Remixed final model
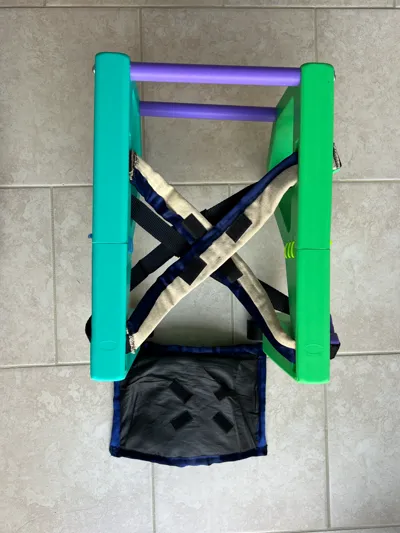
My print requires you to buy non-3D-printed parts and to have some sewing skills. The model was created using the things I mostly already had at home and it was customized for my dog. One size does not fit all here and your mileage may vary, but the reason I am sharing this model/profile is with the hope that you will also get some inspiration to create/improve on the design and customize it for your own furry friend.
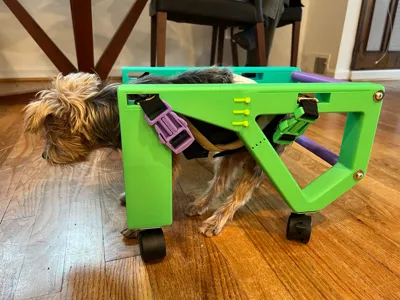
My inspiration: Our dog, Louis, is an 18-year-old Yorkshire Terrier. Due to old age, arthritis and spine problems, he has been having problems with being able to support himself on his hind legs for extended periods of time. I came across GAB-3D's file and thought I could make something similar to help with his quality of life.
**This model is not intended for outdoor use or to be used 24/7. It was printed with PLA.
For this specific model/print, the majority of it is 3D-printed, but you will have to buy the following:
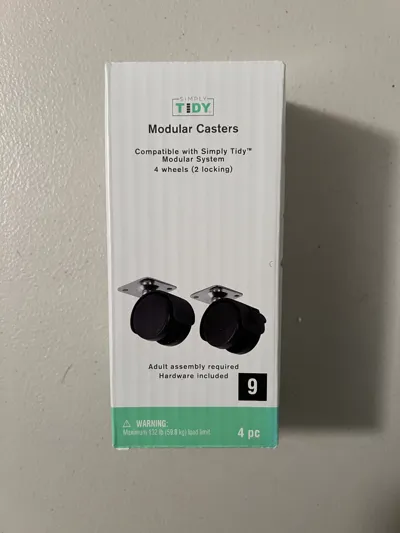
- Caster rolling wheels x4 for 360 degree movement: Modular Casters by Simply Tidy - $7.99 at Michaels (use a coupon and get it cheaper)
- https://www.michaels.com/product/modular-casters-by-simply-tidy-10624097?cm_mmc=PLASearch-_-google-_-MICH_Shopping_US_N_Storage_N_PMAX_BOPIS_N-_-&Kenshoo_ida=&kpid=go_cmp-18514199906_adg-_ad-__dev-c_ext-_prd-10624097&gad_source=1&gclid=Cj0KCQiAqL28BhCrARIsACYJvkcBPDEcyG-rlD512PbXw5a-Xd0lXdQ6ioc1kexDJ0lJAGe0T08SZdwaAv43EALw_wcB
- I created small holes for the included screws to go in.
- There can be minor cracking when you screw in the wheels. I would recommend hand screwing them half way in first, aligning it, and then screwing them in tight to minimize cracking. Screwdriver is needed for this part.
- Large Screws x4: Must be at least 3.5 inches/6 cm or longer for the back connectors.
- I did have to use a power screwdriver to screw them in. I wasn't strong enough to hand screw them in all the way.
- Washers x4: To ensure the screws do not go through the hole
- Zip ties x6: Similar to the original model. You can use super glue but it's not as secure.
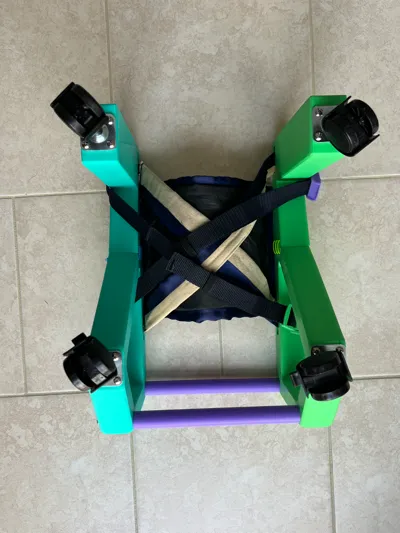
- Some type of cushion for your dog to sit in.
- I created mine by deconstructing an old backpack and used my very minimal sewing knowledge/skills. I did use a sewing machine.
- Used the back mesh of the backpack for the belly area.
- Used the straps to create an “X” design on the back for additional belly support and to be out of the way when my dog walks.
- Used a 2 inch wide ribbon as bias tape to create a softer border and to close all open seams.
- Used nylon strapping to extend the straps for the “X” design
- Added 3D-printed 1 inch snap buckles x2 for easier on and off of the straps and to make them adjustable - https://makerworld.com/en/models/819280?from=search#profileId-762092
- Used velcro to stick cushions to the straps so you can interchange the cushions as needed, ie. washing
- I created mine by deconstructing an old backpack and used my very minimal sewing knowledge/skills. I did use a sewing machine.
If there is a Version 3, things that could make Version 2 better:
- Have the back connecters fit into the holes so you don't need a giant screw.
- Make hole in front larger so snap buckle can go through more easily.
- Fix rectangles to make it more modular for other types of cushions
- I found that using the caster rolling wheels allowed him to be turn and made the wheelchair lighter for him to move, but due to his lack of strength in his hind legs, he tends to lean to one side so he did end up going in circles. Not sure if there is any fix for this at this time.
For reference: Louis' nape to tail is approx 13 inches, belly diameter is 13-14 inches, and legs to belly is 10 inches from ground.
TL;DR: I made a small dog wheelchair for my elderly dog with hind leg and spine issues and hope that you are inspired to make one for your own furry friend.
Update: Louis passed on 3/3/2025. He's brought so much joy into our lives for the past 18 years and we will cherish the happy memories we made together. I'm glad that he was able to enjoy this wheelchair prior to his passing.

Comment & Rating (32)