Medium Mossarium/Terrarium

Print Profile(1)

Description
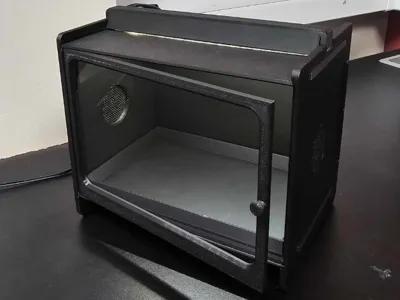
In response to lots of requests for a larger version of my nano Mossarium/Terrarium, I have made this version that uses 150x100x1mm acrylic/perspex sheets used for photo frames which are readily available on Amazon and Ebay.
This larger version is split over 3 plates, and is still a push fit design. The same things apply…. I've done my best to assure it will go together without adhesive assuming your printer is relatively well calibrated, however, if you find the fit isn't quite right on your machine just use a very small amount of XY hole adjustment in the slicer, try 0.05 and no more to start with. It should snap together with a firm push and feel solid once engaged.
The light fixture is designed to take the same 8mm wide LED tape and uses snap fit connectors for the power. The acrylic sheets I used for the project are linked below along with the lighting components.
Acrylic Sheets 150x100x1mm https://amzn.eu/d/8mx6Cvk
Snap Fit Tape Connectors RUNCCI-YUN 8mm 2pin 3528 2835 LED Connector,5.5mm x 2.1mm LED DC Power Supply Connector×6,LED Strip Connectors 2 pin×12 : Amazon.co.uk: Lighting
All you need beyond these items is a 12v power supply, which hopefully you have laying around somewhere, failing that they can be acquired very cheaply, and many times come along with the LED kits.
For assembly, the bottom panel (with drip tray), rear wall, top (with aperture for light), and right hand side piece (the one with the slot for the click close mechanism) are assembled first, in that order. Once these are all nicely together the hinge pins on the door are located in the small hinge dimples on the left hand side of top and bottom plates, finally the left hand wall is added to hold everything in place. Don't be worried if you need to give it quite a squeeze, it should all be very solid with the 5mm walls. Once it's assembled you can then slide the window into place.
Whilst I haven't generated a new GIF to show this version being assembled, it is the same as the original, just scaled up. You can see it on GIPHY here — via GIPHY
I'd love to see what you do with it. If you have any issues at all with the build get in touch and I'll do my best to help.
Hope you enjoy it and may your world be full of mossy wonderment forever more!!!
Documentation (1)

License
You shall not share, sub-license, sell, rent, host, transfer, or distribute in any way the digital or 3D printed versions of this object, nor any other derivative work of this object in its digital or physical format (including - but not limited to - remixes of this object, and hosting on other digital platforms). The objects may not be used without permission in any way whatsoever in which you charge money, or collect fees.
Comment & Rating (23)