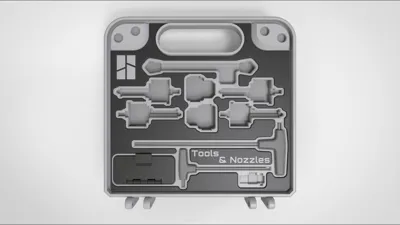
Smaller Tools and Acessories Case for A1 Printers


Print Profile(1)

Bill of Materials


Description
Boost Me (for free)
I usually don’t ask for this, but I’ve noticed that many creators actively encourage it on other platforms—and it makes sense, as it helps increase visibility. So, if you can follow me, it would make difference. It’s a great way to support my work and show appreciation. For more insight subscribe my blog at: https://designrepcom.com/ This design is freely available for the community, but if you enjoy my work and would like to show your support, you can boost this project. Thanks!
Membership
This model is available for personal use. To obtain a commercial license, please check the available options.
I usually don’t ask for this, but I’ve noticed that many creators actively encourage it on other platforms—and it makes sense, as it helps increase visibility.
So, if you can follow me, it would make difference. It’s a great way to support my work and show appreciation, and in return, you’ll always be notified whenever I release something new.
Thank you very much, and see you soon!
Instructions

This smaller version has undergone significant modifications to achieve the finish you can see in the image. Compared to the previous configuration used in larger cases, the improvements are evident.
 |  |
| On the right is the new print strategy | On the right is the new print strategy |
However, this approach required a greater number of components and the need to glue some elements. While the use of glue could have been avoided, doing so would have made the assembly process more complex and potentially increased the number of components needed.
To avoid misunderstandings and unnecessary wasted time, I will describe the precautions to take for each of the plates you will find in the 3MF file (Bambu Studio).

This version includes pockets for:
- 4x nozzles, which can be 0,8mm, 0,6mm, 0,4mm and 0,2mm (Be careful, as the 0.2mm nozzle often has the magnet's polarity inverted. So, when inserting the magnet, make sure it is being attracted by the rectangular magnet inside the nozzle. I cannot say whether this is random or not, but at least one of my 0.2mm nozzles has the polarity reversed).
Bottom side
- 2x Hotend Silicone Sock - A1 Series
- 2x Hexagonal keys - Bambu Lab model
- 1x Replacement Filament Cutter - A1 Series
- 1x Pocket with lid 1x2 module form the UMSS boxes
Top side
- 1x Small Scraper
- 1x PTFE tube - tool remover
- 1x large pocket for pliers
- 1x Pocket with lid 2x3 module form the UMSS boxes
Print and Assembly Instructions
- External Shell - Bottom (the one on the right of the image above):
This piece has no particular points of concern. Once the print is complete, remove the part and glue four 8x2mm neodymium magnets on each side. These magnets are used to keep the case closed, so I used two stacked together. The process is straightforward: apply a small drop of super glue into the hole where you will insert the first magnet, then apply another drop of super glue on top of the magnet before inserting the second one. Each side will have two magnets in total. - Internal Pockets - Bottom:
For this piece, pay close attention towards the end of the print. The printer will pause several times to allow you to insert magnets—there will be a total of four pauses. Refer to the diagram to ensure correct placement.
Note: Magnet Insertion Instructions
The print will pause at specific points to allow for magnet insertion. Ensure that the magnets are inserted with the correct orientation on the lids (both the small internal lids and the main lids of the case). The magnets should be oriented so that they attract each other.
If the magnets fit too loosely, they may get dislodged when the nozzle passes over them, especially on X1 or P1 series printers. To prevent this—which could potentially damage your printer—apply a small drop of glue inside the pocket before inserting the magnet (do not overdo it). Let it dry for at least 5 minutes before resuming the print.

D6x3mm Round Magnet (20PCS) - CA007
D8x3mm Round Magnet (20PCS) - CA008
I have now added a version that uses the handles I designed:
"Handles for Bambu Lab X1 and P1 hexagonal keys."
It seems that Bambu Lab does not always include the handled wrenches that used to come with the A1, opting instead for a simpler version. Because of this, I created a version of these wrenches, which you can download here

At this point, it makes sense to showcase a variation of the panel mentioned above, now designed to work with these wrenches. The pauses for magnet placement follow the exact same sequence, so you can still refer to the previous diagram, even though the layout is slightly different.

- Top Label - Bottom:
This part is purely cosmetic and is not strictly necessary. It was designed as a separate cover to achieve the best possible surface quality while also serving as a finishing touch for the previous two pieces. Let the part cool before removing it from the plate, this part has very thin wall and can break easily! It contains several alignment pins, but these are not meant for fixation. To secure the part, apply super glue on top of the guide pins as well as along the edges to ensure a solid attachment. Again, avoid using too much glue—it will not improve adhesion, only increase drying time. In this case, allow slightly more than 5 minutes for the glue to set, ideally securing the pieces with a clamp. - A Note on These Parts:
For the best results, and given that this is a relatively thin piece, you may use a 0.2mm nozzle if you have one. This is an important accessory for your printer, and if you do not own one, you should consider purchasing it. - Front Label:
This component should be handled the same way as the Top Label - Bottom but is applied to the exterior of the case. - Lid with Hinge:
There are two lids, one for each half—one for a 2x1 module and another for a 3x2 module. Both belong to my UMSS modular solution. These are print-in-place parts, meaning they should be ready to use immediately after printing, with no additional assembly required.
At this point, the lower half of the case should be complete. It should look similar to the image below.
- External Shell - Top: Follow the same procedure as for the "External Shell - Bottom."
- Internal Pockets - Top: Similar to the "Internal Pockets - Bottom," but in this case, there will only be a single pause to insert three 8x2mm magnets. This pause will occur near the end of the print. Refer to the image for the exact placement. Take the same precautions as before when positioning the magnets.

D8x2mm Round Magnet (20PCS) - CA005
- Top Label - Top: Similar to the "Top Label - Bottom" situation. Once again, allow the print bed to cool down properly before removing the part to avoid damage.
- Pliers Lid: This part includes a pause very close to the end of the print. You will need to insert the magnets as indicated in the diagram below.

D8x2mm Round Magnet (20PCS) - CA005
Hardware
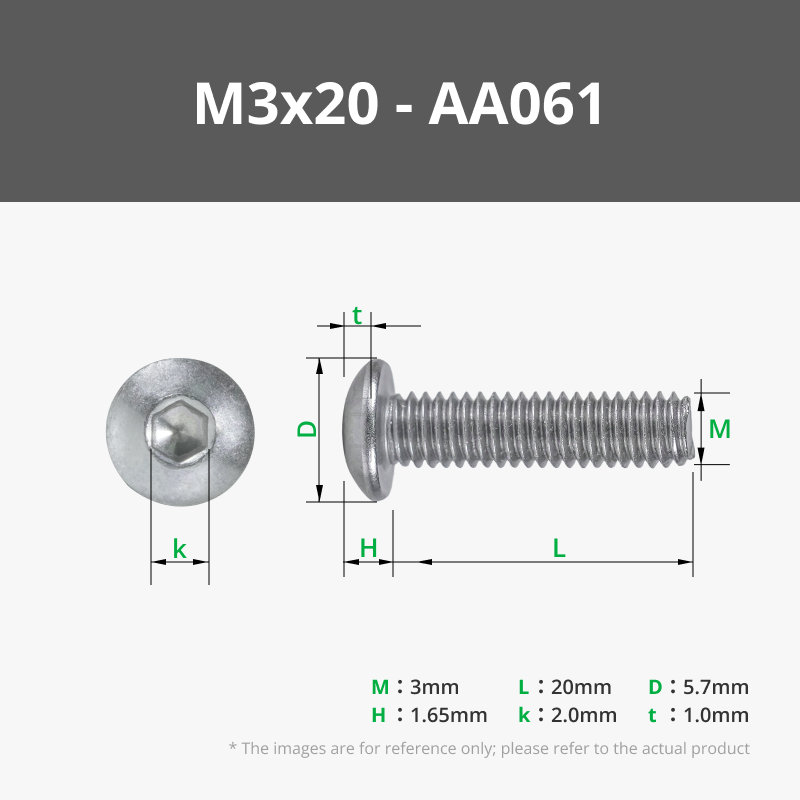
For assembly, you will need two metric screws or equivalent, along with matching nuts. In this case, an M3x20 BHCS screw and an M3 nut will be required.
Do not overtighten—remember that screws can exert significant force and can easily crush plastic. This is why I chose this specific screw head type, as its smaller hex socket naturally limits the tightening torque. However, you should still proceed with caution.
If you are concerned about the screw loosening over time, you can apply a small amount of glue at the interface between the screw and the nut.
The magnets where already mentioned above…
New Section - How do I make this…
Another aspect I am introducing is how I develop my projects. To share more insight into my process, I have created a video series that showcases part of what I do to create models like the one you see here.
Change Log:
- 10/02/2025 - Add a new configuration for the alternative hexagonal keys.
Curious About My Tools? Check This Out!
For those of you who often ask about the tools I use to bring ideas to life, this article, The Journey From Idea To Object (Part I), offers some insights into the initial stages. It highlights the use of various tools, including software like Autodesk Fusion for CAD design, Blender for render and Bambu Studio for 3D printing preparation, and other... So, if you're curious about the software and hardware too, that I've incorporate in my workflow, take a look at the link for more details!" – Visit https://designrepcom.com/ for much more.
License
You shall not share, sub-license, sell, rent, host, transfer, or distribute in any way the digital or 3D printed versions of this object, nor any other derivative work of this object in its digital or physical format (including - but not limited to - remixes of this object, and hosting on other digital platforms). The objects may not be used without permission in any way whatsoever in which you charge money, or collect fees.
Comment & Rating (57)