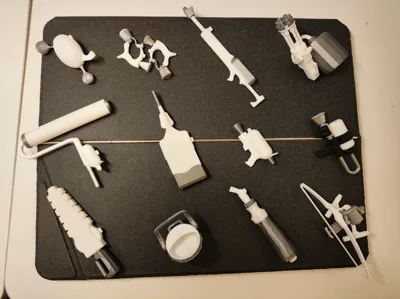
Splatoon 3 Side Order Weapon Set: All 12 Weapons


Print Profile(1)
Description
251102 Update v2.0 (should be the final version barring any unforeseen issues):
1. Several models with complex supports have been further split into parts, increasing the amount of glue needed for assembly but significantly reducing disassembly difficulty and improving printing speed and quality: The longbow is split into 4 parts and can be printed without any supports; the main body of the medium gatling is split into 3 parts, making a total of 5 parts; the green sniper is split into 3 parts, with only the water tank requiring minimal support and filament changes. Assembly instructions can be found in the printing tips below.
2. (Bambu Lab new feature) The smoothing factor for the bucket has been changed to 1, eliminating surface pressure unevenness caused by excessive acceleration.
3. Adjusted the size of some models to be closer to a 1:12 scale: Chainsaw, longbow, medium gatling, and roller enlarged to 110%, Hokusai enlarged to 130%
-----------------------------
250611 Update v1.5: After the Bambu Lab slicer software update, the tree support algorithm was adjusted, and the supports generated for the medium gatling were unusable. The distribution of supports and overhangs and the outer wall line width have been readjusted, resulting in good print quality and easier support removal.
250223 Update v1.4: Several surfaces of the dual pistols were missing silver paint, which has now been applied.
250210 Update v1.3: Updated the printing process for the chainsaw and green sniper. The flat-split print of the green sniper was a bit rough, so it was reverted to Print in Place; the chainsaw was split into three parts, with perfect results.
250208 Update v1.2: Added decorative slots that conform to game design for most weapons (white cannon/small green/Hokusai/green sniper/dual pistols/medium brush/bow); the process for the green sniper and chainsaw was modified to flat-split parts. If you need the original unpacked files without decorative holes, you can download them in STL format.
250207 Update v1.1: The chainsaw gained in-game decorative slots, and the support process was updated; Hokusai's fragile areas were reinforced; the bucket's wall generation algorithm was changed, and a test print showed no surface defects.
-----------------------------
The models are from game data extraction and have been modified/split to meet strength/accuracy/print time requirements for FDM printing, pushing the limits of what FDM printing can achieve.
Note: AMS is required, some models need glue for adhesion, some models require insoluble materials for support surfaces, and other adjustments may be needed for your printing environment. Specific notes for different weapons will be listed later. Players without model experience are advised to familiarize themselves with slicing software before printing!
It is best not to change the orientation/support parameters/modifiers for any models. Remember to change the support surface to insoluble material.
Due to numerous filament changes, it is recommended to print multiple copies per plate.
Models with 0.4mm nozzle, and 0.1/0.12/0.2mm layer heights are available; you can adjust them yourself based on accuracy requirements.
Filament:
- (Body) Bambu PLA Basic white, silver, black (only needed for Hero Shot)
- (Support surface) Bambu PETG HF white
- Parameters for PLA and PETG as mutual supports can be found on the official wikiPLA Basic and PETG HF Mutual Support Printing Guide | Bambu Lab Wiki
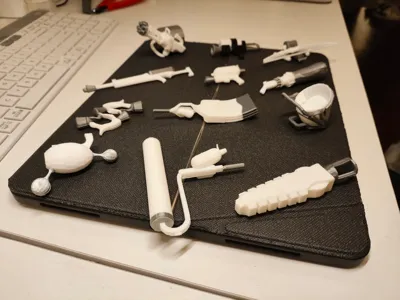
Printing tips for each weapon:
- Dual pistols/Small green: Cut into two parts for flat printing. After printing, use super glue to bond the split surfaces. A textured plate can be used, but a smooth plate will yield better results. No PETG support is needed, only PLA of the corresponding color.
- White cannon/Octopus gun: Cut into two parts, with the muzzle requiring a small amount of PETG support. If you don't have PETG, you can try PLA support (remember to change the top Z distance to 0.15-0.2mm).
- Bucket: The most time-consuming and difficult to remove supports. Be careful not to break the handle when removing supports. The final effect is satisfactory.
- Bow: After the 2.0 update, no supports are needed, with perfect results. When gluing the two parts of the main body, it is recommended not to glue the bowstring to prevent deformation over time.
- Roller/Wiper blade: Split into 2-3 parts based on color. It is recommended to print separately or one by one on the same plate. After printing, the split parts need to be glued. The roller handle and wiper blade handle parts require PETG support; other parts do not.
- Umbrella/Hokusai: Can be printed as Print in Place, with support surfaces requiring PETG support. Since Hokusai is placed in the Z-direction, the handle may break easily. It is recommended not to print models that are too small (horizontal printing provides higher strength but results in poor color transition, so it was abandoned). The umbrella and Hokusai have small support surfaces; if you don't have PETG, you can try PLA support (remember to change the top Z distance to 0.15-0.2mm).
- Green sniper: The 2.0 update splits it into three parts. The two main body parts require no support. The water tank part only needs minimal support at the bottom, and you can try PLA support (remember to change the top Z distance to 0.15-0.2mm).
- Medium gatling: Split into 5 parts. It is recommended to print separately. All parts except the water tank and barrel require PETG support. Bonding method:
- 1. Glue the two flat-split parts of the main body first, then insert the barrel (preferably also secured with glue).
- 2. Insert the water pipe into the water tank (small tolerance, no glue needed), then try to assemble it onto the main body, adjusting the rotation angle of the water pipe.
- 3. Finally, apply super glue to the hexagonal groove and side connection of the gatling body, then attach the water pipe + water tank assembly and press for a while.
Comment & Rating (13)