My Custom Adjustable Tension Stick Bases for Xbox


Print Profile(1)

Bill of Materials


- M3x10x4 Threaded Insert x 2: https://a.co/d/cMTJqVf
- M3x5 Hex Grub Screws x 2: https://a.co/d/ifOGr4y
- 1.5mm Hex Key x 1: https://a.co/d/30eCnFw
- Purple Threadlocker x 1: https://a.co/d/dBO1ASJ
Description
UPDATE AUGUST 2025
These are officially our “old” custom stick base design. So I've opened up adaptations and commercial use. The new design utilizes hexagon inserts and requires no adhesive, but unfortunately is not able to be printed acceptably on FDM printers.
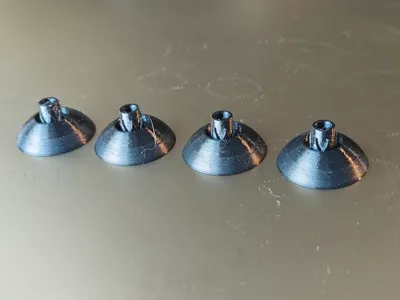
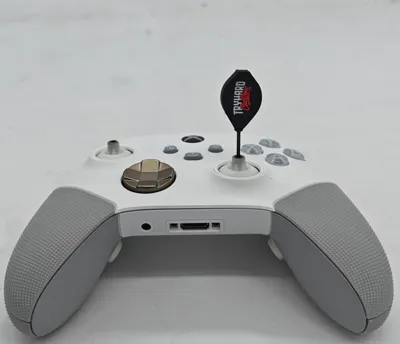
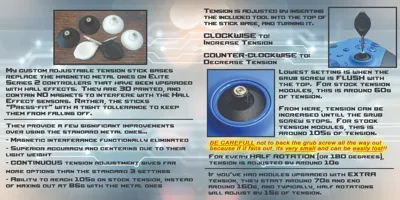
My custom adjustable tension stick bases directly replace the magnetic metal ones on Elite Series 2's. They were designed to work with adjustable tension hall effects, and because there's no magnets, they don't cause any interference. They can also be used with standard potentiometer adjustable tension modules, whether on the Elite Series 2 or anywhere else. They provide multiple advantages over the metal ones.
- Due to being significantly lighter, they are far more responsive and provide better centering
- Instead of the standard 3 tension options, adjustment is CONTINUOUS, allowing you to dial in the exact tension desired
- While metal bases max out at 86g, these allow for adjustment all the way up to 105g on standard tension modules
The sticks are "push-fit" onto the stick bases, their tight tolerance will keep them from falling off.
While they do function if printed with PLA, It is HIGHLY recommended to use either TPU or Resin for flexability. I use “TPU for AMS” on my P1S, and Sunlu's “High Toughness” Resin in the resin printer.
HARDWARE REQUIRED
- M3x10x4 Threaded Inserts https://a.co/d/cMTJqVf
- M3x5 Hex Grub Screws https://a.co/d/ifOGr4y
- 1.5mm Hex Key (for the tool) https://a.co/d/30eCnFw
The threaded insert is adheared to the inside of the stick base, then the grub screw is threaded into the top. The base can then be threaded onto an adjustable tension (Elite 2) stick module using Purple Threadlocker (see below). This is NOT a quick and easy upgrade, but the effort is 100% worth it IMO. It's my most popular upgrade for send-ins.
If using with Hall Effects, you MUST use the green/blue sensor adjustable tension hall effects: https://a.co/d/aVskYPI and replace the sensors with gulikit TMR sensors: https://a.co/d/3xCOIZf
That combo is the optimal way to achieve a perfect calibration! (The included thumbstick with “C” label is to be used during calibration with the Accessories App)
-----IMPORTANT-----
These require some basic knowledge on Elite Series 2 disassembly. It is recommended that the old metal bases be heated up (preferably with a heat gun) to loosen the adhesive before unscrewing them.
When installing the new bases, adhesive must be applied and allowed to dry/cure prior to use. This prevents the bases from unscrewing during gameplay. I personally use and recommend low strength "Threadlocker Purple". It's perfect to keep them secured while still allowing them to be removed later if needed. Amazon link here:
Permatex 24024 Low Strength Threadlocker Purple, 6 ml Tube https://a.co/d/dBO1ASJ
I'm sure I'm forgetting something so if you have questions, ask away!
Comment & Rating (4)