A 3D-printed filament rack optimized for storage


Print Profile(2)
Description
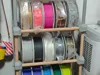
I conceived an idea to collect as many Bambulab PLA basic colors as possible to match my 3D-printed Flex Fabric bags. These colors would also be used to create Flex Fabric pixel art ornaments. To accommodate these filaments, I decided to first create a filament storage rack.
After reviewing several filament rack designs, I chose to use spherical joints to construct the rack's three-way modules. The spherical structure boasts excellent strength due to its chunky nature; substantial material envelops the dowel, making it exceptionally resistant to cracking. However, printing spheres necessitates the use of supports. I employed a different approach, truncating the cube's edges and corners to create a printable sphere.

I opted to print two spheres together directly, linking them with an integrated connecting rod. This imparts exceptional strength to the rack in the fore-and-aft direction. I implemented the same method for the base, using four directly printed connecting rods as feet to elevate the rack. This is crucial for a home-use rack, as the clearance beneath prevents it from becoming a cleaning impediment.
For the rack's crossbars, I opted to purchase 20mm diameter dowels online. I used 40cm long crossbars, accommodating five spools per row.
The rack's uprights can utilize 20cm long dowels. To achieve this, I cut some 40cm crossbars in half. However, I discovered that sawing wood requires both strength and skill, so I designed some connecting rods to substitute dowels as uprights. I used these 3D-printed uprights between the third and fourth layers of the rack, with excellent results.
Printing and Installation Guide:
- Determine the rack's width and purchase dowels accordingly for the crossbars. I purchased 40cm long and 20mm thick dowels. Each layer requires two crossbars.
- Print the bottom layer, printing the first plate twice. They are installed together using the crossbars.
- Print the uprights for the third plate. Note that the 20mm uprights allow a single spool to pass through. If longer uprights are needed, you can stretch the uprights of the third plate vertically.
- Install the printed uprights onto the three-way joints of the bottom layer.
- Print the three-way joints for the second plate and connect the two three-way joints with the crossbar.
- Attach the connected three-way joints to the uprights.
- Repeat steps 3, 4, 5, and 6; each repetition adds a new layer.
Installation may require a hammer; ideally, use one with a rubber head and tap gently to aid in installing the crossbars and uprights into the three-way joints.
I chose a 10% infill rate, which is sufficiently sturdy. If a more robust rack is desired, increase the infill rate. Note that this will significantly increase printing time.
License
You shall not share, sub-license, sell, rent, host, transfer, or distribute in any way the digital or 3D printed versions of this object, nor any other derivative work of this object in its digital or physical format (including - but not limited to - remixes of this object, and hosting on other digital platforms). The objects may not be used without permission in any way whatsoever in which you charge money, or collect fees.
Comment & Rating (0)