Irish Tinwhistle -- 3 piece traveler model


Print Profile(2)


Description
Membership
Click here to join our subscription program today! Includes commercial resale license for all of our models.
As soon as I introduced my Irish tinwhistles, people have been asking me to make a “Traveler” model: a 3-piece whistle that is more easily carried in a pocket or bag. A number of people also asked me to include a 3d-printed tuning slide, rather than requiring the purchase of metal tubing to do the job.
Introducing the Traveler version of my Irish pennywhistle! This whistle breaks down into three similarly-sized sections for easy travel. And while I'm convinced that a metal tuning slide is the superior option, I'm also including a version of the whistle head with a 3d-printed slide. I've also consolidated the print settings, and put everything into one .3mf file. Lastly, with all of the pieces shorter, it should now fit on an A1 mini!
The two body pieces fit together really snugly with a tongue-and-groove system to prevent hole misalignment while playing.

In addition, I've re-worked the head piece drastically. I thickened it a mere 0.40mm in my first version after getting some printing complaints. But that had the effect of making the 2nd octave A and B notes very difficult to hit. So I've gone back to the drawing board to address both of these issues, as well as adding a Copeland-style wall around the windway to strengthen the bottom notes.

As with my first whistle, I feel that a metal tuning slide is the best option, and am including a plate without an integrated tuning slide if you prefer to go that route. Tubing needs to be: 14mm OD, 0.5mm thickness, and 33mm long. I source the following tubing and cut to size with a pipe cutter:
- Steel tube listing: https://www.amazon.com/dp/B09S9PGCZ1
- Brass tube listing: https://www.amazon.com/dp/B08K7RV1HL
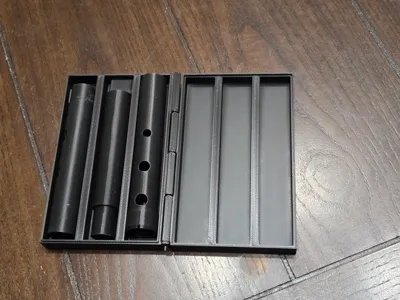
2/25/2025: I have also added a 4th plate to the profile, with a little friction-fit carrying case.

Note #1: The joints on this whistle fit together tightly. They will loosen with use. But making the clearance even 0.1mm greater made the joints way too lose. If you find your tolerances aren't dialed in as rigorously, you may need to print the middle piece 1% larger to compensate, but this may affect tuning. You can also try shaving down excess seams, and/or gently wiggling the pieces together instead of sliding them together.
Note #2: Running a little jeweler's file through the mouthpiece and wiggling it a little while pressing toward the floor will do a lot to help clean up the sound right off the printer, as shown (just don't hit the blade of the whistle!):

License
You shall not share, sub-license, sell, rent, host, transfer, or distribute in any way the digital or 3D printed versions of this object, nor any other derivative work of this object in its digital or physical format (including - but not limited to - remixes of this object, and hosting on other digital platforms). The objects may not be used without permission in any way whatsoever in which you charge money, or collect fees.
Comment & Rating (213)