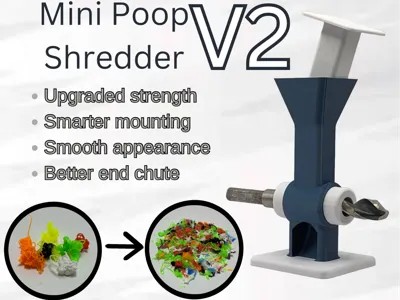
Mini Poop Shredder V2


Print Profile(4)


Description
Download my newest model here! ;) https://makerworld.com/en/models/2555081
V3 IS AVAILABLE!!! https://makerworld.com/en/models/1444731-mini-poop-shredder-v3#profileId-1504274
V2 is finally here! After reading many comments on my V1 shredder telling me what I could do better, I have now made a V2 which features
- Stronger center
- Better chute system
- Smoother appearance
- Allowance for the drill bit to be on both sides
Assembly tool https://makerworld.com/en/models/1454668-assembly-tool-for-mini-poop-shredders#profileId-1515850
Enjoy!
Boost Me (for free)
Models like this take a very long time to produce. Boosting me is a fantastic way to show your support! :)
Membership
If you would like to support me even more, please join my support tier membership! These contributions help me unimaginably. Let's keep the good vibes going! 😎
For assembly, please refer to the guide below! ⬇️ Using this model make the assembly process a whole lot easier! https://makerworld.com/en/models/1454668-assembly-tool-for-mini-poop-shredders#profileId-1515850
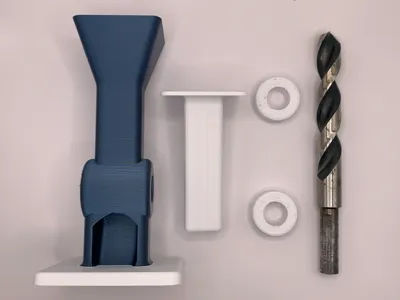
Step 1:
Using the assembly tool, https://makerworld.com/en/models/1454668-assembly-tool-for-mini-poop-shredders#profileId-1515850 hammer the bushing onto the drill bit just enough to cover up the grooves. This is essential for not letting any filament scraps escape! Also, make sure to install it in the right direction according to the pictures. If it is too loose, you can put masking tape over the drill bit to have a more snug fit.


Step 2:
Slide the drill bit into the shredder body. The direction does not matter.

Step 3:
Once again using the assembly tool, https://makerworld.com/en/models/1454668-assembly-tool-for-mini-poop-shredders#profileId-1515850 hammer on the other bushing making sure to be careful not to hammer it too far so that it jams up.


Step 4:
Slide in the plunger. Voila, it is now complete!

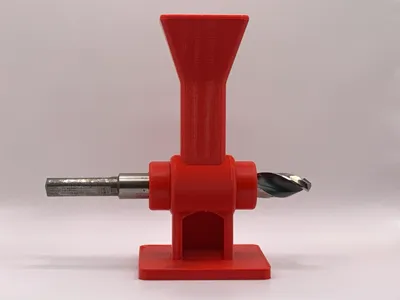
For use, clamp the shredder to any ledge and attach the drill bit to a drill. Make absolute sure that the drill is going the right direction (clockwise) so that the sharp part of the drill bit comes in contact with the plastic.

Membership
If you’d like to support me, consider joining my Support Tier Membership! For just $3 a month, you’ll be making a huge impact on my work. Your contributions help me keep creating, improving, and innovating! 😁
No AI is used in this model. All of my models are made by me in Fusion 360.
License
You shall not share, sub-license, sell, rent, host, transfer, or distribute in any way the digital or 3D printed versions of this object, nor any other derivative work of this object in its digital or physical format (including - but not limited to - remixes of this object, and hosting on other digital platforms). The objects may not be used without permission in any way whatsoever in which you charge money, or collect fees.
Comment & Rating (363)