Search models, users, collections, and posts
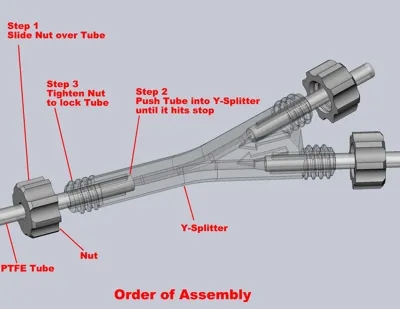
Y-Splitter
IP Report


Print Profile(3)

0.2mm layer, 3 walls, 20% infill
Designer
50 min
1 plate

transparent PETG, 0.1mm layer, 1 wall, 100% infill
1.5 h
1 plate

Nylon 0.2mm layer, 3 walls, 20% infill
47 min
1 plate
Open in Bambu Studio
Boost
1020
2558
433
158
3.6 k
2.6 k
Released
Description
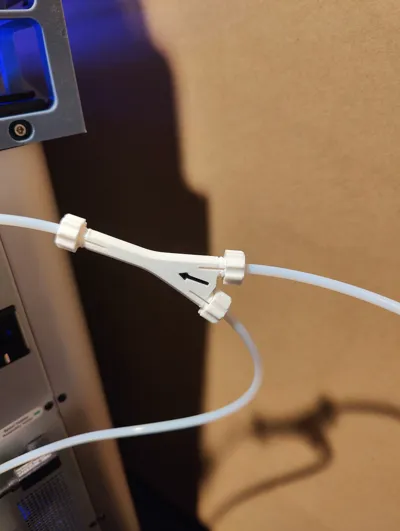
In printing with Polycarbonate I decided it was time to create a Y-Splitter so I can leave the PC spool in the external drying box. This way the humidity level will stay well below 20% and I won’t have to plan so far ahead to re-dry each time I want to print with it.
This is my take on a Y-Splitter.
- I made the main body a hex shape. This gives a flat surface to print from.
- Decided to make the ends of the Y-Splitter to work like a Pin Vice. This design eliminates any tolerance issues; PTFE tube OD’s don’t measure exactly the same for reliable press fits. With a Pin Vice scheme, regardless of tube OD, as you tighten the nuts the PTFE tube gets held firmly.
- The Y-Splitter and Nuts require no supports, skirts or brims or anything special to print. But, do make sure your print surface is clean, I used the Bambu Lab textured PEI build surface and the Bambu Lab print surface adhesive (the liquid version).
- The Y-Splitter shown in use is made white ABS but, I elected to print the bottom of the direction arrows in black for good contrast.
Below is a link to a Bambu Lab video on loading external materials.
Enjoy
License
This user content is licensed under a
Creative Commons Attribution-Noncommercial-Share Alike
Comment & Rating (433)