Omega Seamaster Diver 300m Clock


Print Profile(1)

Description
Description
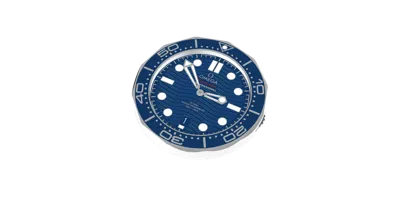
This model is a replica of the Omega Seamaster Diver that I'll never have enough money to buy. I worked for dozens of hours and produced several revisions before getting it just right. The date selection is truly functional via a thumbwheel on the side. Unfortunately I can't make it automatic but it is nice to have.
Assembly
You will need (4) 3mm x 12mm flathead screws to mount the face to the body. Simply pace the face in the correct alignment, place the date ring, and use the three brackets to tighten it all down. The brackets also keep the date dial in place. Put the thumbwheel gear assembly together and secure in place with the last screw. You should then be able to turn it easily. You'll need to glue the wall hanger in place with super glue. There is a notch on the back to help align the hanger. I use Loctite Super Glue Gel and I hold it in place for 90 seconds.
Hour and Minute hands press down onto the clock mechanism. Depending on the accuracy of your printer, you may need to adjust the hole sizes to get them to fit. If the holes are too big, try adjusting the print size down by 1% increments. I did not make a second hand for this clock as I do not like the look of it. I used the second hand that came with the movement. Here is a link to the Amazon page for this movement:
https://www.amazon.com/dp/B09B35CPHL?ref_=ppx_hzsearch_conn_dt_b_fed_asin_title_1
And the screws that I use:
https://www.amazon.com/dp/B0CCML6Y1F?ref_=ppx_hzsearch_conn_dt_b_fed_asin_title_1
Here are some important tips:
- Clean your build plate thoroughly with Dawn dishwashing soap and hot water before each print. You'll be surprised how many little dark strings there are and they'll get picked up by the white. Don't touch the place with your bare hands (fingerprints).
- I use Elmer's Glue Stick for every print. Yes I realize most people hate it but it works for me. Especially with small details. After application, smooth it out with your thumb so nothing is sticking up from the plate.
- If you want great smooth prints, slow down.
- Make sure the seams are where you want them before you start.
- Use the Nut on the side of the build plate in the slicer to open and select your print sequence by color. Print white, silver, red, blue, and black in that order. Essentially, light colors first.
- Some gluing is required. I use Loctite Super Glue Gel. Be quite careful not to get glue on the visible parts of the clock. I placed the glue on the hanger first and then held it in place for 90 seconds. And don't glue your fingers together!
Filaments
I used the following filaments to print this clock. Of course you are welcome to use anything you choose.
Overture Easy PLA White
Sunlu Elite Silk Silver PLA
Overture Easy PLA Red
Anycubic Silk Blue PLA
Elegoo Black PLA Pro
Final Thoughts
I must have printed 10 of these things trying to get everything just right. The clock face prints fine at 0.4mm Nozzle however, I think a 0.2mm would work better for the small letters. Everything in this model is 0.16mm layer height, 0.4mm nozzle, 3 walls (except the first layer which is 1 wall), and 15% infill. Hey if you're not having fun then you're not doing this right! Please let me know if I can change or fix anything to make it better.
License
You shall not share, sub-license, sell, rent, host, transfer, or distribute in any way the digital or 3D printed versions of this object, nor any other derivative work of this object in its digital or physical format (including - but not limited to - remixes of this object, and hosting on other digital platforms). The objects may not be used without permission in any way whatsoever in which you charge money, or collect fees.
Comment & Rating (32)