Search models, users, collections, and posts
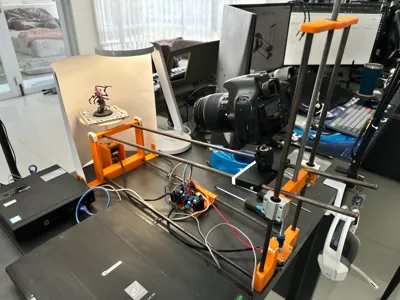
3D Photogrammetry Scanner with DSLR
IP Report


Print Profile(1)

0.2mm layer, 5 walls, 15% infill
Designer
13.4 h
2 plates
Open in Bambu Studio
Boost
57
146
9
3
26
5
Released
Description
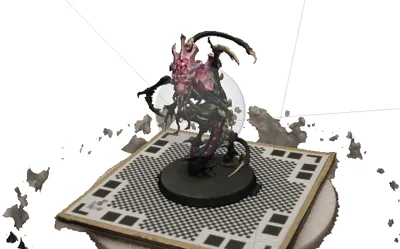
This is a DIY 3D scanner built for photogrammetry, using a DSLR camera mounted on a stable, motorized rig. Ideal for scanning figures, props, or small objects for modeling or 3D printing.
Features:
- High-resolution image capture using a DSLR (tested with Canon 500D)
- Object rotation and camera movement via 2 NEMA 17 stepper motors
- DSLR camera triggering fully automated using Python and digiCamControl
- Compact and rigid M8 rod frame for accurate image alignment
- Smooth motion with linear rails, bearings, and stepper control
Electronics & Control:
- Microcontroller: Arduino Nano
- Motor Drivers: 2x L298N
- Motors: 2x NEMA 17 Stepper Motors
- Button: Mechanical keyboard key switch (manual scan start)
- Software:
Python Script for automated capture control
- digiCamControl for DSLR shutter triggering via USB
Mechanical Parts:
- 2x 40cm M8 Rods
- 2x 50cm M8 Rods
- 2x 60cm M8 Rods
- 1x 50cm M8 Threaded Rod
- 1x M8 Nut
- 1x 5x8mm Aluminum Alloy Coupling
- 4x 608ZZ Bearings
- 2x SC8UU Linear Bearings
- 1x DSLR Hotshoe to 1/4-Inch Male Adapter
- 8x M4x10 Screws
- 10x M3x8 Screws
- 2x M3 Nuts
How It Works:
- Start Scan: Press the keyboard-style key switch.
- Stepper Control: Arduino rotates the platform or camera arm.
- Image Capture: Python script communicates with digiCamControl to trigger the DSLR.
- Result: A full 360° set of photos ready for photogrammetry software (like Meshroom or Metashape).
Ideal For:
- Makers & hobbyists scanning miniatures or props
- DIY digitization of real-world objects
- Anyone wanting an affordable, customizable photogrammetry setup
License
This user content is licensed under a
Creative Commons Attribution
Comment & Rating (9)