Vintage Disneyland LED Sign Large 28"


Print Profile(1)

Bill of Materials


Description
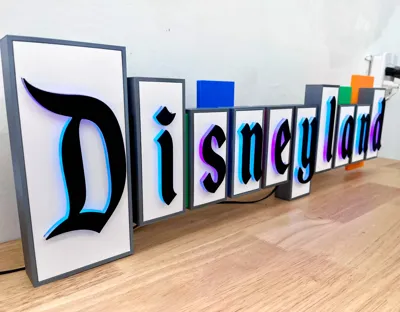
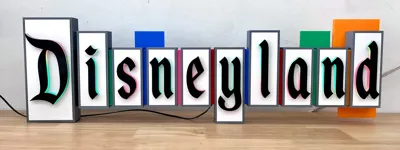
I proudly showcase a stunning recreation of the iconic Vintage Disneyland sign, capturing its full glory. Countless hours and meticulous attention to detail went into bringing this enchanting design to life.
😀 No supports are required for any parts, rejoice! 😀
Like this model? Want to show your support, buy me a coffee ☕.
Details
As a long time Disneyland fan, I always loved the vintage sign, and have wanted to create a model for quite some time. Well the time has come and thanks to Fusion360 here I present all the details you need to make your very own, truly special, vintage Disneyland sign.
This model when constructed measures over 28" in length. It is designed in pieces so that you do not need a massive printer to make it. You will need a printer with at least 220mm x 210mm. There are about 50+ pieces in this build. Not to scare anyone off, but this build requires patience, some soldering skills (if you want a lit version), and some Disneyland music in the background!
With great patience comes great results. This is one of the most astounding pieces when done. and you will be very proud to have this hanging in your house, game room, or playroom. Guaranteed to bring a smile and ignite a discussion in any that looks upon it.
👇Please read the details if you are serious about making this.👇
Printed Parts
- Frames Silk Gray: Printed .2-.3mm layer height 15% infill,
These are the main containers for the text, and what holds the LEDS. Channels are implemented for running wires, and two of the frames (S and E) have holes to insert a screw to run a hanging wire on the backside.
- Inserts White: Printed .2mm height.
These are the white pieces. Highly recommend painting the backside with black spray paint to ensure no unwanted light transmission.
- Lenses PETG or PLA Translucent: Printed .2mm height
These are the magic, they act like a neon light of sorts. The inserts slide onto these then the text letters sit atop. For some of the letters that have a “counter” (negative space) like a D you will need to do it in 2 steps. See steps below
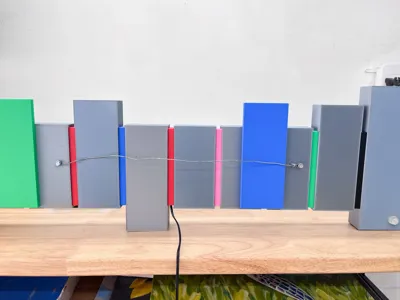
- Blocks Red, Green, Blue, Pink, Black: Printed .2mm layer height
These are the colored blocks that go in between each letter frame. There is an order so reference the photos often. They also have a channel for the LEDS to pass through.
- Letters Black: Printed 🚨Face down🚨 .2mm layer height. You can use a textured PEO plate to get a really cool texture to the letters
Non Printed Parts needed
- Super Glue, highly recommend and accelerant as well.
- If you plan on lighting it:
- LEDS: either WS2812 for color changing or solid color LEDs.
- LED Controller ONLY NEEDED for WS2812 - These are AMAZING with tons of built-in patterns.
- Picture frame hanging wire
- 2x Screws for the wire to hang. I used a standard Hex head wood screw.
Instructions
Assembly
1. Assemble the Letters
The first step is to Spray paint the backsides of the inserts, this prevents light bleed.
Note: This step is no longer needed, as the files have a color swap from white to black that now takes care of this!

Here is how the letters go together from the bottom up. Glue the letters, lenses, and inserts first. Glue the Lense to the Insert, then glue the text to the insert. 👉 Pay attention to the order, as it is important if you glue the text to the lens before gluing the inserts to the lens you will not be able to get the insert on.

Take note of how the pieces fit together
You should have something like this

Optional
Hot glue styrofoam to the back to diffuse the light.

2. Glue the blocks to the frames
paying attention to the orientation of both the frames and the blocks.

It helps to glue groups together and then glue the groups to each other.

3. Run the LEDs if you are lighting it
Install the led strips in the frames. It helps to use hot glue and tack them down with hot glue to ensure they do not come loose. NOTICE the led controller is hot glued to the bottom right corner of the large D frame (leftmost frame)


4. Glue the completed faces to the frames.
You only need a dab of CA glue in the four corners, don't go overboard with glue because if you ever need to remove a letter, you will be stuck.

5. Run the wire to hang
Inserts 2 screws into the holes in the back and run the hanging wire between them.
NOTICE the stack of rubber feet on the right, that is to help even clearance from the wall when it's hung.

Enjoy!! 😀 🙌

License
You shall not share, sub-license, sell, rent, host, transfer, or distribute in any way the digital or 3D printed versions of this object, nor any other derivative work of this object in its digital or physical format (including - but not limited to - remixes of this object, and hosting on other digital platforms). The objects may not be used without permission in any way whatsoever in which you charge money, or collect fees.
Comment & Rating (72)