Harry Potter's Musical Trunk


Print Profile(1)

Description
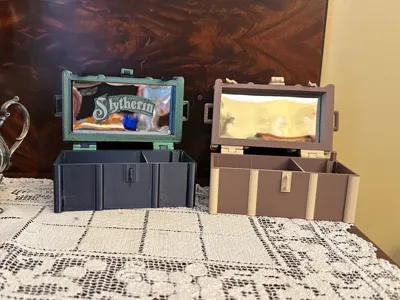
I became interested in printing a music box when I purchased my PS1 and was gifted the K-014 kit. I printed the Grand Piano and it was very nice. I did want to create a box that would start and stop with the opening and closing of the lid. I decided to model my box after the trunks that were used by the Hogwarts students in the Harry Potter movies. The trunk has the Hogwarts logo on its top and for those people who want to personalize their trunks I created decals which can be glued on. Also there are labels which can be applied to show which house you belong too.
I included two print profiles for the trunks they are 0.16 and 0.2 layer heights, both are printed with 4 walls and 20% infill and they functioned the same. All other items, hinges, hasp and “decals” printed at 0.12 layer height to provide the desired detail. I developed the hinges and the hasp myself and they were strong enough when printing with Bambu basic PLA. I did print one box with Amolen Silk PLA and the box was fine, except for a little lifting on two of the corners, if i printed it again I would use something to help with the hold the print to the plate. Every print with the Bambu Basic PLA was perfect. Other problem with the silk PLA was that one of my hinges broke. Not a problem I just reprinted them with the Bambu PLA.
I printed a plate to go into the lip to cover up where the supports were. You can print this any color youn desire, but I bought some mirror adhesive sheets on Amazon the applied it to the plate and the results were pleasing. See the pictures.
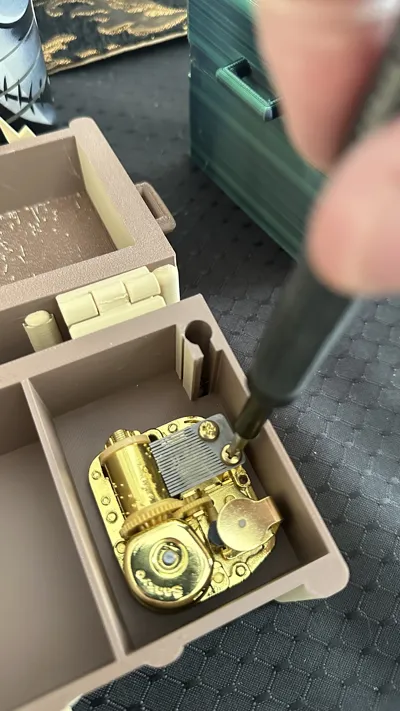
The trunk is compatible with Makers Supply Piano Music box kit K-014. The shut off mechanism came initially from a device I bought from Music Box Attic and I customized it to fit my trunk. Problem was there was no way to purchase this device. I found another cut off device on Amazon that actually fits much better, Creative Hobbies E240 Spring Loaded Plunger. I fastened the box to my trunk and then cut the wire to fit the plunger I designed and it worked than my first attempt.
I am new to designing and learning my around the CAD programing, this was a fun challenge to take on and I hope you may enjoy it as well!
Items used for this model:
8 Self taping screws 3mm x 8mm long for hinges
7 self taping screws 2mm x 6mm for hasp and scar attachments on the lid
1 Piano Music Box Winding Kit K-104
1 Creative Hobbies E240 Spring Loaded Plunger on Amazon https://www.amazon.com/dp/B01LX7O3UU?ref=ppx_yo2ov_dt_b_fed_asin_title
1 Flexible Mirror Sheets Self Adhesive Non Glass Mirror Tiles Stickers on Amazon https://www.amazon.com/dp/B08SJNRZ6F?ref=ppx_yo2ov_dt_b_fed_asin_title&th=1
License
You shall not share, sub-license, sell, rent, host, transfer, or distribute in any way the digital or 3D printed versions of this object, nor any other derivative work of this object in its digital or physical format (including - but not limited to - remixes of this object, and hosting on other digital platforms). The objects may not be used without permission in any way whatsoever in which you charge money, or collect fees.
Comment & Rating (3)