CNC Vacuum Clamping Plate


Print Profile(2)


Description
CNC Vacuum Clamping Plate
Seeing quite some demand on vacuum-related workshop equipment, I created another more industrialized equipment for CNC vacuum clamping. Of course, this can also be used as on normal workbenches for large-size workpiece fixation.
All my vacuum related equipment can be found in this collection.
Key features
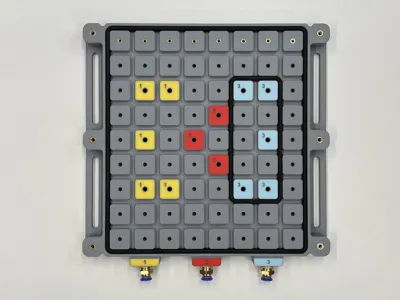
- Large size vacuum-clamping accessory
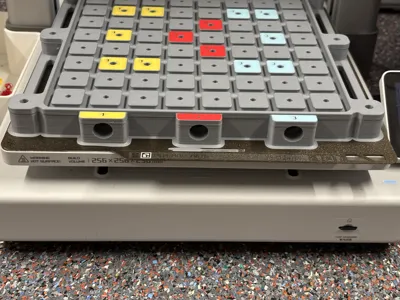
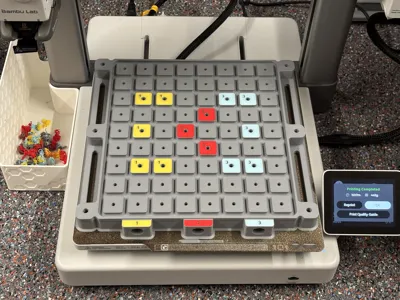
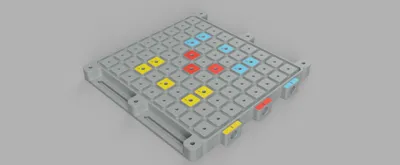
- Maximum working area: 209 x 234 mm
- Total size 250 x 245 x 20 mm (leveraging the full size of A1 print bed)
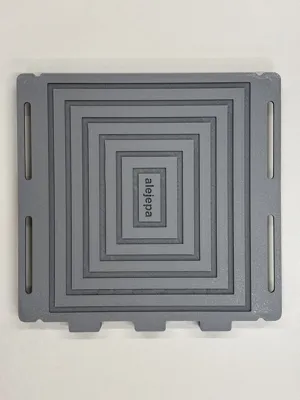
- Flexible seal routing in a 20 mm grid
- Long slots with 6.5 mm width for universal mounting onto your CNC bed or workbench
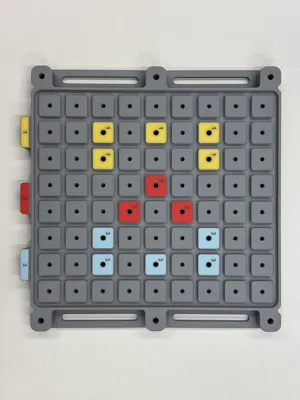
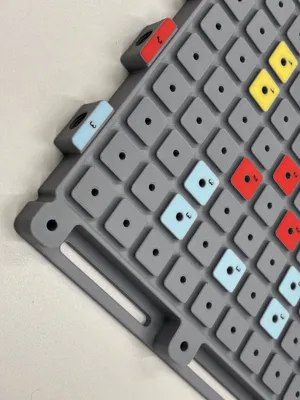
- 3 separate color-coded vacuum sections (to allow for smaller workpieces to be clamped)
- Mounting option for accessories (e.g., alignment jigs) via M3 and M4 screws
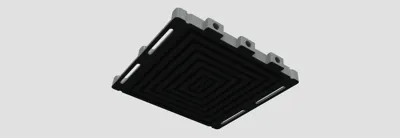
- Optimized for flat and low warpage design (many tweaks included via CAD and the provided print profile)
Update May 3, 2025: Created a new version to also fit the X1/P1 series (new print profile). This version consists of 3 parts (1 main block + 2 attachments) which can be glued together. It is also possible to glue several blocks together to create a large working surface. This version also has a slightly improved vacuum performance.
Boost Me (for free)
Large-size prints take a lot of time and development costs (e.g., material costs for test prints) while the number of downloads is typically lower. Hence I would very much appreciate your support via a boost to continue working on sophisticated designs. Thank you very much in advance.
Instructions
- Print leveraging the supplied print profile
- There are many adjustments with selective strengthening & weakening to create the desired mechanical strength and very low warping (optimized for BambuLab PLA Matte)
- Color-coding is optional and monochrome will also work well: channels are marked 1-3 on the corresponding holes
- The brims are needed unfortunately, especially as the print is going to the maximum edges of the print bed; they can be easily removed with a deburring tool
- While I minimized warpage from a design and print profile perspective, a remaining minimum warpage is unavoidable (although it is really low compared to the size of the print). However, there are a few more options to drive this close to zero:
- Print on a larger printer (e.g., H2D). The corner areas of the A1/P1 series are cooler than then center. Furthermore, the forces inside the part can be stronger than the magnetic force, lifting slightly the build plate itself. This can be minimized by using a larger printer if you have one available.
- Use a higher grade filament, e.g., PLA-CF or PLA-GF
- Comply with the basic stuff (clean build plate, heated room with no air drafts especially when printing on an open-space A1, …)
- Press the inserts in
- Inserts are optional in case you want to mount jigs on the top
- The 6 outer holes are for the M4 inserts, the holes in the working area are for the M3 inserts
- Don't put inserts in the vacuum holes (the color-coded ones)
- Mount the 3 pneumatic fittings
- Apply only gentle force and don't over-tighten
- If needed, heat up the fitting with a heat gun/torch before screwing it it; this will soften the PLA and avoid layer separation
- Create sealant rings use the 5 mm foam sealing
- You can create different sets with different lengths for clamping flexibility
- Make sure there also always a sealant ring around all holes of a single color (they are internally interconnected and must all be in the vacuum area)
- It is recommended to cut the foam ends at around 45° before glueing them together with CA glue. This will result in a stronger joint
- Ready to use
- Screw on your (CNC) working bed or workbench
- Attach the vacuum tubes
- Mount the workpiece
- Turn the vacuum on
- Enjoy
Bill of Materials
- 5 mm foam seal (e.g., https://amzn.eu/d/6fLlTmm)
- PC6-02 pneumatic fittings (e.g., https://amzn.eu/d/3aHwWCe)
- Useful starter set including pneumatic fittings and tubes (e.g., https://amzn.eu/d/br2hIfl)
- CA glue for closing the foam seal
- Vacuum pump: I would recommend a strong version with 500+ Watts if you are planning serious work like clamping for sanding or routing. I am the using this slightly upgraded one (BoM included there)
- Brass inserts
License
You shall not share, sub-license, sell, rent, host, transfer, or distribute in any way the digital or 3D printed versions of this object, nor any other derivative work of this object in its digital or physical format (including - but not limited to - remixes of this object, and hosting on other digital platforms). The objects may not be used without permission in any way whatsoever in which you charge money, or collect fees.
Comment & Rating (37)