Search models, users, collections, and posts

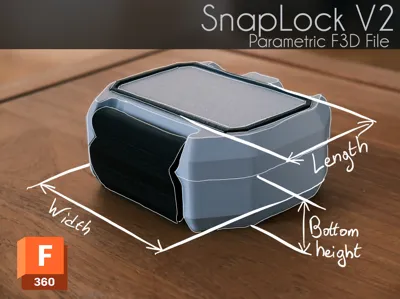
SnapLock V2 parametric F3d file

IP Report

Print Profile(6)

All
A1 mini
H2D
A1
P2S
H2S
X1
H2D Pro
X1E
P1S
X1 Carbon
H2C
P1P
X2D
A2L

A1/P1/X1 - 0.2mm layer, 3 walls, 10% infill
4.9 h
5 plates
4.7(33)

A1 Mini - 0.4mm nozzle, PETG (or PLA) and TPU
8.2 h
4 plates
5.0(3)

H2D - 1 plate - 0.2mm layer, 3 walls, 15% infill
4.1 h
1 plate
5.0(2)

A1 Mini - 0.6mm nozzle, PETG (or PLA) and TPU
7.4 h
4 plates
5.0(2)
Click to see more

Open in Bambu Studio
Boost
1161
2979
139
212
4.2 k
451
Released 

Description

After uploading the new SnapLock version 2, I'm sharing the highly requested Fusion 360 file. I've also included a STEP file to make customization easier in other software.

How to customize :

  1. Download the f3d file :

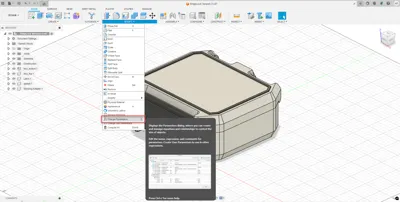
  2. Open the .f3d file in fusion 360
  3. In the “MODIFY” tab, select “Change Parameters” :

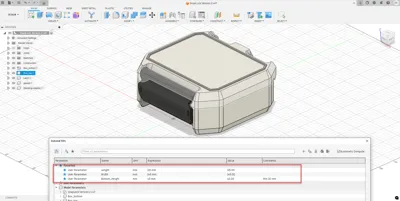
  4. A window will appear showing the parameters. Only adjust the three parameters listed under the “Favorite” section (unless you're confident in your skills and know how to fix a broken model :)
    IMPORTANT: I recommend changing values in 5 mm increments (e.g., to go from 145 mm to 130 mm, adjust to 140, then 135, and finally 130). Larger changes might cause sketches to fail and the model to break.
    If the model does break, simply click Undo and try again using smaller steps.


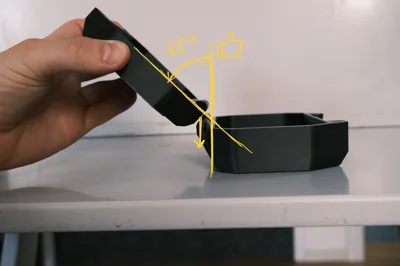
Assembly instructions

Assembly is quick and easy. if you know what you’re doing, it takes just 10 seconds.

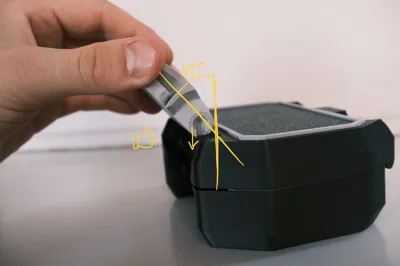
Thanks to the new hinge design, everything only fits together in the correct orientation, making assembly foolproof :

There is a notch that aligns with the hinge only at a 45° angle
Keep a 45° angle while pressing down to assemble the top and bottom
Keep a 45° angle while pressing down to assemble the latch

All of this can be done in about 10 seconds :


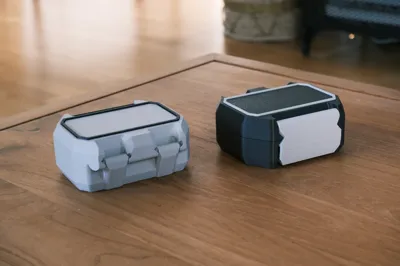
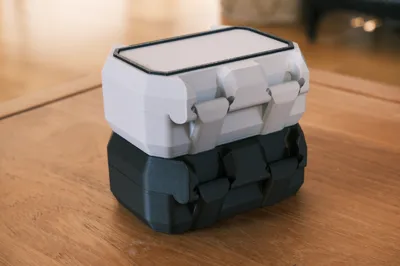
I’ve added an optional stacking adapter for those who want to stack boxes of the same size. It simply glues onto the top of the box for a secure fit.

There’s also an optional TPU gasket you can print to help seal the box and keep the contents protected.


Enjoy :)

Comment & Rating (139)

(0/1000)

I love the mechanisms on this model! It's easy to assemble and feels strong - and you can exploit the full size of your build plate to boot since you're not forced to use PiP hinges. The walls are just thick enough to give it some durability without being excessively material-consuming, which is a delicate balance many boxes seem to miss - either being super thick or super thin. I exported a tall/large volume version that fills the A1 Mini build plate and fired out the body, handle, and trim in PETG with a 0.6 nozzle and the gasket in TPU with a 0.4 nozzle (actually printed that part first before changing nozzles). Literally the only problem I have with the model is that there's pinch point in the top two corners of the gasket that causes a lot of travel (and stringing with TPU), but it can be mitigated by dropping the wall widths and switching it to print in Arachne. Re-printing this part with these settings all but eliminated the stringing with Bambu's TPU 90A. Thanks a bunch!
(Edited)
6
Reply
That white and blue colour scheme is really pleasing to the eye! How are you liking the Frostbite plate for these prints? I stopped using it for the v1 boxes because I didn't always like the texture.
0
Reply
Replying to @jazionk :
I like the feel of the texture it leaves behind, kinda like... orange peel. It's fine for things that are not detail-intensive as it's not always the most consistent. Anything text or material swap heavy (signage, light boxes, etc) I still go back to my tPEI plate for. I really like the Glacier plate for a more satin finish. Here's a side-by-side of a few plates to get an idea. (right-click it and "open in new tab" for the full resolution)
0
Reply
My Sunlu TPU gaskets had issues in those two points as well. Was hardly any stringing, more of just additional material in those two spots that needed to be snipped off to fit well. I just assumed it was the TPU. You're saying, changing these three things helped with the TPU gaskets?
0
Reply
Boosted
Excellent model, it would be really cool if the Fusion file also included an inlay box that automatically adjusts when the size is changed Then you would have the option later to add things like battery molds yourself Great model
Show original
5
Reply
Can you share your battery inserts or the entire modification for it
Show original
0
Reply
Replying to @3D_TomTom :
@NewBII and @TomTom_S. I read your comments today and tried to create such an inlay - maybe you can do something with it - it's fully parametric and the number of holes adjusts automatically (as many as possible :-) I uploaded the model here: https://makerworld.com/en/models/2174046-snaplock-v2-_-mod-_-parametric-inlay
Show original
0
Reply
Replying to @user_2957743350 :
I'll test it when I get the chance :D
Show original
0
Reply
Boosted
This is a fantastic 3D model! I love your first version, and I love V2 even more. I only had one issue which was with the gasket not lining up exactly which caused it to pinch. If I were make another project using this model, I will probably design a circular o-ring instead of a shaped gasket. Other than that, fantastic! 10 stars!
6
Reply
Boosted
Thank You. Great boxes!
1
Reply
How do you get the inserts like that to fit your step bits like that!?
0
Reply
Boosted
Replying to @Esperanza :
Brought the box file into Fusion360 and modeled the step bits to fit. Fusion360 or any other CAD program can be daunting at first, but if I can learn it, anyone can.
0
Reply
Replying to @Pelphry17 :
I've been putting it off, but slowly warming up to the idea. I really, really want to get good at it but fear it will end like all my other hobbies, haha! Thanks!
0
Reply
Thanks for sharing the Fusion 360 model! I have some engineering squares that needed a case and I was able to scale it to fit my exact dimensions. I added some packing foam my 3D printer came in to make the perfect protective case!
(Edited)
3
Reply
I still need to make an insert for the lid to fill in the space there that isn’t needed, but I love these parametric boxes and thought this version with the single latch was the best option for this use case. Thaks!
2
Reply
PS if you are using MakerWorlds Parametric model maker it doesn't work. Using F360 it works great though. Please note this is a problem with Maker World's web software NOT the model maker but I wanted to post this to prevent anyone from wasting time and money.
(Edited)
2
Reply
This is probably my favorite box you've made so far (even over V3) but the only issue I'm having is with size. Both in the customizer and in F360, the model completely breaks down past a certain size. It seems like height is the limiting factor. You can see in the image what happens to the latch when I increase the bottom size from the default to 75mm. Is there a fix for this? Otherwise, would it be possible to consider super sizing the boxes in future iterations? Again, incredible work as always. I just love big boxes lol
0
Reply
I'm also encountering the same problem, after increasing the size, the structure of the buckle has completely changed, and a groove has appeared on the lid of the box, it seems to be a vent
Show original
0
Reply
To add visibility, as i overlooked it the first time and wasted some filament: DON'T USE THE MAKERWORLD Parametric model maker! IT WON'T WORK! Use Fusion! And follow the instructions. You can get a free personal version of Fusion here: https://www.autodesk.com/products/fusion-360/personal If the process fails, use the support chat. Had it sorted in a few minutes and was able to download Fusion and follow the instructions. If the model breaks while resizing, reduce the increments even more (had to use 2mm steps for the height). If you do what the author says, this is a brilliant design, 10/10! I added text to the lids within BambuStudio.
0
Reply
Something must have happened to the parametric function. I used it early on to design at least 12 different boxes, and all worked perfectly. I just now tried the parametric option, and it is super finicky. I could only get it to work with a few different sizes and could not recreate sizes I had previously created. That is too bad because the parametric option worked flawlessly before. One of the updates must have caused issues.
1
Reply
I made a compact case for the game 'Splendor' using the Snaplock Case. https://www.printables.com/model/1403618-ultimate-snaplock-v2-splendor-box
1
Reply

License

This user content is licensed under the MakerWorld Exclusive License.

You may create derivative works based on this object, provided that all such derivative works are published exclusively on the MakerWorld platform and include proper attribution to the original creator. You may not share, upload, host, distribute, or publish this object—or any derivative work of this object—on any other digital platform, marketplace, or distribution channel. Commercial use of this object and any derivative works is strictly prohibited. This includes, but is not limited to, selling, renting, sublicensing, or using the object in any context in which you receive monetary compensation or other financial benefits.