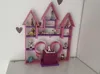
Tonie Castle


Print Profile(6)


Bill of Materials

Description
Boost Me (for free)
Feel free to boost me if you like my creations :)
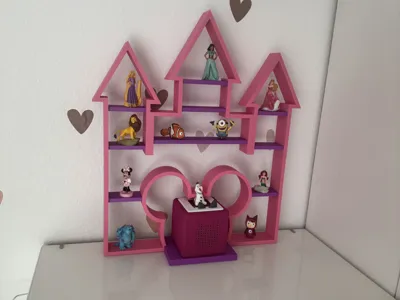
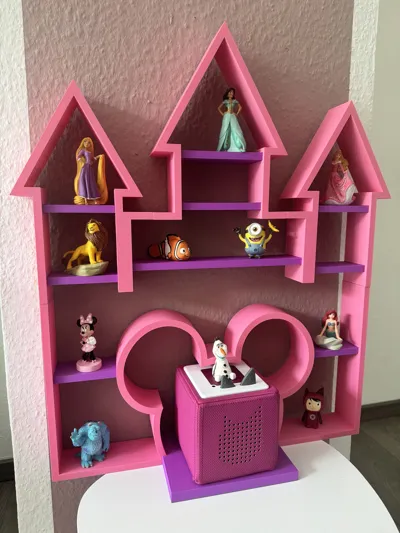
Tonie Fairy Castle Shelf
Transform your child's room into a fairytale kingdom! This lovingly designed castle-style shelf provides space for 22 Tonies, which adhere magnetically thanks to printed washers (pauses for insertion are necessary during printing). The Toniebox has its own compartment with an integrable charging station. All parts are easily assembled with plug-in connections – no screws required! Whether on the wall or freestanding on a cabinet: The castle is a real eye-catcher with practical benefits.
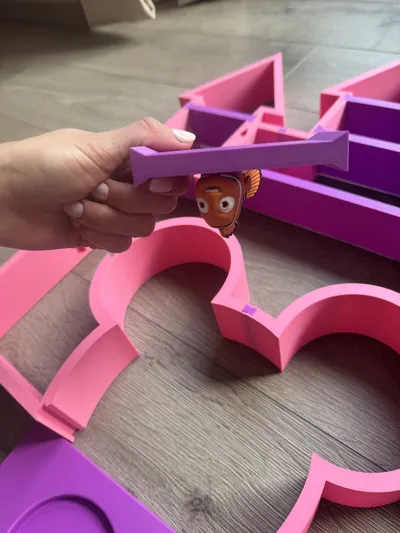
ATTENTION: All parts must be printed with the front face down. This creates a smoother surface and eliminates the need for supports. The specified stops only apply when printing with the front face down. If you print differently, you'll need to adjust the stop positions in your slicer!!
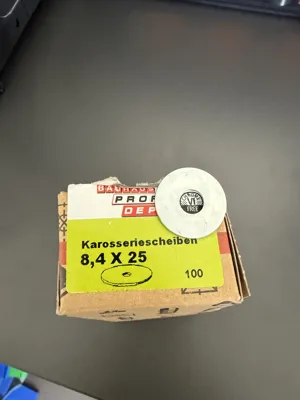
Washer dimensions: 8.4x24 mm and max. 2.1 mm thickness. These from Obi fit best:
https://www.obi.de/p/6390595/lux-karosseriescheibe-8-4-mm-x-24-mm-verzinkt-100-stueck?wt_mc=gs.pla_lia.Technik.EisenwarenBeschlaege.UnterlegscheibenRinge&wt_cc1=664779265&wt_cc2=6390595&wt_cc4=c&wt_cc5=140803992201&wt_cc8=pla-local&wt_cc9=33392976203&extProvId=5&extPu=obi-gaw&extLi=664779265&extCr=33392976203-140803992201&extSi=&extTg=&keyword=&extAP=&extMT=&storeId=419&gad_source=1&gad_campaignid=664779265&gbraid=0AAAAADk-hbGLSt4um6pL_mnfZtkxcKiWE&gclid=CjwKCAjwiezABhBZEiwAEbTPGOJJmU7oi6z2_14T7YjM_VFjQSJtMucTAtfoT1YZ-QyVsAM7kP8UBRoCKeMQAvD_BwE
Or these from Amazon: https://www.amazon.de/suki-Stück-Karoscheibe-verzinkt-6113174/dp/B00B4BDH36
Dimensions of hanging screws: 4.0x30 mm
STOPS for the washers:
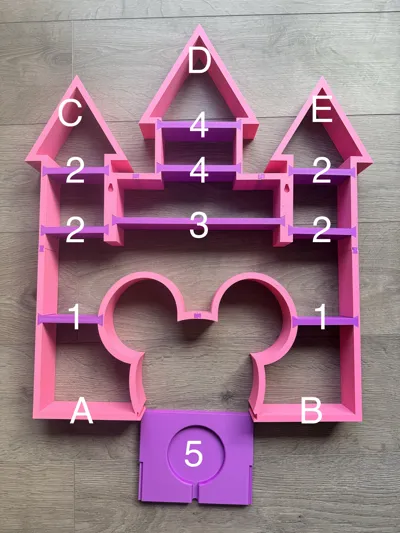
Outer frame:
Part A: Stop at layer 171 and 250
Part B: Stop at layer 171 and 250
Part C: has no stops
Part D: has no stops
Part E: has no stops
Insert plates:
Plate 1 (2x): Stop at layer 197 H2D Version 199
Plate 2 (4x): Stop at layer 197 H2D Version 199
Plate 3 (1x): 1. Stop at layer 171 (4 washers) and 2. Stop at layer 225 (2 washers)
Plate 4 (2x): Stop at layer 197 H2D version 199
Plate 5 (Tonie Box tray): has no stops
Dimensions of the complete castle:
Height: approx. 63 cm
Width: approx. 50 cm
Depth: Outer frame 6 cm / Tonie-Box plate 14 cm Approx. 1013 g of filament are required.
All parts are plugged together. I recommend adding some glue for a better and more secure hold.
Thanks to the integrated mounts, the shelf can be hung on the wall with 2 screws. Alternatively, it can also be placed on a cabinet.
When placing the charger in the fixture, the Toniebox must be placed directly on the plate with the charger. It is designed so that the Toniebox remains there, as it cannot be easily removed.
To assemble the castle, it is best to place it on the floor and slide all plates and connectors in from the back. The large plate for the Toniebox must then be slid into the standing castle from the front.
ATTENTION!
There is also a 2nd version of the shelf that also fits smaller printers (min. 245x245 mm).
For the current shelf, a printer with a print bed of at least 300x300 mm is required.
A finished BambuLab-H2D file with 8 print plates and a finished BambuLab-P1S file with 14 print plates are already included in the download. The images show the original file for the large printer.
The stops for the smaller file are identical to the stops for the large file. The parts have only been split once more so that they can be connected with an additional plug-in connection. (see last image)
3D PRINTING SETTINGS
The settings for the frame and plates are all identical.
- 2 walls
- 0.2 mm layer height
- 5 bottom and top layers
- 5% infill with grid infill
All parts are printed with the visible side facing down. Therefore, no supports are needed.
License
You shall not share, sub-license, sell, rent, host, transfer, or distribute in any way the digital or 3D printed versions of this object, nor any other derivative work of this object in its digital or physical format (including - but not limited to - remixes of this object, and hosting on other digital platforms). The objects may not be used without permission in any way whatsoever in which you charge money, or collect fees.
Comment & Rating (142)