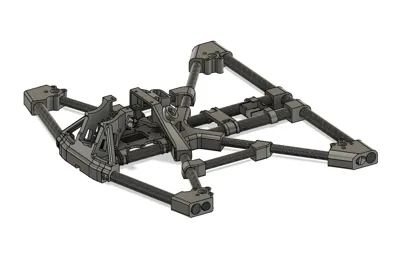
6inch Deadcat "Neo S thicc" - no props in view


Print Profile(1)

Description
Summary
This is a new 6inch Deadcat design labeled "Neo S" - S for “Stretch”. There are 2 versions - one for a light-weight build with 12mm motors and this one here for 16mm motors for thicc builds.
It's based on the Neo-design, but this way there are no props in view during record. This was highly requested with the Neo design, so here we go.
Depending on if you're using an AIO or a stack, either choose the 11mm or 20mm cage version (this is the amount clearance is gives you.
Currently it's designed for the O4 only, but I can gladly add a design for your camera or VTX of choice. Just let me know on Discord ideally (link see below).
Assembly tutorial:
Over the years I've designed many tubular frames. There are 3 main body types and then a growing number of subtypes.
Learn more about all of my tubular designs here on my website.
If you plan on building one or would like to get more info, there is a Discord server dedicated to this frame class. You'll get all the support you need there. I'll do what i can to help.
Printing
Core clamps:
Best printed with a material that's resistant to impact force - I personally have used PA-CF in the past, PLA+ though works fine as well, just don't leave it lying around in the sun for too long.
VTX-mount:
Print in TPU. I personally use one with a higher shore value, which is harder (Extrudr Flex Hard). I had no Jello at all in the footage.
With the "antenna-mount" part -> You can either 3d-print it using the same material you've used for the clamps, or you can just cut a piece of the 6mm tube to the size shown in the picture below.
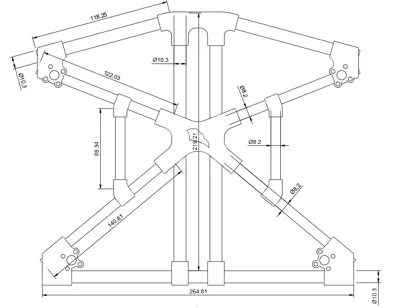
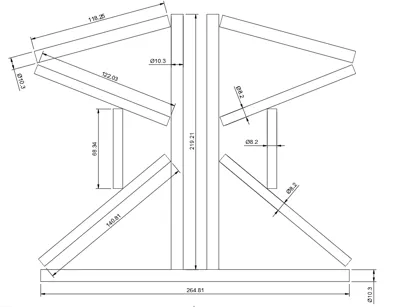
I added the rod lengths in a separate picture. Make sure to cut them wearing a mask in a well ventilated space (I use a dremel outside, hand saw is better as it creates less carbon dusk - but is more of a hazzle). Or if you're serious about tubular build, build your own cheap DIY rod cutter I designed here: https://www.thingiverse.com/thing:6909710
Cutting the rods
I'm using these: https://aliexpress.com/item/4000407024494.html
You will need:
2 x 10x8mm (which are 2 x 500mm pieces)
1 x 8x6mm (which are 2 x 500mm pieces)
Lengths please see in the following image. Please round them "down" to the next full mm. So 77,72mm -> 77mm. This is perfectly fine. Also you don't need to go OCD - if it's 75,5mm or 74,5mm won't matter too much. For the 10x8mm it's a close call with the 2x500mm, so feel free to make them a little bit shorter (~0,5mm).
I you source them elsewhere: Twilled rods are always better and more robust, but pulltruded ones also work (even cheaper).

Assembly tips
First of all do a dry assembly. You might need to drill of some of the holes to make the rods fit nicely. I designed them in a way that they should provide the least amount of drilling, but it's all depending on your 3d-printer as well as the rods (they are almost never the diameter they are supposed to be).
It should be possible to stick the frame together, but ideally the rods should not be flapping around.
I suggest using expoxy / epoxide glue for glueing them together. Superglue also works, but breaks more easily in case of a crash. Epoxy really is best.
However with expoxy things can get messy, do I usually only use it on parts where I won't need to move around the rods after glue has been applied too much. You'll know during dry fitting them. Tip: the main arms can be moved outwards and inwards - make use of that for easier assembly.
Comment & Rating (5)