Geocache box


Print Profile(2)

Bill of Materials


- Rite in the Rain notebook x 1: https://amzn.to/4ml0dfx
- Pen x 1: Any ballpoint should do
Description
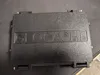
I recently hid a few Geocaches, and needed a nice box for them. Ammo cans are getting expensive, and pelican and similar cases are frankly overkill for your average GeoCache, not to mention their price.
This box prints quickly and cleanly, has a nice label on the top to deter muggle vandalism (and possibly clue them into geocaching), and neatly fits a 3x5" (75x100mm) notebook, like the kind Rite in the Rain sells, along with a standard Bic pen, as well as any trackers and doodads you want to include.
A TPU gasket plate is included, if you don't print it you can fill the groove in the box with vaseline or similar other grease, although the TPU is more likely to survive the life of the cache.
You'll want to print this in an outdoor-hardy filament. PETG, ABS, similar. PLA can survive the elements, but its unlikely to.
If you print it and hide a GeoCache, feel free to leave the Cache ID in the comments/reviews!
| If you want a stashnote to put into the box, instructing “muggles” who come across it what to do, I made this one that fits perfectly |
BOM and Assembly
Assembly is much the same as your average 3D printed box. You will need 6 M3x30 screws.
Place the hinge together, and use a screw as the hinge pin.
Drive two screws through the bottom half of the latch, these act as the closures that the latch clamps fasten over. Attach the latch clamps to the top half of the box using the remaining screws.
All screw heads face outwards. The inner holes are dimensioned to have the screw engage with the plastic, so as to retain it.
Boost Me (for free)
Like this model? Boost me!
Changes
- 2025-07-25: Made the hinge and latch attachments a bit thicker, so they are less likely to snap. Shrunk the O-Ring down a bit so its not such a tight fit.
License
You shall not share, sub-license, sell, rent, host, transfer, or distribute in any way the digital or 3D printed versions of this object, nor any other derivative work of this object in its digital or physical format (including - but not limited to - remixes of this object, and hosting on other digital platforms). The objects may not be used without permission in any way whatsoever in which you charge money, or collect fees.
Comment & Rating (6)