H2D AMS Pro2 Hinge Flipper


Print Profile(2)


Bill of Materials


Description
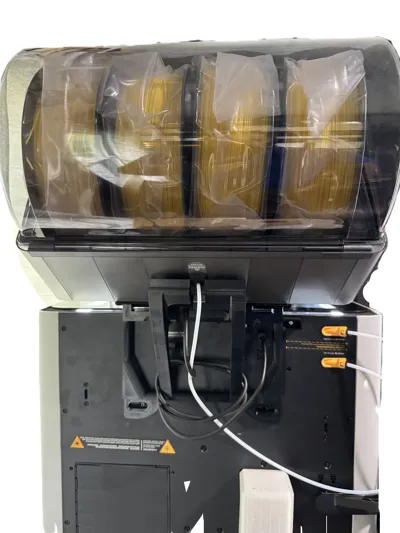
Inspired by AMS Flipper - better access to your P1S/X1C by Jakob_K_Design this is for the H2D.
Due to the width of the H2D compared to the X1C, you can't use Jakob's design.
- Allows for full access to the top of the H2D
- Tall so you're able to see through the top glass or add additional LED lighting if wanted.
- Tested to be strong and can hold up to 4, brand new 1KG spools.
- Simple design allows for a screw-less assembly of the bracket. You only need what came with your H2D AMS Combo to attached to the H2D.
- Does not block the TPU port
- Does not block the AMS connector
Allows for easier cable management for the AMS so there aren't a lot of dangling cords.
Required Hardware:
- 2x ST3×6 bolt (existing bolts on rear panel)
- 2x AMS transport screws or BT3x16 -AA10 minimum - 3 recommended. If you purchased the AMS with the H2D the AMS was screwed to the transport bracket. These are the same, silver screws. You keep your screws, right? Right?!
Print recommendation:
I printed it in Hatchbox ABS due to the heated chamber.
Installation Instructions:
Remove the screws circled in yellow. You will not need these. These will be replaced by the AMS transport screws.
Remove the screws circled in pink. You will REUSE these.
Remove AMS plug.

CAUTION: When tightening down the screws in yellow, DO NOT OVERTIGHTEN. These are ‘self-tapping’ screws and they will strip out if you overtighten. Go to snug and stop. Pink screws are threaded, you can tighten them down snug.
Affix bracket to H2D. They are slotted so you can adjust it side to side. For alignment, you may need to flex the bracket by pushing from the very top or bottom to get the screws aligned.
Place uprights into their proper location. Left and Right are indicated and are when viewed from the front of the H2D printer. The text will be facing forward.
Slide the pin into the hole to secure the uprights. There are supports inside the bracket, they will break when you push the pins in.
Slide AMS over the uprights.
Tilt the AMS back until it is resting on the bracket. You will need a roll of filament inside the AMS for this.
Slide the feet into the proper location. Do not slide all the way in.
Set the AMS back down. With even and gentle pressure, apply downward pressure on both sides of the AMS over the feet until AMS is level.
Comment & Rating (54)