Stand Up Paddle Board GoPro Valve Mount


Print Profile(1)

Description
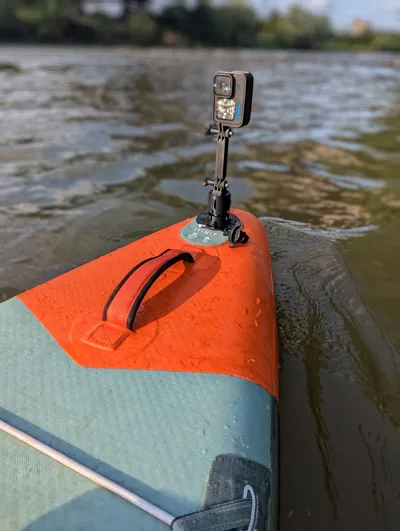
This adapter lets you securely mount a GoPro camera onto a stand-up paddle board using a standard Halkey-Roberts valve. A screw mechanism ensures a firm grip – even in waves or during movement.
Note: Do not overtighten – this may damage the valve!
⚠️ Heads-up:
The valve adapter used to break at its narrowest point – not during paddling, but during installation.
As the German saying goes: “Nach fest kommt ab” – tightened too much, and it snaps. And once it snaps… well, now you’ve got work to do 😅
To avoid that, I redesigned the part with a layer-optimized version that significantly improves strength under torsion.
✅ Important:
The optimized version requires two separate print plates, as the critical section is now rotated to change layer orientation.
One part of the valve insert must be printed lying flat instead of upright to improve durability.
⚠️ Note on the thread fit:
The threaded adapter is intentionally smooth-running for easy installation. However, this also means there's a risk of the GoPro mount rotating during use.
To avoid this, we strongly recommend using two lock nuts – one between the GoPro adapter and one between the valve base and flange.
🖨️ Print Instructions
🅰️ Option A (Recommended – Stronger, Safer):
- Print Plate 2 and Plate 3 (both marked as Option A)
- These are split for optimal layer alignment
- Much stronger in the critical area
- Ideal if you want long-term durability
🅱️ Option B (Simpler – All-in-One):
- If you're careful during installation and want fewer parts:
- Print only Plate 1 (marked Option B)
- Same design as the original
- Works fine if you don't overtighten
✅ Recommended Installation Steps
- Insert the threaded adapter into the Halkey-Roberts valve.
(Tip: Print the threaded adapter upright for best fit. This results in less favorable layer direction but is generally strong enough.) - Screw on the large round washer and gently tighten it.
Important: This is the most fragile point – do not overtighten! Just make sure the washer can no longer spin freely.
It's normal if the inner thread is still able to turn a little. - Thread on the first lock nut and tighten it firmly against the washer.
This will stop the whole assembly from turning. - Thread on a second lock nut.
- Attach the GoPro mount head.
- Tighten the mount head firmly against the second lock nut.
Everything should now be rock solid.
For extra safety, always secure your camera with a tether – better the adapter breaks than the valve gets ripped from the board. Otherwise, you (and your GoPro) might go swimming...0
📸 Portrait Mode? Use this vertical case:
🔗GoPro Hero Vertical Mount (fits 9–12)
📏 Need more height? Use one of these extenders:
🔗GoPro Mount Extenders – 50/100mm
🔩 Fasteners: You'll need a GoPro knob and an M5 machine screw:
🔗GoPro Knob with M5 Bolt
🎬 …and of course, a camera.
Maybe we’ll 3D-print those one day too 😄
🛶 Tested on a Decathlon Itiwit X500 Touring SUP.
Perfect for capturing timelapse footage of your route – or yourself paddling.
💬Share your setup and feedback with the community!
Comment & Rating (18)