Search models, users, collections, and posts

Golf Club Clip Holder for Golf Bag

GIF

Print Profile(3)

All
A1 mini
H2S
H2C
H2D Pro
X1 Carbon
A1
X1E
P1S
X1
H2D
P2S
P1P
X2D
A2L

0.2mm layer, 2 walls, 30% infill
Designer
39 min
1 plate
4.5(62)

V2
V2
Designer
2.4 h
1 plate
4.8(18)

0.2mm layer, 4 walls, 30% infill, PETG
50 min
1 plate
4.2(5)

Open in Bambu Studio
Boost
737
2422
129
18
2 k
1.6 k
Released 

Description

Golf Club Clip Holder for Golf Bag

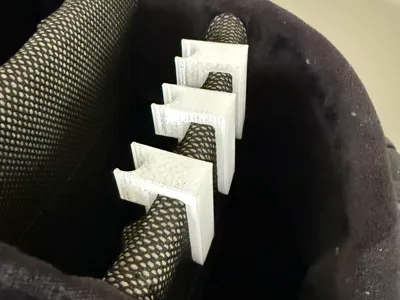
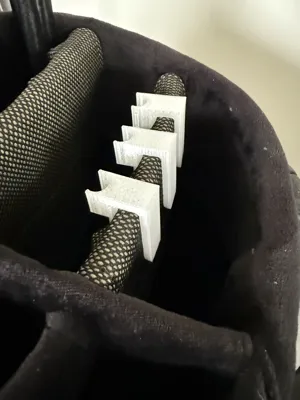
Tired of your golf clubs clattering around in your bag while walking the course or riding in a cart? This handy Golf Club Clip Holder is designed to keep your clubs securely in place. Simply clip the holder onto the rim of your golf bag, and snap your clubs into the clip. The snug fit prevents them from moving around, reducing noise and minimizing wear on your clubs.


Perfect for 3D printing, this model is quick to print, easy to install, and adds a practical upgrade to your golf gear. Works best with standard golf bags and iron/wood club sizes.

Features:

  • Easy clip-on design
  • Firm grip to hold clubs in place
  • Reduces noise and movement
  • Lightweight and durable
  • No screws or tools required

Make your golf game a little smoother with this simple but effective golf bag upgrade!

Top row without Clip           Bottom row with ClipJJ (V1)

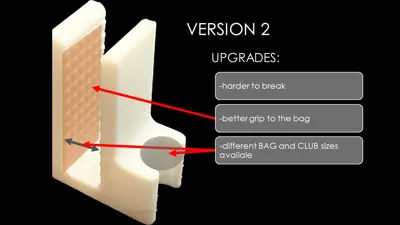
                                                            Update V2 (16.12.2025) – Better strengt + New Size Variants Added                            

Due to many requests from the community, I have updated the model and uploaded multiple size variants.

You can now choose between 3 different sizes for:

  • BAG SIZE
  • CLUB SIZE

This should ensure a good fit for most golf bags and club shafts.

Note: The original V1 size corresponds to MM.

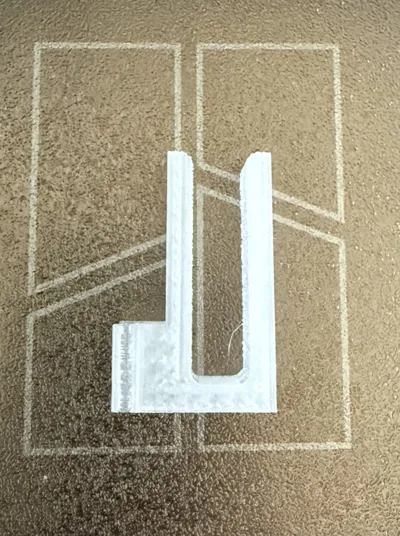
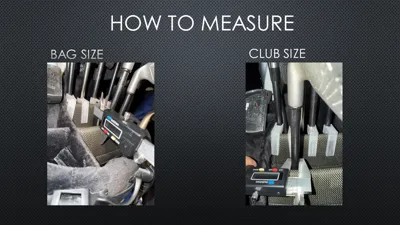
How to determine the correct size:

Bag Size (bag thickness):
Measure the thickness of your golf bag at the position where the clip will be attached, also shown in the photo.

Club Size (shaft diameter):
Measure the diameter of the club shaft at the height where it sits inside the golf bag, as shown in the attached photo.

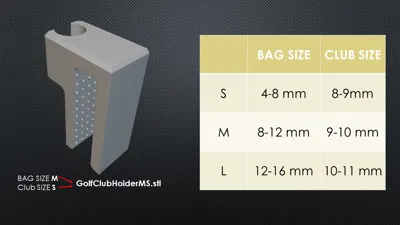
Size naming & Size table

All measurements can be found in the attached table.


The models are labeled as follows:

XY

  • X = BAG SIZE
  • Y = CLUB SIZE

All combinations are available in S, M, and L.


Please select the model you need from the print profile V2.
Or feel free to print all the sizes to find the best fit.

If you need additional sizes, leave a comment and I’ll see what I can do.
I hope these options cover everyone!


HAVE FUN!!!

Boost Me (for free)


Comment & Rating (129)

(0/1000)

Print Profile
V2
Prints beautifully and is fully functional with my Sun Mountain 2.5 6 divider bag. I will be printing another two sets for my Kradul and Vessel bag. Keeps my Irons from banging into each other. Printed on my P2S Printer using Black PLA Matte.
The profile uploader has replied
profile
1
Reply
thank you for your feedback and sharing the pictures, it looks great! have fun with it
0
Reply
Which size did you end up using?
0
Reply
Replying to @user_2343949133 :
Sorry for the delay. I am not on here much. I honestly can't remember. I believe it was Medium. Measure the width of your dividers and go to the chart he provided. Good luck!
0
Reply
Print Profile
0.2mm layer, 2 walls, 30% infill
Nice item & works well. Only suggestion for improvement is to be able to print multiple units at the same time.
The profile uploader has replied
profile
1
Reply
thanks for the feedback. you can right click on the item in the bambustudio and click then multiply to print as many units as you wish
(Edited)
2
Reply
Yoi can do it on the update app now!
0
Reply
They printed great using PLA. I bought a 14 divider bag and kept struggling to find the empty slot, so I started looking for some kind of clip or marker to label each club location. After about 8 sizing adjustments, I finally got them dialed in and printed a full set of clips. I even turned some into simple labels instead. Why? Because we can. 😄
The designer has replied
1
Reply
Thanks for your review, and have fun with it!
0
Reply
Awesome model but it needs to be laying on its side on the print bed instead of standing up mine broke immediately when removing the putter because it printed on the layer lines if it’s laying on its side, it prints the layer lines 90° to the object.
The designer has replied
5
Reply
thank you for the feedback. for me the accuracy of the hole was more important and i did not had problems so far. But they are sureley stronger when rotated 90 degrees. You can easily rotate them in bambu studio, if you need help to do it just send me a DM.
0
Reply
Replying to @MikelAngelo :
ahh.. I see, maybe somehow it could be beefed up at the top. Mine snapped the first time I took the club off right at the point where it goes over the lip of the golf bag.
0
Reply
Print Profile
0.2mm layer, 2 walls, 30% infill
printed perfect
The profile uploader has replied
profile
1
Reply
thanks. have fun on the round!
0
Reply
Print Profile
V2
Did these for a friend. works great.
profile
1
Reply
Excellent, simple fix.
(Edited)
1
Reply
Print Profile
0.2mm layer, 2 walls, 30% infill
Excellent, fits very well
Show original
profile
1
Reply
Print Profile
0.2mm layer, 2 walls, 30% infill
Test print in PLA because I don’t have any PETG on my AMS at the moment
profile
1
Reply
Print Profile
0.2mm layer, 2 walls, 30% infill
I'll try it out in the field and we'll see
Show original
profile
1
Reply

License

This user content is licensed under a Standard Digital File License.

You shall not share, sub-license, sell, rent, host, transfer, or distribute in any way the digital or 3D printed versions of this object, nor any other derivative work of this object in its digital or physical format (including - but not limited to - remixes of this object, and hosting on other digital platforms). The objects may not be used without permission in any way whatsoever in which you charge money, or collect fees.