Monitor and ESP32 for Home Assistant


Print Profile(1)

Description
Project Title: ESP32 Home Data Monitor with TFT Display for Home Assistant
Short Summary:
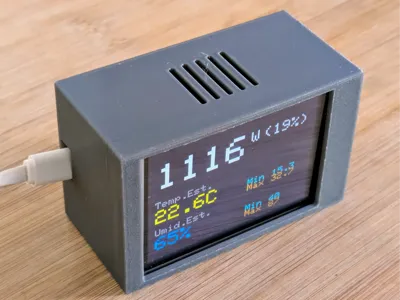
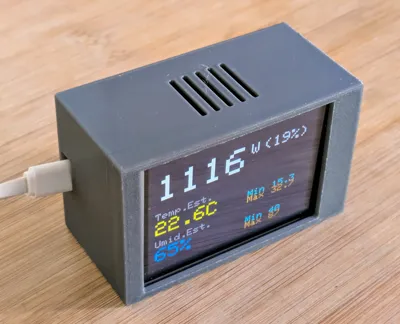
An elegant ESP32 and ILI9341 TFT display (320x240) based desk monitor that shows real-time data from Home Assistant via MQTT. Perfect for keeping an eye on instantaneous energy consumption, outdoor temperature (with daily min/max), and outdoor humidity (with daily min/max). Compact design and a 3D printable case are included.
Full Description:
This project presents a customizable home data monitor, ideal for Home Assistant users кто desire a clear and immediate display of key information. At its core is an ESP32 microcontroller that connects to your WiFi network and receives data from an MQTT broker, which is populated by sensors and automations configured in Home Assistant.
The 3.2-inch ILI9341 TFT display (320x240 resolution) offers excellent readability and allows for the visualization of:
The layout has been designed to be clean and easily readable at a glance. The ESP32 firmware is written in C++ (Arduino) and handles WiFi connectivity, MQTT topic subscription, and display updates. The Home Assistant side configuration includes template sensors to aggregate/correct raw data (if needed) and automations to publish the values to the appropriate MQTT topics.
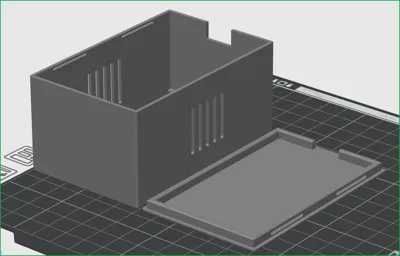
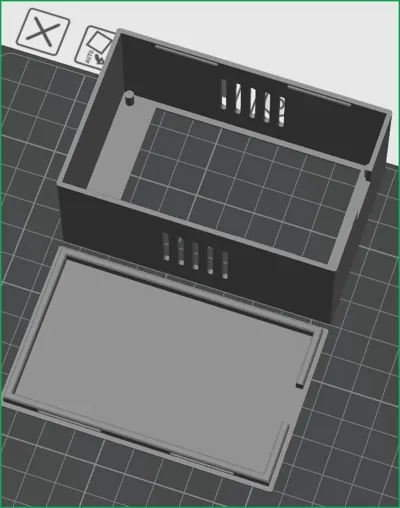
An STL file for a compact and stylish 3D printable case is included, which houses the ESP32 (DevKitC model or similar) and the TFT display.
Main Features:
- Displays data from Home Assistant via MQTT.
- Monitors consumption, temperature, and humidity with their respective daily min/max values.
- ILI9341 color TFT Display (320x240).
- ESP32-based.
- Arduino firmware and YAML configurations for Home Assistant provided.
- Dynamic coloring of consumption text based on thresholds.
Required Components (BOM - Bill Of Materials):
- ESP32 DevKitC (or compatible ESP32 module)
- 3.2" ILI9341 TFT Display (320x240) with SPI interface (ensure pins match those defined in firmware: CS, DC, RST)
- Jumper wires for connections
- USB power supply and cable for the ESP32
- Access to a 3D printer for the case (optional, but recommended)
- A working Home Assistant instance with an MQTT broker (e.g., Mosquitto)
Assembly and Setup Instructions:
- Hardware Connections: Connect the TFT display to the ESP32 following the pin definitions in the firmware (TFT_CS, TFT_DC, TFT_RST, plus SCK/CLK, MOSI/DIN, MISO, VCC, GND, LED).
- Home Assistant:
Set up your source sensors in Home Assistant for consumption, temperature, and humidity.- Implement the provided YAML package (pkg_esp32_consumi_meteo_display_data.yaml) to create template sensors (if needed to correct/aggregate data), Min/Max statistics sensors, and the automation that publishes data to MQTT topics.
- Ensure your MQTT broker is configured and running.
- ESP32 Firmware:
Open the .ino sketch with the Arduino IDE.- Install the necessary libraries: Adafruit GFX Library, Adafruit ILI9341, PubSubClient.
- Configure your WiFi credentials (ssid_array, password_array) and MQTT server details (mqtt_server, mqtt_user, mqtt_password) at the beginning of the file.
- Compile and upload the firmware to the ESP32.
- Final Assembly: Assemble the electronics into the case.
Additional Notes/Customization:
- MQTT topics in the firmware and Home Assistant YAML must match exactly.
- Thresholds for consumption text coloring and display layout parameters can be easily modified in the ESP32 firmware.
- The project can be extended to display other data from Home Assistant by adding new MQTT topics and modifying the display logic.
Comment & Rating (13)