"Benchcade" Tabletop Raspberry Pi Retro Arcade Machine


Print Profile(3)


Bill of Materials


Description
Boost Me (for free)
If you're enjoying this model, don't forget to give it a rating, like or even boost! Check out my profile for more- I mostly make a mix of toddler toys, DND dice towers and mechanical fixings.
Details:
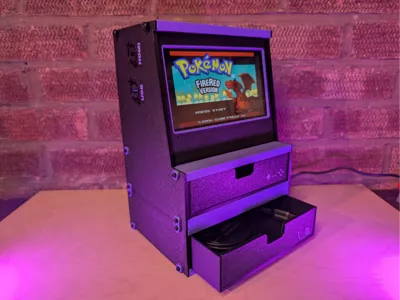
Literal years in the making, undergoing a hundred different forms, this, finally, is Benchcade, my own personal take on a Raspberry PI desktop Arcade.
For this desktop arcade, I designed for simplicity, intuition and accessibility above all. The Benchcade is flat-pack and modular, using heat-set inserts, M3 bolts, and slot-together grooves to allow for easy flat printing and self assembly. It has simple tech requirements using external third-party controllers as opposed to complex arcade button and joystick setups. Just install a retro gaming OS on your raspberry pi, add ROMS, connect your favourite controller via USB or Bluetooth and get playing!
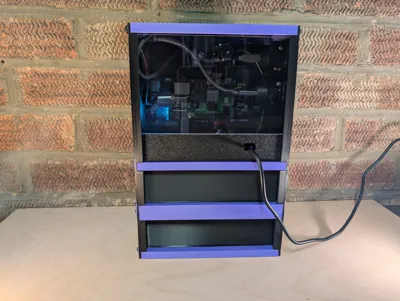
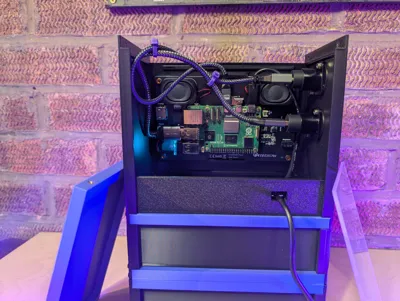
The Benchcade has one drawer for game accessories but you can add extras via my modular drawer system, making this a great piece of workbench/ desktop furniture. I’ve incorporated optional panel mounting slots on the side to allow the use of pass throughs for USB and HDMi, improving the versatility of the Benchcade.
This is very much an ongoing passion project which I can't seem to put down so please get in touch if you have any suggestions, need any help or would like me to do any customisations for you, I'd be more than happy to help.
Features:
- Flat print, no support, flat-pack assembly
- Nut & bolt assembly for easy build and interior access
- Simple, intuitive tech setup using a raspberry pi, touch screen monitor, built-in speakers and external third-party bluetooth controllers/ audio
- Built-in drawer for controllers and accessories
- Built-in cable saddle to safely secure power cable
- Small form-factor compared to other desktop arcades (W185mm, H220mm, D205mm)
- AMS optional (some small AMS features like screen surround and labelling but these can be avoided)
Optional extra features:
- Modular additional drawers
- Optional HDMI & USB Panel mount pass-through slots for external usb connection, usb charging and HDMI in or out. Plug your Pi into a bigger external monitor, or use it as a desktop second monitor of its own!
- Optional acrylic panel for pc-style visual access to the interior (180mm X 110mm, 3MM Clear Acrylic )
- Uploaded some high-quality STEP files to allow modification and customisation on the sides and front (Monitor panel, sides, drawer front)
Non-3d Printed Parts:
Raspberry Pi
Monitor
M3 Heat Set Inserts
M3 Bolts (or any generic 10mm M3 bolt)
(OPTIONAL) Knurled (PC case style) M3 Bolts
(OPTIONAL) Panel Mount (USB)
(OPTIONAL) Panel Mount (HDMI)
(OPTIONAL) Acrylic Panel (180mm X 110mm, 3MM Clear Acrylic ) - Can be sourced from any supplier of acrylic, many of which will cut to size relatively cheaply.
Print:
Printing is extremely easy as the entire arcade prints in separate parts with no supports. I use mouse ear type brims on almost everything to help with adhesion with my unenclosed A1, but this is optional if you trust your printer not to lift corners.
I have supplied three print profiles. One contains everything you need to print one basic benchcade, one contains the additional side panel for panel mounting, and lastly one contains everything you need to print additional modular drawers.
Assemble:
Step 1:
Take your two middle/ bottom panels and the top panel, and set four M3 heat-set inserts into each via the holes on the sides.
Step 2:
Using M3 Bolts (10mm) and colour-printed washers fix the two sides to the two middle/bottom panels
Step 3:
Clip the monitor/electronics setup onto the face panel and slide it into the front grooves.
Step 4:
Take the power panel and place two heat-set inserts into the cable saddle mount. Run your USB power cable through the hole and use two M3 Bolts (10mm) to ‘pinch’ the cable in place using the cable saddle. (Don’t overtighten, no drill).
Step 5:
Plug your power into the Raspberry Pi and slide the power panel into the rear grooves. Slide the printed or acrylic rear panel into the same grooves.
Step 6:
Using M3 Bolts (10mm) and colour-printed washers fix the top panel into place
Step 7:
Slot the drawer front panel into the drawer, then simply slide the drawer into its slot
Step 8:
Hardware/software: I won’t even pretend to be able to write a better tutorial for this than already exists online, but below is a list of resources I used.
- ELECROW Monitor Info (My choice of monitor for this project with audio, pi mounting and touch screen built-in)
- Getting started with your Raspberry Pi
- Recalbox Homepage (My personal choice of RPi retro gaming OS)
- Recalbox Installation Guide
OPTIONAL STEPS
Panel Mounts:
After printing the panel-mount left side, you can mount most commercial panel-mounted pass throughs (diameter 24mm). You may need to design, tweak or drill out different mounting holes depending on the manufacturer, so I have supplied a high quality STEP file for this piece. I used double-female pass-throughs which require an extra cable to run between the pi and the panel, but you can get versions which have the cable built-in.
Modular Drawers:
Print two more middle panels and set the heat-set inserts into each like before. Then use the two ‘modular drawer side panels’ to bolt these together into a box, making sure to put the drawer blocker wall towards the back of the drawer. You then use the modular joiner washer with the pre-existing bolts to connect this box to the original arcade. Prep and fit your drawer following the instructions above.

Documentation (1)
License
You shall not share, sub-license, sell, rent, host, transfer, or distribute in any way the digital or 3D printed versions of this object, nor any other derivative work of this object in its digital or physical format (including - but not limited to - remixes of this object, and hosting on other digital platforms). The objects may not be used without permission in any way whatsoever in which you charge money, or collect fees.
Comment & Rating (25)