Magnetic Snap-On Fly Screen


Print Profile(1)

Description
It's summer again in UK!
That means windows will need to open, which means flies will gain entry points into your house. Commercial fly screens are quite expensive, so I designed this snap-on fly screen clips.
It's quite easy to assemble in my opinion and I designed it as minimalist as I could, both in terms of filament used and extra components.
I hope it keeps you cool! :D
Components:
- Fly Screen Mesh https://amzn.to/463f9ZW
- Neodymium Magnets N52 (8mm x 3mm) https://amzn.to/44eSkQN
- Each corner clip requires 5 magnets, so 10 per corner
- The straight clip requires 3 magnets, so 6 for the pair
- Nano Double Sided Tape (1mm) https://amzn.to/445TVrU
if you have a more uneven surface consider using 2mm tape instead https://amzn.to/445gUDq
Make sure you buy large enough mesh for your window or door.
The above links are affiliate, but feel free to buy equivalent components, as long as the dimensions are the same you shouldn't have any issues.
Assembly
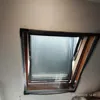
For reference, this is what we are trying to achieve. 4 clips in the 4 corners of the mesh and 4 more clips magnetically attached from one side and adhesive tape on the other side. One set of clips, grabs the mesh, while the other set is stuck on the wall. Depending on the size and the situation, you might need additional straight clips in between the corner ones. We can then remove the adhesive tape protective film and stick it around the window opening.

Measuring your opening.
I would advise you to measure multiple times at multiple points (3 at least) and keep the largest measurement. The idea is to measure the height and the width of mesh you will need. Whatever number you get add ~5-10cm in each dimension for spare.

Cut the mesh.
It is advisable to use a long spirit level and a utility knife to cut as straight as possible, but you can also use scissors like I did. It's more important to make sure you cut a larger piece than you need, rather than keeping it straight, as you will have the chance to make it straight when you fold the edges.
Position the first clip.
Make sure you position it as square as you can relative to the mesh grid lines rather than your corners, mostly because the edges might not be square. Position the first clip in a way that the next two clips will have a similar amount of spare mesh on the sides and there is enough material in between to cover your window.

- Once you like the position, place magnets inside the cutouts and pace magnets on the back sides in order to hold them.

- Place it at the position as described in step 3 and cut the mesh at the points of the connection dowels with a utility knife

- Then place the thin cap with the dowels and cap it. If the clip opens up too easy use some super glue.

- Once secure, you can remove the magnets on the back and place the mating piece. Make sure the thick part (the one that holds the batteries, is attached to the thick side of the closed clip

- Move the mating connector to attach thin side with thin side and place the adhesive strip on the clip that is not clipped on the mesh

- Repeat steps 4-8 3 more times for each corner.
- Place straight segments as you need them to help with clamping force. In my example I found that I needed them.
- Remove the adhesive tape protection film and place around your opening, starting with two corners. I started from two top ones

- Fold the edges onto themselves and glue them with some adhesive tape

- Enjoy your new removable window fly screen :)

I have found that the double sided tape inside the folded mesh edges could help with adhesion as well, but if you need it it might indicate you need extra straight clip segments.
Boost Me (for free)
Consider boosting this model if you found it useful and enjoyed it. It's a massive help for non-professional designers like me in covering for the costs of testing.
Additional Ways to Help:
- Like, rate and take a photo of your print. You help me, other people and yourself with MakerWorld points :D
- Follow my account
- Comment with your feedback
If you liked this model you might also like models in my Collections :
My Skadis Collection : Spool Holder |Parametric Holder | Parametric Box
My Tools & Hardware : Benchdog Drill Template |Shelf Peg Drill Template |DIY fly screen |Corner Trowel |Parametric mounting bracket
My Organisers & Containers : Desk Organiser |Modular Battery Box |Controller Stand with Storage
My Lights : Hex Light w Wireless Charging Base |Donut Light

Documentation (11)


License
You shall not share, sub-license, sell, rent, host, transfer, or distribute in any way the digital or 3D printed versions of this object, nor any other derivative work of this object in its digital or physical format (including - but not limited to - remixes of this object, and hosting on other digital platforms). The objects may not be used without permission in any way whatsoever in which you charge money, or collect fees.
Comment & Rating (12)