Itsukushima Shrine Diorama | Japanese decor


Print Profile(1)

Bill of Materials


Description
Remember to read the model's license! The Standard Digital File file forbids SELLING, REMIXING and REDISTRIBUTING models!

Want to sell this model? The only legal and safe waya to obtain a commercial license are through my Patreon or via Makerworld Commercial License. Please join to know more. You can also support me, join our Patreon chat and learn more about what I am doing. With a Patreon membership, you'll also be able to participate in giveaways and send me private customisation requests!
🔍 Please read the model description fully before printing!
Membership
If you don't want to join Patreon, a commercial license with similar benefits is available here on makerworld!

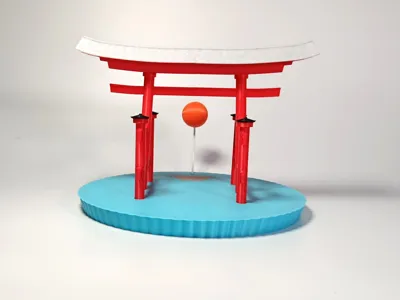
This is a diorama inspired by the famous Itsukushima Shrine in japan. The tori gate is simplified but catches the essence of the shrine. An orange sun is setting over the horizon, reflecting over the light blue waters.
Boost Me (for free)
Hit the boost button to show your appreciation!
Printing instructions
I highly suggest you use a PEI Smooth Plate to print this, as components of the gate are printed in halves, and having a smooth bottom makes fitting a lot more precise.
Pegs are provided for alignment but are not necessary. Depending on your filament bridging capabilities, pegs may be too long because of sagging in the hole areas. In this case, you can simply align the components by hand.
Assembly instructions
Roof
The roof has four parts. Two halves are red beams and must be glued together. Then the actual roof also has two halves which must be glued onto the large red beam.
Main pillars
Two tall red pillars have slots for inserting 8 secondary beams. The main pillars have a slight inclination of 5 degrees to the left and to the right. Make sure to arrange them appropriately
Secondary pillars
Four secondary pillars attach to the two main pillars by means of 8 secondary beams which simply slot in the holes provided. Four black “hat” pieces must be glued onto each secondary pillar.
Sun
The sun is split into two halves and a white holder should be glued into the halves. When the sun sphere is assembled, it can slot into the appropriate hole in the diorama base. Sun reflections are three rounded rectangles which slot into the appropriate holes.
Last pieces
Last, slot all pillars into the round holes in the diorama base and glue the roof onto the two main red pillars.
Boost Me (for free)
A boost is free to you and helps me a lot! Hit the happy blue button :p

Tolerances and clearances
- It is impossible to design for all filament types
- My models are designed and printed using Bambu Lab printers and Bambu Lab filaments
- If you use other filament types (different materials) or vendors (different brand), the result may differ. Before posting issues about tolerances / model tightness / loseness, please consider the filament you used for the print.
- Even with the same filament, results may vary (different settings, humidity, ventilation, etc…)
Common print troubleshooting
- Adhesion. Ensure you clean your print bed regularly with quality dish soap and water. Use of a releasing agent like Magigoo is advised. This advice is only applicable to PEI plates. Please consult your build plate manufacturer for detailed cleaning instructions! If you still have adhesion issues, try using a Super Tack or a BIQU cool plate; or add an extra brim to the model.
- Material. My prints are all PLA. Use other materials at your own risk. You will likely need to tune the printing profile.
- Temperature. Cold air and drafts can lower the quality of the print. Ensure your printer is located in an environment with stable temperature.
- Drying. Drying PLA is not a requirement, but be aware that over-drying can cause layer detachment.
License
You shall not share, sub-license, sell, rent, host, transfer, or distribute in any way the digital or 3D printed versions of this object, nor any other derivative work of this object in its digital or physical format (including - but not limited to - remixes of this object, and hosting on other digital platforms). The objects may not be used without permission in any way whatsoever in which you charge money, or collect fees.
Comment & Rating (0)