Creality K1 Max Silicone Nozzle Wiper


Print Profile(0)
Description
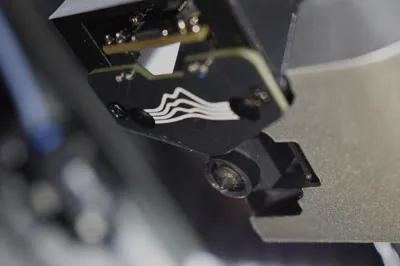
K1 Max Silicone Nozzle Brush
Simple nozzle brush designed for the Creality K1 Max 3D printer, allowing the printer to wipe itself. Especially useful when using the Cartographer probe.
This mod is ONLY compatible with the Creality K1 Max. -It will not work on the K1, K1C, K1 SE.
- The K1 does not have sufficient nozzle clearance from the outside of the print area to be able to install a wiper like this.
Installation can only be done through:
SimpleAF firmware by pellcorp. - This ensures a simple macro installation.
OR
Rooted stock Creality firmware (Helper Script) [NEW!]
Features:
-Quick, single part print
-No supports
-Simple macro install (in less than 30 seconds, for SimpleAF)
Printing instructions:
- < 30% infill
- No supports
- PETG, ASA, etc. recommended (especially if you print with high chamber temps)
Required parts:
A1 Silicone Nozzle brush, specific ones I bought:
Macro installation instructions for SimpleAF firmware:
- In Fluidd / Mainsail, create a file named "custom_macros.cfg"
Open the file, and paste the following code:
[gcode_macro WIPE_NOZZLE]
gcode:
{action_respond_info("Wiping nozzle on silicone brush…")}
{% set EXTRUDER_TEMP=params.EXTRUDER_TEMP|default(230)|float %}
M109 S{ EXTRUDER_TEMP|int - 35} #set nozzle to 35 below printing temp
{% if "xyz" not in printer.toolhead.homed_axes %}
G28
{action_respond_info("Homing")}
{% endif %}
SET_VELOCITY_LIMIT ACCEL_TO_DECEL=8000
SET_VELOCITY_LIMIT ACCEL=8000
M104 S0 #set nozzle temp to 0, to begin cooling nozzle while wiping, to stop oozing from coming out of the nozzle AFTER wiping is finished
M106 S255 #Turn on part fan
G90
G1 X306.00 Y45.00 F7000
G1 Z{****CHANGE_Z_VALUE_HERE****} #Change this value to fit your printer (different versions of K1 Max's have different z#
G1 E-5 F2400 #Retract filament
G4 P500 #Give half a second for nozzle fan to spin up{% for i in range(5) %} #Wipe 3 times then 1 more fast wipe, 4 total
G1 X300 F15000
G1 X306 F15000
G1 Y32.00 F15000
G1 Y0.00 F15000
{% endfor %}
{% for i in range(4) %}
G1 Y38.00 F5000
G1 Y0.00 F5000
{% endfor %}
M109 S{ EXTRUDER_TEMP|int - 70} #Wait for nozzle temp to drop enough to prevent oozing, then do one more wipe to remove those extra bits 😉
G1 Y40.00 F5000
G1 Z10 F2000
M106 S0 #Turn off part fan{action_respond_info("Done.")}
[gcode_macro _SAF_NOZZLE_WIPE]
gcode:
WIPE_NOZZLE- On the line with G1 Z{****CHANGE_Z_VALUE_HERE****}, change the whole part with brakets to the value that works best (eg 1, 2, 3, 4 or 5) -the higher the value, the less the nozzle will dig into the brush (so start high, 5 or 6) The best way to find the value is to home all axies, then move the printhead over the wiper and move z until it's 2/3rds into the brush, and use the z value in the coordinates and paste it into the line. After editing, the line should look something like this: G1 Z3.2 #(with your z value of course)
- Click the Save button in the top right of the editor.
- Go into the printer.cfg file and paste [include custom_macros.cfg] somewhere in the header.
Click the “SAVE & RESTART” button in the top right of the editor.
Macro installation instructions for rooted Creality firmware:
Download appropriate macro files for your printer by downloading the appropriate custom_macro.cfg file for your setup, in the K1 Max Silicone Brush folder found here:
https://github.com/Calin65/K1-Max-Brush-and-Wipe-System/tree/main/Macros%20%5BK1%20Max%20Silicone%20Brush%5D
With KAMP:
Copy the contents of the custom_macro.cfg file that was downloaded, and paste the contents onto the bottom of the custom_macro.cfg file on the printer, which can be accessed using Fluidd / Mainsail.
Because KAMP comments out the start print macro, and places their own into a locked file, we must disable this locked file. This can be done by simply commenting out the [include Start_Print.cfg] line in the KAMP_Settings.cfg. This file can be found in the #/Helper-Script/KAMP folder.
Note: If for some reason your start print macro was already uncommented after installing KAMP, make sure to either replace it with the new start print macro, or comment out the old one.
- SAVE & RESTART!
Without KAMP:
Copy the contents of the custom_macro.cfg file that was downloaded, and replace the original start print macro with the new, copied one. The start print macro can be found around line 382.
- SAVE & RESTART!
If you encounter any problems, or have any questions, feel free message me through:
Discord: calin_o
Email: calinolsen@gmail.com
Boost Me (for free)
If this project was a help to you, and you want to show some support, feel free to leave a boost!
License
You shall not share, sub-license, sell, rent, host, transfer, or distribute in any way the digital or 3D printed versions of this object, nor any other derivative work of this object in its digital or physical format (including - but not limited to - remixes of this object, and hosting on other digital platforms). The objects may not be used without permission in any way whatsoever in which you charge money, or collect fees.
Comment & Rating (50)