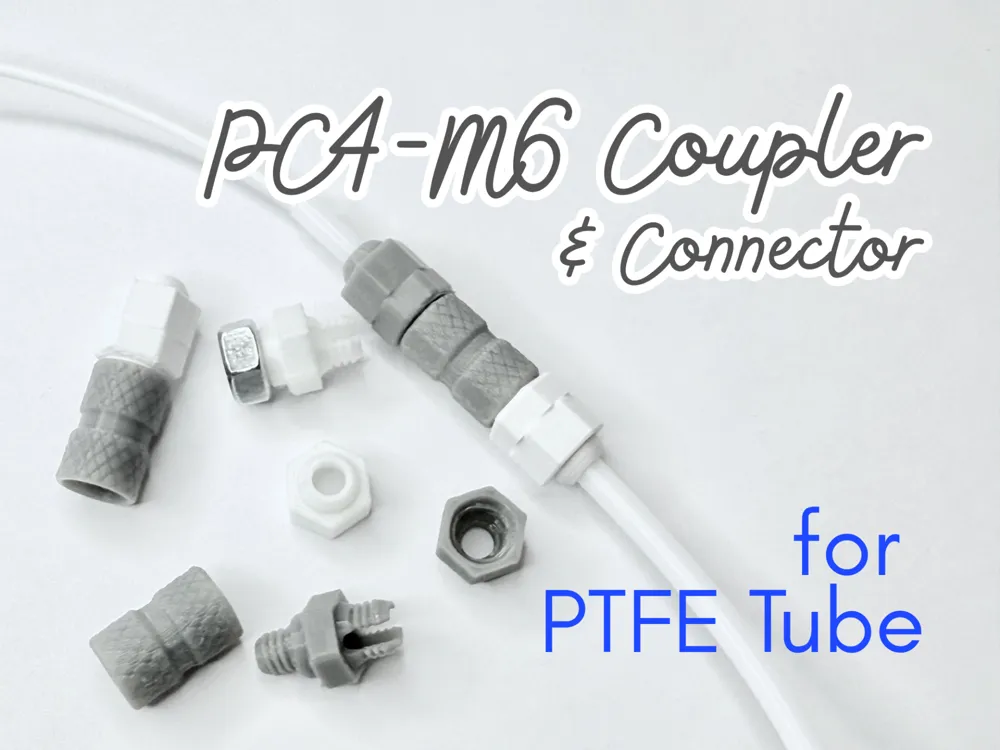
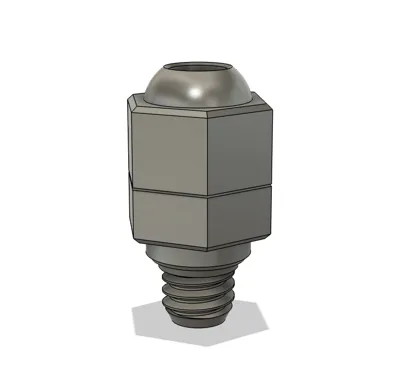
PC4-M6 coupler & connector for PTFE tubes - 1.5g!


Print Profile(1)

Bill of Materials

Description

I found myself in need of some PC4-M6 pneumatic couplers with none on hand, and didn't find any printable options that met my needs, so I created this. It is designed from scratch but inspired by the design of PC4-M10 PTFE Tube Connector Replacement by Sdot Prints.
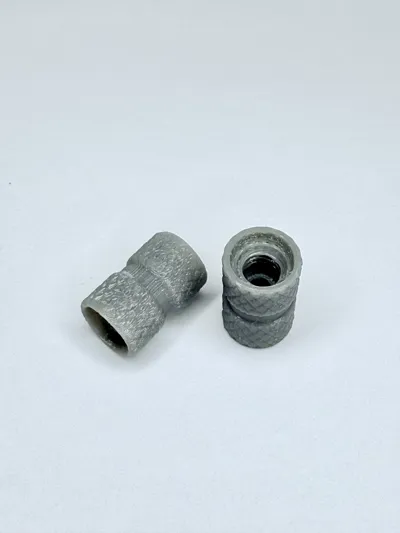
This also includes a connector to join two PTFE tubes. Screw one PC4-M6 into each end.
Specs
This coupler is designed for use with Bambu PTFE tubes: external ⌀ 4mm, internal ⌀ 2.5mm.
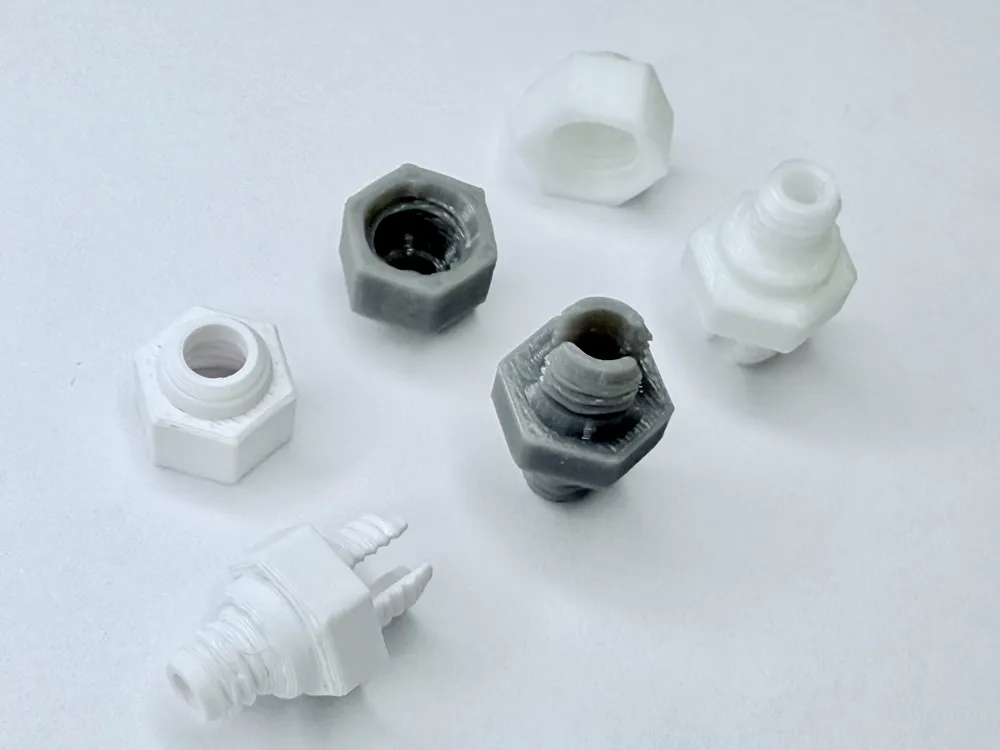
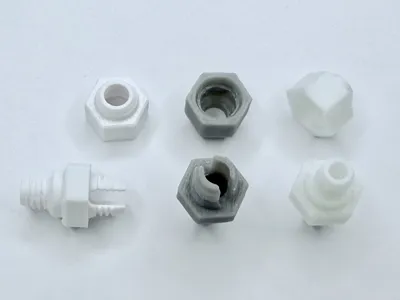
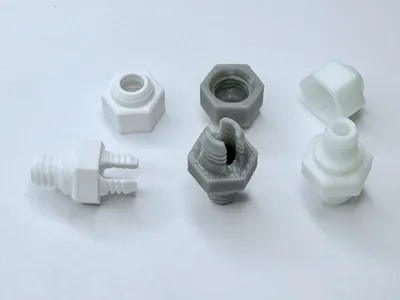
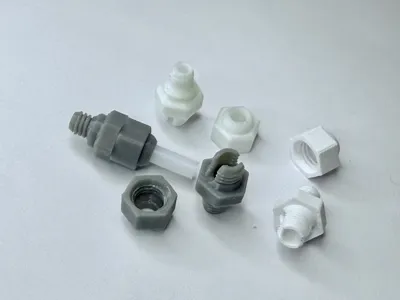
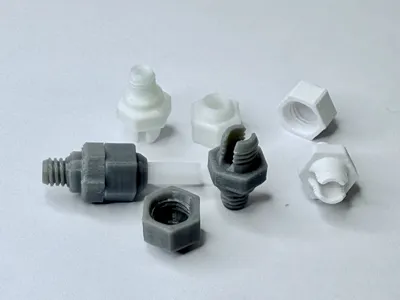
This model includes three parts:
- PC4-M6 coupler
- Cap
- Threaded body
- Tube connector
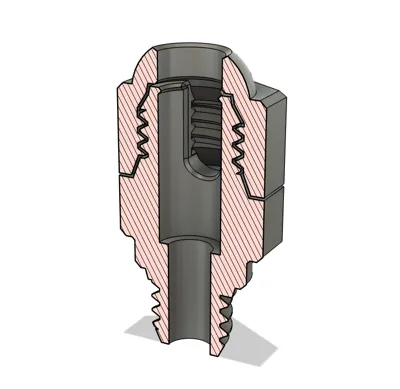
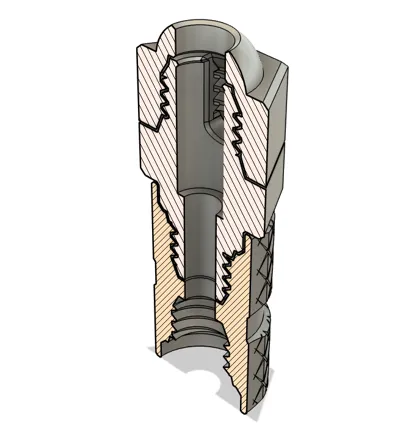
The PC4-M6 coupler accommodates the PTFE tube then narrows to the internal diameter of the tube so that filament can pass through smoothly. Unfortunately, the small difference in size between M6 threads and a 4mm tube was too small to successfully print a coupler that allows the tube to pass through completely. The tube connector has the same smaller internal diameter as the coupler.
This model is designed to accommodate a small amount of material shrinkage. The model's internal diameter for the tube section is 4.3mm, and 3mm for the filament passthrough. With the filaments I tested, the internal diameter of the filament passthrough section is between 2.54 and 2.57mm, but your results may vary depending on your filament and printer settings.
The cap uses M7 threading. While I have not tested it myself, you could potentially replace the threaded cap with an M7 nut.
Threaded parts are designed with 0.2mm or less clearance.
Printing
This model contains fine detail and requires pretty good dimensional accuracy. Please calibrate your printer and make sure your build plate is very clean to ensure a successful print. This model requires some supports to print, but you should find them fairly easy to remove.
I have printed this with a 0.4mm nozzle only. All of my test prints have been done on a smooth plate but should work with textured, too.
Filament
I have tested this design with Bambu PETG HF, a generic PETG, and a generic PLA. If you print these successfully with other types of filament please leave a comment and photo :)
Print orientation
Print orientation matters - these parts include very small printable threads. The PC4-M6 threaded body must be printed in a vertical orientation for good dimensional accuracy but this results in a fragile part. Printing it in a horizontal orientation makes it much stronger, but the tiny internal lip that bites into the tube and holds it securely will not print in a horizontal orientation.
The tube connector can be printed horizontally or vertically. Printed horizontally the threads are less accurate but sufficient to securely screw into the PC4-M6 coupler. I recommend printing vertically.
The provided print profile contains six plates with different options for print orientation. Print what you need:
- PC4-M6 coupler
- Tube connector vertical
- Tube connector horizontal
- PC4-M6 coupler with connector horizontal
- PC4-M6 coupler with connector vertical
- All options
Plates with the PC4-M6 coupler include an extra copy of the threaded body, as it is very easy to break the threads during assembly.
Assembly
Insert the PTFE tube into the top of the cap, then push the tube into the split threaded end until it stops, to ensure the end of the tube is in contact with the inside of the coupler. Press down firmly on the cap as you screw it onto the threaded body. You may hear a click when the threads engage.
Screw one PC4-M6 coupler into each end of the tube connector.
Assembly tips
- Screw parts together finger-tight only. Using tools to tighten threaded parts will likely result in breaking off the threaded sections.
- When inserting the tube, hold the threaded section between your fingers to avoid putting too much leverage on the edge and snapping the part off. The split threaded section must flex slightly to insert the tube.
- If you do break one side of the split threaded section it may still work to securely hold your tube as long as the piece is still attached and you screw the cap down firmly.
- It may be tricky to get the cap to thread onto the body the first time. It is easier to do this when there is a tube inserted than without.
- You may wish to use a deburring tool to clean up the inner edge of the cap if your supports did not detach perfectly cleanly.
Usage
This coupler is best suited for use in areas where the tube and coupler will be supported and motion is minimized, where there is no need to remove the tube once its in place, or as a temporary part until you can get some metal couplers.
Once it is assembled, the weakest point is at the base of the M6 threads. The connector is designed to cup the bottom of the coupler and protect the M6 threads a bit. If you plan to use this as more than a temporary part, I suggest you design your model with a similar support to reduce the shearing stress on the threads.
I have been using these for a few weeks now as couplers in this manual dry box feeder, and they're holding up pretty well considering the usage, which has the tubing and device hanging in the air and is put under a fair amount of stress by being grabbed every time I do a filament change. I've only snapped the threads off two, over dozens of filament changes.

I welcome your comments and feedback! I'm new to 3d printing and modelling. Your input helps me improve.
If you print it and find it useful, please rate! I would also love to see your photos!
Boost Me (for free)
If you found this well constructed and it solved a problem for you, you can Boost me for free! Boosts are a great motivation to keep sharing functional prints to make your life a little easier and contribute to the community. Thanks!

Check out my collections of other models:


Comment & Rating (45)