Magnetic levitation square base


Print Profile(2)

![[A1 mini] Magnetic base - 2 versions](https://makerworld.bblmw.com/makerworld/model/USccd140d21cb1dd/362367564/instance/2025-07-26_3ee66c700cafe.jpg?x-oss-process=image%2Fresize%2Cw_100%2Fformat%2Cwebp)
Bill of Materials

Description
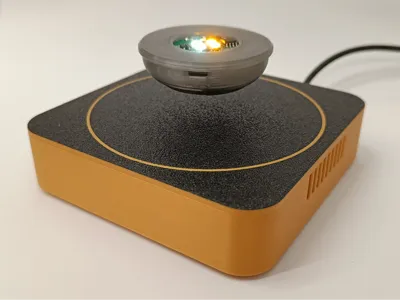
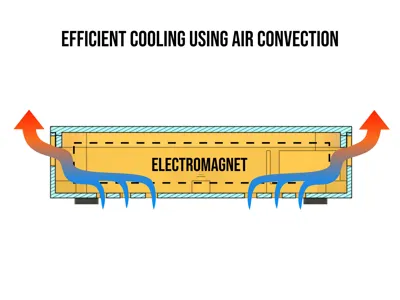
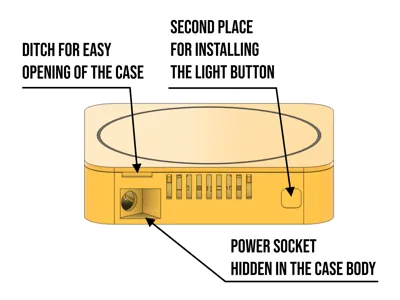
This is a universal square base designed for the "Magnetic Levitation DIY Kit" available in the Bambu Lab store. Unlike the model offered by the official MakerWorld account, my enclosure features a power outlet hidden within the structure and a significantly improved cooling system. This is achieved by using two separate sets of ventilation holes: intake vents at the bottom and exhaust vents on the sides. All of this is maintained within a compact 100-millimeter size.
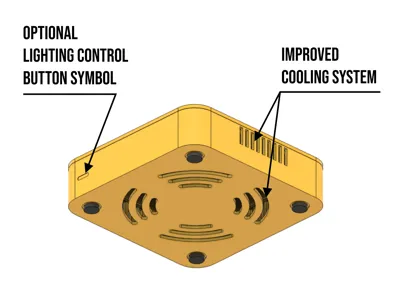
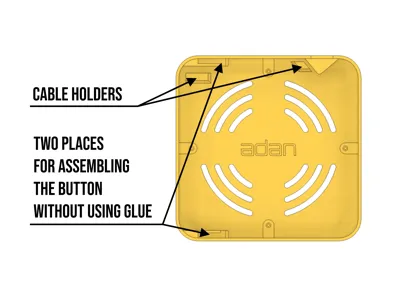
Using an AMS is optional and is only for creating the white circle on the enclosure's lid. To attach the feet to the enclosure, you'll need glue or double-sided adhesive tape (less recommended). The button for controlling the lighting can be mounted in two locations: on the front or rear panel of the enclosure. Two design versions are available: with or without a front symbol indicating the button's location. Both variants offer two mounting points, but only one has the symbol on the front.
Assembly Instructions
1. Glue the four feet to the designated spots on the bottom of the enclosure.

2. Remove the electromagnet from its protective casing, then disconnect both external accessory wires (power outlet and touch button).

3. Install the power outlet into the enclosure. Unscrew the metal retaining ring and thread the wire through the hole. Tighten the ring securely and route the wire into the slot on the left side.

4. Insert the device into the printed enclosure and seat it on the four feet. The power outlet plug and the button wire should be in the upper left quadrant of the enclosure.

5. Choose one of the two mounting locations for the touch panel and place the PCB in it, then connect it to the electromagnet. If you choose the rear panel, the wire and its plug can be pressed into the holder next to the button slot.

6. Arrange both wires at the bottom of the enclosure, and finally, connect the power outlet to the electromagnet.

7. Place the lid on the enclosure, aligning the latches with the ventilation holes. Note that one of the lid's walls does not have a cutout and should face the front of the enclosure.

Boost Me (for free)
License
You shall not share, sub-license, sell, rent, host, transfer, or distribute in any way the digital or 3D printed versions of this object, nor any other derivative work of this object in its digital or physical format (including - but not limited to - remixes of this object, and hosting on other digital platforms). The objects may not be used without permission in any way whatsoever in which you charge money, or collect fees.
Comment & Rating (20)