Pokemon Miraidon - Dual Ride Form (Complete Version 2.0)


Print Profile(3)


Description
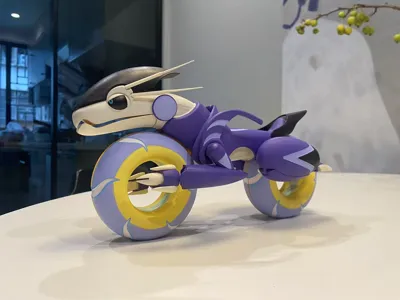
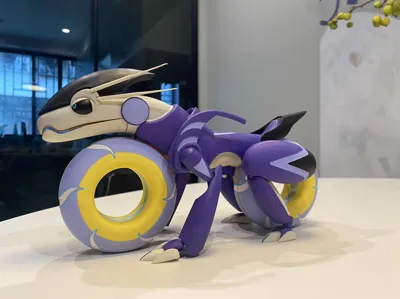
This is version 2.0, capable of transforming between the two forms shown in the image through limb articulation.
Future upgrades are planned (if profitable 0v0).
I've uploaded four versions: monochrome 0.12 variable layer height, monochrome 0.2 layer height, color 0.12 variable layer height, and color 0.2 layer height.
Monochrome 0.12 variable: This version has been personally 3D printed and tested, requiring subsequent sanding and painting.
Monochrome 0.2 layer height: Also printed several times with minor adjustments; (the lower leg and upper arm plates are set to variable layer height because 0.2 layer height is unsuitable).
Color 0.12 variable and 0.2: Simply colorized. Note! My ideal main body requires at least six colors! I omitted yellow (inner tire) and teal (eyeballs), these will need hand-painting.
Recommendation: Print the monochrome 0.12 variable layer height version, then sand and paint to achieve the result in my photos.
Essential tools: water pump pliers for removing supports, a hobby knife/blade for addressing overhangs, and AB-type adhesive (small quantity needed, I used leftover nail-free glue, easily purchased online).
Recommended: tweezers, paint, sandpaper, and 6mm*2mm round magnets (strong magnets are best, I used moderately strong magnets from online, hence the need for 6).
Precautions:
1. This product should have 6mm*2mm round magnets (approximately 4-8) placed in the designated areas (pre-made) on the forelimbs. This is to prevent the forelimbs from drooping due to loose joints.
 The depth here fits one perfectly.
  The depth here fits two.
Use one in each location. Add more if needed; this is on the inside and not visible.
2. Reason for 0.2 layer height being unsuitable for lower legs: 0.2 layer height prints may cause adhesion between the leg and the ball joint of the foot, making it difficult to separate.
3. Reason for 0.2 layer height being unsuitable for upper arms: The area for placing the round magnets may collapse, hindering magnet placement.
4. I've included two additional files: support removal instructions and assembly instructions (including painting suggestions).
5. Painting: Most areas are textured, making painting relatively easy; however, the eyeballs (teal) and the tire tread lines (light blue) are tricky and require care!
6. Regarding scaling: Enlarging may require further cutting of the main body. Shrinking is not recommended due to the concern of the articulated joints becoming too fragile.
Finally: If you create a finished product, please share photos! I'd love to see what experienced painters can do.
Documentation (2)
License
You shall not share, sub-license, sell, rent, host, transfer, or distribute in any way the digital or 3D printed versions of this object, nor any other derivative work of this object in its digital or physical format (including - but not limited to - remixes of this object, and hosting on other digital platforms). The objects may not be used without permission in any way whatsoever in which you charge money, or collect fees.
Comment & Rating (0)