Peloton Breeze Bar


Print Profile(1)

Description
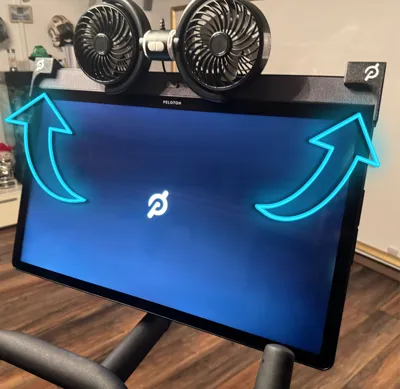
Peloton Breeze Bar – Your Riding Wind for the Living Room
Who knows it? You're pedaling on your Peloton in the basement, your legs are burning, sweat is running, and still: no riding wind!
Sure, a big fan next to the bike helps – but unfortunately, it looks about as sexy as a fan can look.
So I thought: There's more to it! I got a car headrest fan and designed two custom holders in Fusion, which allow an M8 threaded rod to be elegantly attached behind the monitor.
Result: Always a fresh breeze on your face – and stay cool while cycling.
How it works
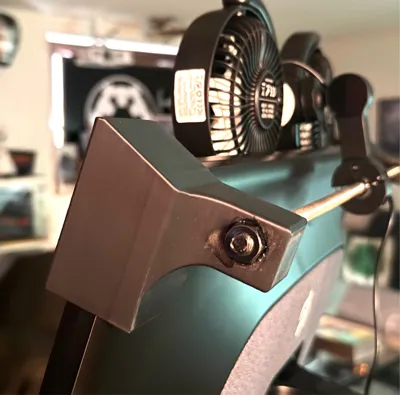
The holders are clamped (not glued!) to the monitor and connected with an M8 rod. Your fan will later hang from this rod. Superglue appears multiple times in the text here, but only for securing nuts – not for "gluing" the monitor, don't worry.
What you need
- the 2 printed holders
- a fan (see below) costs range between 8 and 30 Euros
- a USB wall adapter
- a USB extension cable (unless your Peloton is directly next to an outlet)
- a few black cable ties
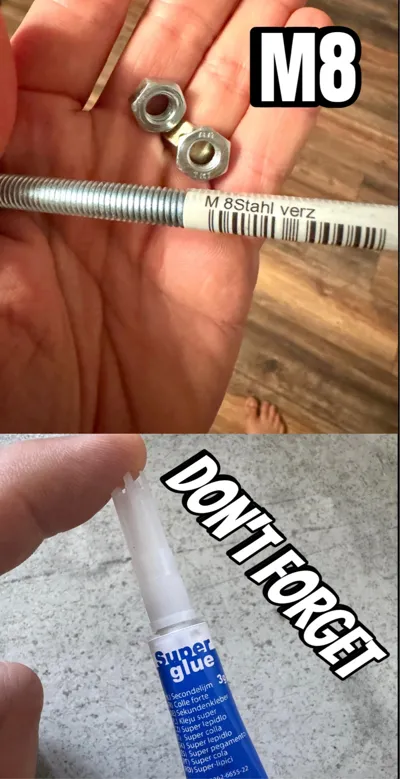
- an M8 threaded rod
- six matching nuts
- buffer material for safety... something to cut with adhesive surface (single-sided used double-sided tape, thin felt gliders or similar – a friend swears by 4 layers of duct tape)
- superglue
Important Notes
- The holders only grip the upper speaker at the front to avoid stressing the touchscreen – therefore, they are only suitable for the Peloton Plus.
(On the regular Peloton, the speakers are at the back, where the holder would rest directly on the screen – not a good idea!) Even if the monitor is robust: I give no guarantee if someone mounts the holders with Hulk-like force.
Please be gentle – they fit perfectly.
- For extra protection: Please glue a thin felt strip or similar into the inner curve of each holder See Image 8
Assembly Tips
Prepare the rod
Shorten the M8 threaded rod to the correct length. In the middle, tighten 4 nuts against each other with a lot of force and additionally secure them with superglue.
This is the mounting point for the fan – it hangs eccentrically, and we don't want it to tip forward during training because the nuts on the rod rotate. And if a clever person now asks: "Why even put nuts on the rod, it holds in the car too", here's the answer: In the car, the rod is vertical, here it's horizontal. In addition, a good sprint already moves the bike well => without a few nice/square nuts, the fan will simply turn forward.
Very important: It's best to let the glue dry overnight.
Insert buffer material
Before you mount the holders, apply a strip of thin double-sided tape (or other soft material) only to the outer curve of the holder – see Image 8.
Important: Do not stick it on the inner sides that will later rest on the front or back of the monitor!
The strip merely serves as a buffer so that the hard plastic does not rest directly under tension on the monitor – it does not stick the holder firmly.
Fasten holders
Clamp them to the side of the monitor (without force!) and connect them with the rod. Tighten until there is slight tension. In between, simply try pulling the holders and rod upwards from the monitor and continue tightening if that still works... it's actually foolproof.
Secure the connection between nuts and rod as well as between rod and holders with superglue – let it cure overnight again.
Mount fan
I bought mine on Temu, but any fan that can be attached to headrest metal rods will work. Simply search on Amazon or the internet for "USB, fan, car" until you find one that fits for mounting on headrest rods (see Image 7). Simply clamp the fan onto the 4 nuts.
Route cables
Use cable ties to neatly route the cable down the bike. Attention: Leave enough slack at the top so that the monitor remains rotatable.
Conclusion
With a little crafting effort and some separate material, the "Peloton-Breeze-Bar" is quickly installed.
I've been cycling with it for weeks – nothing loosens, nothing wobbles, and the breeze is wonderful.
May your rides be long – and ice cold!
Comment & Rating (7)