Electric Guitar Key Cover (3D Print, Customizable)


Print Profile(9)


Bill of Materials


Description
Boost Me (for free)
I am still quite new here and happy to share my first models. Thank you very much for your support
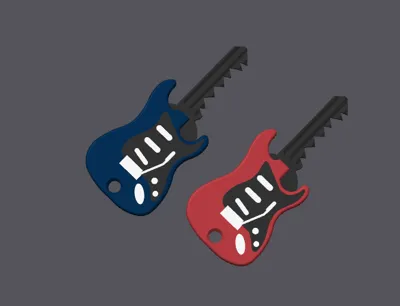
Bring rock 'n' roll to your keychain!
This 3D printable key cover in the shape of an electric guitar gives your house key a unique look. The two-part design is easy to assemble and offers both protection and style. Perfect for musicians, guitar fans, and music lovers
Details:
- Suitable for common standard keys (note dimensions ⌀ 23.5mm)
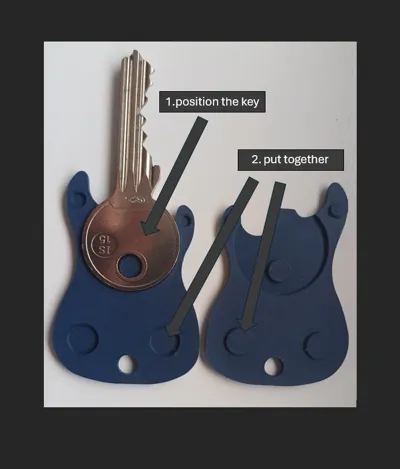
- Two-part plug-in system for easy assembly
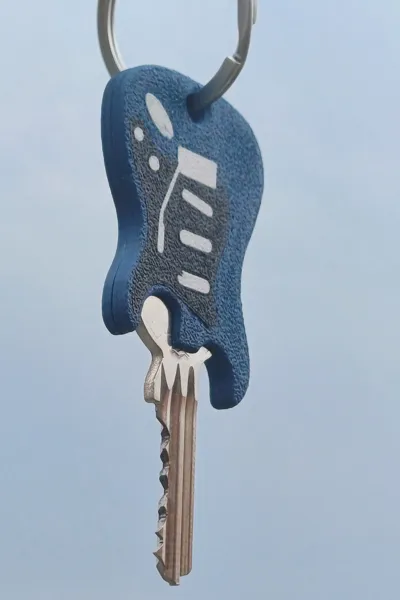
- Ideal as a keychain or decorative cover
- Fits ergonomically in the hand
- Suitable for PLA, PETG, or ABS
- Can be printed in any color
Recommendations:
For the best effect, print in three colors (e.g., red body, black pickguard)
! Note there is an old model which is not customizable and customizable models. !
Instructions: Electric Guitar Key Cover Customization
1. Choose Guitar Size
There are two sizes of the guitar:
- Small → for normal to smaller keys
- Large → for larger keys (otherwise the recess appears too large or the proportions do not fit)
👉 Separate files are available for trapezoid and hexagon (Small and Large)
2. Choose Key Type
Four head shapes are supported:
🔵 For round keys → use the sliders with ◯
◼️ For square keys → use the sliders with ■
Trapezoid (trapezoidal)
⬡ Hexagon (hexagonal, also rotatable)
⚠️ Important Note:
If a shape has been chosen, you only need to set the slider with a red (!) to 0 for the other shapes (e.g., “Square_Position” or “Round_Position”). All other values for this shape remain unchanged!
3. Measure with Calipers
For the key to fit correctly, you need to precisely adjust the pin and slot:
Common values:
- Pin_Position → Distance from the hole in the key head to the outer edge of the head
Pin_Diameter → Diameter of the pin that fixes the key
Round:
- Round_Diameter → Diameter of the head
- Round_Position (!) → Distance from outer edge of head to shoulder
Round_Depth → Depth of the recess
Square:
- Square_Width → Width of the head
- Square_Height → Height of the head
- Square_Position (!) → Distance from outer edge of head to shoulder
Square_Depth → Depth
Trapezoid (separate file):
- Trapezoid_TopWidth → Top edge of the head (narrow side)
- Trapezoid_BottomWidth → Bottom edge of the head (wide side)
- Trapezoid_Height → Height of the head
- Trapezoid_Position (!) → Distance from outer edge of head to shoulder
Trapezoid_Depth → Depth
Hexagon (separate file):
- Hex_Diameter → Corner to corner distance (outer diameter)
- Hex_Position (!) → Distance from outer edge of head to shoulder
- Hex_Depth → Depth
- Hex_Rotation → Rotation in 30° increments
👉 Tip: Always measure with calipers and allow 0.2–0.3 mm clearance, as 3D prints often turn out slightly tighter.
4. Printing Material Recommendations:
- PLA or PETG
- Layer height: 0.1 mm
- Infill: 15–20 %
- Support: not needed
5. Application
Place the key in the bottom half (over the pin). Place the top half on top. Optional: Glue the halves together so the key cannot fall out.
- Place the key into the bottom half over the pin (head in the recess, shaft facing outwards).
- Place the top half of the guitar on top.
Optional:
The two halves can be glued together so that the key cannot fall out.
⚠️ Caution: If you glue the halves together, it will be very difficult to remove the key later!
Test:
Insert the key into the lock. If it doesn't fit → re-measure and correct the values.
✨ Done – your key is now securely and stylishly housed in a guitar cover!
License
You shall not share, sub-license, sell, rent, host, transfer, or distribute in any way the digital or 3D printed versions of this object, nor any other derivative work of this object in its digital or physical format (including - but not limited to - remixes of this object, and hosting on other digital platforms). The objects may not be used without permission in any way whatsoever in which you charge money, or collect fees.
Comment & Rating (203)