MagMate – Parametric Magnet Dispenser


Print Profile(2)


Description
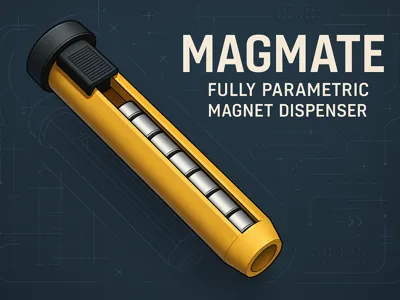
MagMate is a fully parametric 3D-printed dispenser for round magnets. Customizable directly on MakerWorld to match your magnet size and stack height. Insert magnets cleanly, quickly, and without the hassle.
Overview
MagMate is the easy way to handle neodymium magnets in your prints. Instead of struggling to press magnets into tiny recesses, just load a stack into MagMate and push them in smoothly one by one.
Designed in Fusion 360 and exported with full parametric flexibility, MagMate adapts to virtually any round magnet dimensions. Thanks to the Customize function on MakerWorld, you can adjust it in seconds without touching CAD software.
Features
- 📐 Parametric design – works with any magnet diameter and thickness
- 🧲 Stack dispenser – feeds magnets one at a time into your part
- 🔄 MakerWorld customizable – adapt dimensions instantly
- 🖨️ Optimized for 3D printing – no supports, minimal material
- 🛠️ Comfortable grip – easy to hold and press
Print Settings
- Printer: Any FDM printer
- Material: PLA (easy) or PETG (durable)
- Layer height: 0.2 mm
- Infill: 20–30% (Gyroid or Grid)
- Supports: Not needed
- Orientation: Upright
How to Use MagMate
- Print the MagMate body.
- Drop in your magnet stack.
- Place MagMate on your 3D-printed part’s recess.
- Press the slider to seat a magnet flush.
- Repeat until all magnets are inserted.
Tips
- If tolerances are too tight, scale X/Y +0.2–0.3% in slicer.
- Ideal for neodymium magnets between 3 mm and 10 mm diameter.
- Try ABS or PETG if you need extra strength.
- When you customize and the parts appear as “one part” in slicer: use right click → seperate
Boost Me (for free)
support my ideas
License
You shall not share, sub-license, sell, rent, host, transfer, or distribute in any way the digital or 3D printed versions of this object, nor any other derivative work of this object in its digital or physical format (including - but not limited to - remixes of this object, and hosting on other digital platforms). The objects may not be used without permission in any way whatsoever in which you charge money, or collect fees.
Comment & Rating (105)