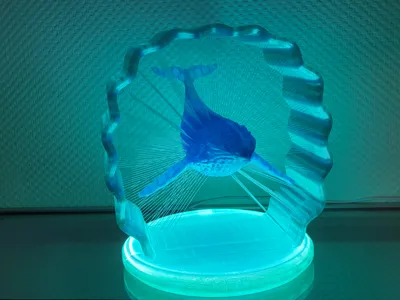
Suspended Whale with LED lighting


Print Profile(4)


Bill of Materials


Description
Hello,
My "floating" whale can be easily illuminated with an LED light strip. For this, I printed the model with a transparent filament. For the print profile, I used Bambu Lab's PETG Translucent. It also works with PLA, of course, depending on your preference.
My LED light strip used had a length of 1m and is designed for 5V with a USB plug. The LED light strip can be easily cut to the appropriate length. A length of 50cm would have been too short.


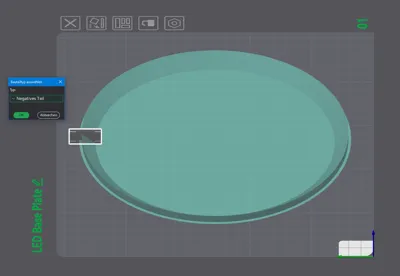
For the cable outlet, I used a negative blocker in the profile so that the outlet can be easily adapted to the thickness of the cable used if necessary.

To precisely join the 2 halves of the model, I planned for connectors to allow for easier fixation. I recommend fixing these with super glue on one side beforehand.

The connector pins deliberately have some tolerance to avoid applying force to the model during attachment.
At this point, it should be noted once again that the strings are very sensitive, especially when handling the model.
For the critical removal from the print bed, I have 2 recommendations:
- Allow the print bed to cool sufficiently to avoid stress in the model during detachment.
(As a print bed, I use the “CyGrip Pro Glacier” from BIQU, with which I have had very good experiences, especially when detaching models)
- DO NOT(!) bend the print bed in the printer to detach the model. I recommend pulling the print bed straight forward out of the printer and then detaching the model on a work surface.
- I have had good experiences detaching the model by holding it on the print bed with one hand and then bending the print bed in small steps(!) over a table edge. This prevents too much force from being applied to the model and the strings from tearing.
Have fun reprinting.
Boost Me (for free)
If you like it, I would appreciate a boost.
Thank you very much
License
You shall not share, sub-license, sell, rent, host, transfer, or distribute in any way the digital or 3D printed versions of this object, nor any other derivative work of this object in its digital or physical format (including - but not limited to - remixes of this object, and hosting on other digital platforms). The objects may not be used without permission in any way whatsoever in which you charge money, or collect fees.
Comment & Rating (3)