Search models, users, collections, and posts

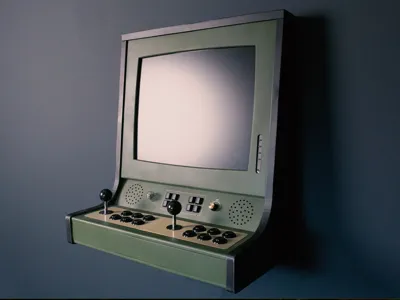
Arcade Wall Cabinet (ARCtron-R Mk2)

Print Profile(2)

All
X1 Carbon
P1P
H2D
P2S
A1
P1S
X1
X1E
H2S
H2D Pro
H2C
X2D
A2L

ARCtron-R_Mk2
ARCtron-R_Mk2
Designer
70.8 h
26 plates
4.5(2)

ARCtron-R (Original Model)
Designer
58.5 h
28 plates
5.0(1)

Open in Bambu Studio
Boost
1295
2969
140
149
1.5 k
98
Released 

Description

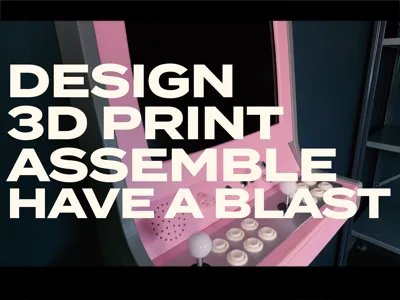
🕹️ NEW UPDATE – ARCtron-R Mk2 Now Available!

The ARCtron-R Mk2 is here — an updated version of the original 4:3 / 5:4 wall arcade cabinet, now featuring the modular, lock-in-place stick panel system introduced with the ARCtron-W.


You can now swap control layouts in minutes — from the included dual-stick arcade setup to a single-player panel with a cup holder (Patreon Exclusive) — while keeping the same compact, classic look.


Parametric Models for the control and stick panel is now in BETA, Early access for paying Patreon members. These lets you customize the panels to fit your exact needs! 


Key changes in Mk2:

  • Interchangeable “lock-in-place” stick panel system
  • Slightly deeper frame (+12 mm) for the new panel structure
  • Compatible with all existing Display Frames and Control Panels
  • Updated parts: Stick Panel, Guard, Bottom and Sides

👉 New builders: Start with the Mk2 files — they include everything you need for the latest version.
👉 Existing builders: The original ARCtron-R (Original) files remain available if you want to finish or rebuild the first design.


The Versus Mk2 Stick Panel Layout is the included one. 


----------------------------------------------------------------------------------


Below is the Original Post / Description:


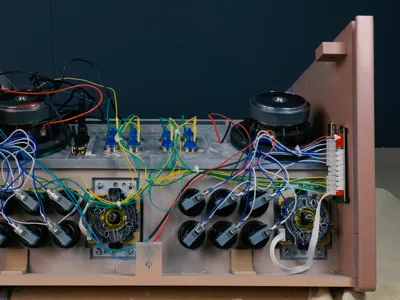
This is a cool one, with a lot of parts and fun design choices for you to make. You can put as much time and effort into it as you want. Sand until you hands bleed and use decals and transfers for button texts to give it that exclusive final touch!


I recommend downloading the Arcade Wall Cabinet ZIP file, as it contains everything. 3MF files, STL, PDF documents like; Parts To Source, Build Instructions and Design Options. You will find it under “Download STL” and the documentation is also found below this description. 


In the 3MF file the parts are pre-arranged and cut to fit the print bed of X1C and P1S. Each part is modified with it´s own settings, like material, support, brim, etc. Some of the parts have more than one version. Be sure to have a look at them and read through the ”Design Options” document about each one. Each part and print bed is named for easier reference.


Some of the plates are empty and you will have to find the part version which fits your

build off to the right in the build plates area and place it on the correct plate. 


Please read all documentation before you start printing. 


-------------------------------------------------


My intension is to keep my projects alive!

If you want to support me and get extra exclusive content in form of optional builds for my projects, basic chat group support, more in depth videos on the builds and access to projects STP files. Please become a Patreon at patreon.com/artifextron


An option for the tier Commercial License is available if you want to build and sell my projects. 

-------------------------------------------------


Next Steps on Makerworld

  • Improve the documentation
  • Adjust print files and add print profiles (If needed)

-------------------------------------------------


Watch me build and showcase the Arcade in this youtube video. Please like & Subscribe! 


-------------------------------------------------


Updates

  • 09/28/25 = Updated the Added_Files.zip with Generic 4:3 and 5:4 screens together with a totally blank one. In the folder you will find both STL and STP files to make it easier for you to modify if you desire. 
  • 09/16/25 = Added a generic display frame for 19'' 4:3 Screens. The inner frame size is 38,6x29cm (15.2x11.4in). No cut out for any physical menu bars. Just a pure frame to work from. You will find it in the “Added_Files.zip”. 

Documentation (4)

Assembly Guide (4)
Build Instructions.pdf
Parts To Source.pdf
Design Options.pdf
ARCtron-R_Mk2_Documentation.pdf

Comment & Rating (140)

(0/1000)

Pinned by Designer
🚀 New Project Alert! Check out my latest build — the ARCtron-W, a modular widescreen wall arcade! It’s fully 3D printed and free to download on MakerWorld: 👉 https://makerworld.com/sv/models/1922534-arcade-wall-cabinet-16-9-modular-arctron-w#profileId-2062972 If you liked this project, you’ll love this new one! 🕹️
3
Reply
This looks sick, I would totally sign up for your patreon, but I have a question and I'm not sure you know this: How does the Pi compare to Mister FPGA in terms of emulation? Mister runs a ton of platforms really well and close to the real thing, it's hardware emulation like a console.. I don’t know much about the Pi, only that it’s always high in demand and hard to get. If I'd go the Mister FPGA route, specifically a SuperStation, could you provide support or do you think there's no difference in the setup? here's a picture of the ports in the back
The designer has replied
1
Reply
I don't know much about the Mister FPGA, but I think this only would replace the Pi as it got the outputs needed.. The cabinet has a button for powering on and off the Pi, I don't know how it would work on this one though.
1
Reply
Replying to @Artifextron :
oh okay, there's a power and menu button on top of the device, I guess that's the only challenge to make it accessible on the arcade enclosure
(Edited)
0
Reply
Replying to @damnyell :
The Pi runs RetroPie Emulator. look it up and see how it compares to the Mister. I don't know much about it myself tbh. And yes as you say, in the current setup the power and menu access would be a bit of a problem.
1
Reply
Update (09/28/25) I added generic display frames for 19'' 4:3 and 5:4 Screens. No cut out for any physical menu bars. Just pure frames to work from. You will find it in the “Added_Files.zip”. NOTE, these are generic frames, I have not fitted them to any particular screens. I have also included a totally blank frame if you want to make your own cut out for the screen. In the Added_Files.zip folder you will find STL and STP files so that you can easier modify your frame if you desire.
(Edited)
4
Reply
Boosted
Do we have to split these ourselves and foresee dowel holes?
0
Reply
Boosted
It turned out to be a very nice project
(Edited)
Show original
1
Reply
amazing! did you use any bondo? what is the wood look? did you use vinyl wrap?
0
Reply
You put the time and effort into this - Looks great!
0
Reply
Thank you! I just wrote a review and my contruction thoughts on your Patreon. This was a really nice project.
The designer has replied
3
Reply
Looking awesome! nicely done :) You really made it your own with all the details 👍
1
Reply
Just wanted to say a very sincere thank you for a really fun build - My main goal was to recycle/re-purpose as much as I possibly could for a nice workshop cabinet, just for me. I already have a two player cabinet as well as a v-pinball cabinet that I've built, and it's in a games room that the kids mostly use. For this I wanted something "unique", single player, low power, and space saving. Your model hit all the check marks! The paint was leftover samples, PC is a 10+ year old ASUS chromebox that I jailbroke and threw a micro SD card into, I had an old Dell square monitor (not the same as the model here, but close), all the buttons and control board are leftover from the other two builds, old speakers, etc. The only part I had to order was an adapter for the HDMI to VGA, and the PLA - so under 100$ in materials First control panel is for Morse - old mouse soldered to a key+arcade button = unique gaming experience!
(Edited)
1
Reply
Boosted
Hi! I just started to purchase some of the parts and will be ordering the rest soon hopefully. Id like to ask for any tips that I should know about, now that I am invested in this project. Id like to say that its a really great design and I absolutely love to build. Please note I bought the Dell P190Sb 19’’ 4:3 as the monitor. Thanks and keep up the great work!
The designer has replied
2
Reply
Happy you like the design, and awesome that you have started the project! Will you make the Mk2 version? As for tips, be sure to dry fit when you do the assemble as the pins can be quite tight, and you might have to use a knife to adjust them a bit. otherwise it´s quite straight forward :) The dell screen is a nice one, works perfectly. Good luck with the build!
0
Reply
Boosted
Replying to @Artifextron :
Thank you! May I ask what is different between the builds?
1
Reply
Replying to @Bennu :
the Mk2 has a different stick panel frame which lets you swap stick panel layouts. So you are not locked int one setup.
1
Reply
This is awesome! I've been back and forth on building a cabinet, but I like how compact this is and wall hangable. I'd probably go French cleat for hanging it. FYI, the project download link gives a 404 error for me!
The designer has replied
2
Reply
Thanks for the feedback and letting me know about the link, it should work now :) It is actually modeled with a french cleat, and the part is in the folder. works like a charm!
1
Reply
Replying to @Artifextron :
@Artifextron Thanks for fixing the link! Quick question. How do you think PETG would hold up over ABS? I only ask because I'm not keen on printing that much continuous ABS on my machines, due to the potential VOCs and fumes. I have Bentos and various other activated charcoal filters in place, but yet I hesitate to print ABS for more than a couple hours and only on rare occasions when it's vital for function.
3
Reply
Replying to @Vustadumas :
I think PETG or PLA will work fine, I only choose ABS as its easier to sand while post-proccess
1
Reply
Print Profile
ARCtron-R (Original Model)
⭐️⭐️⭐️⭐️⭐️ This is an awesome project and I’m really happy with how the final build turned out. The design is super cool and makes for a great finished arcade cabinet 🤩 That said, I’d consider this an intermediate to expert level build. It’s not overly difficult, but it does require patience, attention to detail, and some problem solving along the way… especially during assembly and fitment. One important thing to note: MK1 and MK2 parts are not interchangeable. I learned that the hard way, so make sure you commit to one version before getting too far into the print process. My biggest issue was with the MK2 layout- - the Player 2 joystick sits too close to the Player 1 buttons, which made it feel cramped during use. Because of that, I personally think the MK1 layout is the better option ergonomically. Overall though, this is a fantastic build and absolutely worth the time. I’ll definitely be printing another one soon, likely sticking with the MK1 version next time.
0
Reply
Parametric models for both Stick and Control Panels is now in BETA, and Early Access for Patreon Members. These lets you customize the layouts to fit your exact needs! https://www.patreon.com/Artifextron This parametric model will be released publicly in the future.
0
Reply
I've started printing this project, really looking forward to getting it working. I've just finished the Dell 1914S Display Frame, and the cutout for the buttons doesn't line up like in the picture you have. Did you disassemble the monitor and remount the buttons? The monitor itself fits perfectly in the recess, but the monitor buttons are covered.
The designer has replied
1
Reply
Awesome that you have started the build! If I remember it right I cut out the whole button part from the screen frame, I did not pick apart the buttons from the original frame in this case. It was easier to just keep them as they were. So in short, once the I had the cut out part I could arrange it more freely in the frame. I can upload a photo of how I cut it, but I dont have the cab where I am now, but I can fix it in a day or two.
1
Reply
Replying to @Artifextron :
Awesome, thanks! I'll still be printing for a couple weeks yet, just glad to know I didn't print it wrong somehow.
0
Reply
Replying to @DrLabRatOry :
Here you see how I made it. Just cut out the plastic frame from the original screen and glued it in place.
1
Reply

License

This user content is licensed under a Standard Digital File License.

You shall not share, sub-license, sell, rent, host, transfer, or distribute in any way the digital or 3D printed versions of this object, nor any other derivative work of this object in its digital or physical format (including - but not limited to - remixes of this object, and hosting on other digital platforms). The objects may not be used without permission in any way whatsoever in which you charge money, or collect fees.