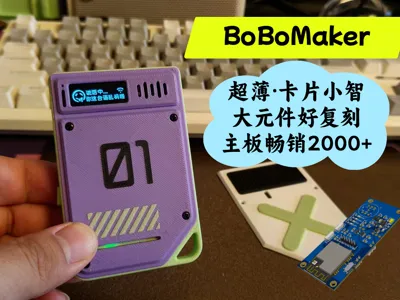
BoBoMaker Card Xiaozhi AI Voice Chat Robot


Print Profile(1)

Description
Project Introduction
[Replication Discussion Group: 192429844, password: bobomaker]
JialiChuang Open Source Address: Card Xiaozhi·2k Sales·High-Value Large Components Easy to Replicate by BoBo - Lichee Open Source Hardware Platform
Hello everyone, I'm a DIY enthusiast from BoBoMaker. I enjoy making small circuits, designing 3D drawings, tuning large models, and developing programs... I started working on voice robots last September. Later, I saw Brother Xia's project, and since I was new to it, I chose the easiest breadboard to integrate and develop, which led to this current board. The internal version number is v1.9, and it seems quite stable at present, with extremely low replication difficulty; even primary school students above grade 3 can replicate it.


These are all made by me

Project Features
1. Can connect to Brother Xia's Xiaozhi server, or connect to a third-party Xiaozhi protocol server to achieve very realistic conversations with AI;
2. Simulated chat with anime personality and voice (I recommend my own Bobo server, O(∩_∩)O, the emotions are lifelike after calling the Doubao Pro model);
3. Call third-party MCP to implement various functions, such as playing API music, live stream interaction, checking weather, checking news, etc.;
4. Serves as the core for many recent AI plush toys;
5. Integrates with HomeAssistant to achieve smart home control.
Project Parameters
The main components used on this circuit board are as follows:
- ESP32S3-N16R8 module: main control, responsible for communication with the server, local amplifier, and mic audio processing;
- INMP441 module: I2S digital microphone;
- MX98357 module: I2S amplifier, used for connecting to speakers;
- MCP73831T: Charge and discharge management;
- AMS1117-3.3RG: Linear voltage regulator, outputs stable 3.3V to power the main control, microphone, and amplifier.
Principle Analysis (Hardware Description)
The board is divided into three main modules: main control, audio, and power supply:
This project primarily receives and processes voice signals through the I2S digital microphone, sends them to the server for speech recognition, large model invocation, and sound generation, which is then returned to the device for playback. Borrowing Brother Xia's diagram:

The following diagram might be more intuitive

I added very stable power management based on this

Software Code
1. The firmware is written using the IDF framework, code repository: https://github.com/78/xiaozhi-esp32
2. Python server code for the Xiaozhi protocol: https://github.com/xinnan-tech/xiaozhi-esp32-server
Hardware List
Except for the microphone and amplifier, all other components can be purchased with one-click ordering from Lichee EDA:
The BOM list is in the attachment. Except for the items listed below, all can be purchased with one-click ordering from Lichee EDA.
[Disclaimer: The following links are for reference only, as the prices were suitable or in stock at the time. If you can find other options, as long as the model and wiring are correct, feel free to use them]
- INMP441 module: https://e.tb.cn/h.S2X7DJf6R69sYGH?tk=7EKM4uDVJSv It doesn't have to be this specific link; as long as it's this model, it's fine. Note: Make sure to choose the version without soldered header pins, otherwise those pins will be difficult to remove.
- MX98357 module: https://e.tb.cn/h.S2XkOnCt1eGhQT3?tk=05op4uDSW5o It doesn't have to be this specific link either. As long as you choose the 98357 chip, and it must be the slightly more expensive, larger chip version (small chips have a high rate of missed soldering and are prone to being faulty; money is not the issue, but you'll have to remove and replace it, which is time-consuming and laborious), choose unsoldered.

- Screen: https://e.tb.cn/h.S2k18epK2n6dHye?tk=be7s4uDtLok , must choose SSD1306 driver, resolution 128*32

- Speaker: https://e.tb.cn/h.S2XAFLblAlyqT24?tk=adr54uDFUCs , choose 2030 model side-firing, 1.25 terminal

- Battery: https://e.tb.cn/h.S22b5r3DmLok32B?tk=FJo24uDwprg , choose 1.25 terminal, forward connection

- Screws: M24 8 pieces, M26 4 pieces: https://e.tb.cn/h.S224lHOP4FL8koJ?tk=zXiY4uxYQec

Assembly Tutorial
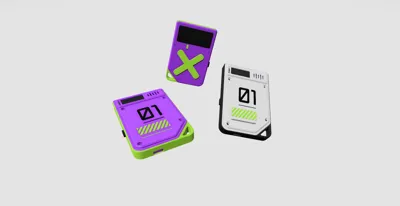
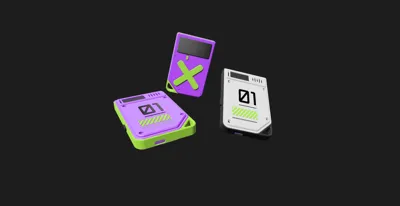
First, a family photo:

1. Assemble the top cover (M2*4 4 pieces)

2. Secure the circuit board (M2*4 4 pieces), then use hot glue to fix the screen, speaker, and battery

3. Install the back panel (M2*6 4 pieces)

Comment & Rating (0)