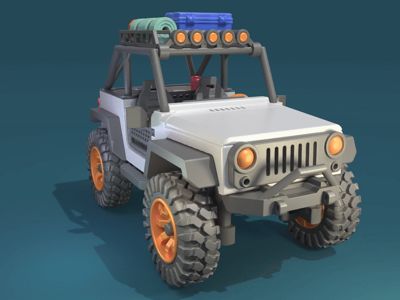
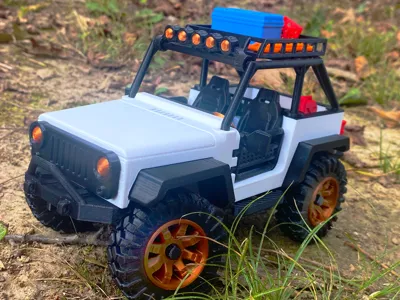
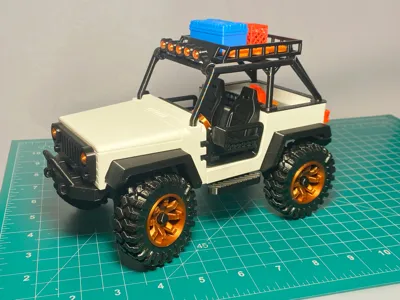
Offroad Rock Crawler Jeep


Print Profile(3)


Bill of Materials


Description

🚙 OFF-ROAD ROCK CRAWLER JEEP 🛞
Bring a piece of off-roading indoors with this model kit. This rugged vehicle is inspired by Jeep, Bronco, 4Runners, & other rock crawlers. The kit can be printed entirely without a multicolor system, no AMS required. Each part has been designed to minimize the appearance of layer lines, reduce support waste as much as possible, and utilize as little color swaps as possible (If used at all for minimal multicolor pieces).
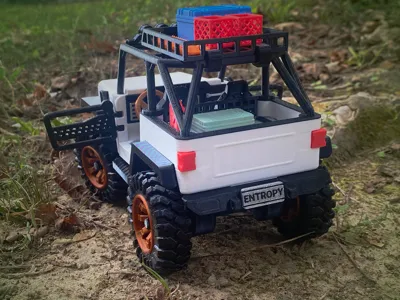
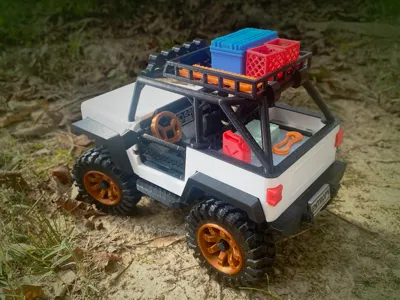
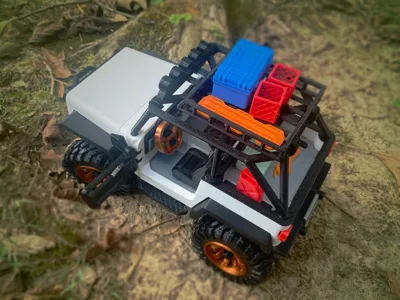
🎁 Bonus: Several accessories are included to go into and on the vehicle, giving it extra character and style.
🎨 Customize: The design includes a blank license plate as well as the one pictured. Create a personalized plate!

SIZE:
~210mm Long
~110mm Wide
ASSEMBLY:
Step 1 - Wheels
 |  |
| Push each tire half onto the rim. Align with the 2 snap holds and press down evenly to join. | Repeat the process until you have all four wheels assembled. |
Step 2 - Underbody
 |  |
| Press the front axle into the wheel. I recommend using a screw driver or something similar to push directly within the C shaped recess without risk of breakage. | Once the front axle is attached snap the front wheel assembly onto the main car underbody as shown. |
 |  |
| After both front wheel assemblies are on you can slide in the steering linkage. This will allow the wheels to turn as one. | Slide the rear axle through the back of the car underbody. |
 |  |
| Press the wheel onto the axle using firm but even pressure. | Place the side steps on top of the completed underbody. The side bar steps will be held in place when the body is attached later. |
Step 4 - Main Body
 |  |
| The back bed snaps into the back of the seat bed. | Put the rear most pins of the body in first and flex the outer walls of the body slightly to get the remaining pins secured. |
 |  |
| The back fenders slide up from underneath and snap into the openings in the rear bed. | The rear tail lights slide into place as shown. |
 |  |
| The seats slide onto the bed as seen above. Use even pressure without twisting to avoid shearing off the locking mechanism. | The rear fender slides into place and locks on the lip seen here. |
 |  |
| Add the plate. | Set the assembled body aside for assembly later. |
Step 5 - Front
 |  |
| The font fenders snap in from bellow. Gently flex the hood to get the fender snapped into place. | Insert the headlights and press firmly. |
 |  |
| The grill affixes over the headlights to further hold them in place. | The front fender locks into place as shown. |
 |  |
| Line up the dashboard and insert the dashboard holding piece. | The front can be set aside for final assembly. |
Step 6 - Top
 |  |
| Press the top light inserts into their housing firmly. | Attach carefully to the roll cage top bar. |
 |  |
| Slide the front of the top rack under the top light bar. | Use the top rack clips to attach the rack. Note the outer edge is beveled slightly to fit correctly in the position shown. |
Step 7 - Final Assembly
 |  |
| Push the main body into the hood. | Press the doors into place firmly to lock them into their hinge. |
 |  |
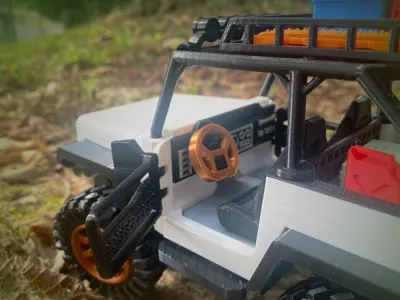
| Press the steering column down onto the steering wheel. | Press the steering wheel into its recess. |
 |  |
| The entire assembled body can then be snapped into place on top of the under body drive train. | The top can now be inserted into the body to complete the assembly. |
ACCESSORIES:
All the accessories pictured below can be added to create a more authentic look. These items fit loosely in the back bed or within the top storage rack.

If you've enjoyed feel free to leave me a comment or picture. I always enjoy seeing builds of my models!
Boost Me (for free)
I have no expectation of boosts, but if you appreciate the massive amount of work that goes into these projects a boost is very much welcome! Cheers!
License
You shall not share, sub-license, sell, rent, host, transfer, or distribute in any way the digital or 3D printed versions of this object, nor any other derivative work of this object in its digital or physical format (including - but not limited to - remixes of this object, and hosting on other digital platforms). The objects may not be used without permission in any way whatsoever in which you charge money, or collect fees.
Comment & Rating (49)