Spooky Haunted Halloween Door Knocker


Print Profile(0)
Description
KNOCKER UPDATE - The code pack is posted. There are some placeholder sound files and instructions on programming for those going animatronic. I’ve a couple more things I’m working on for the software and will update when I get those. Bambu made it impossible to verify this model with a print profile. Sorry Handy users but the print profile now has to go into the regular files section in the downloads button.
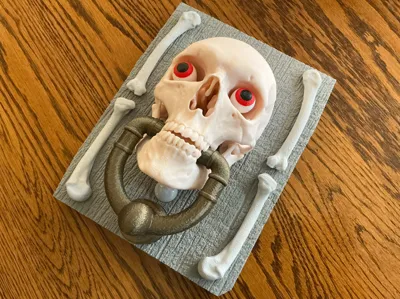
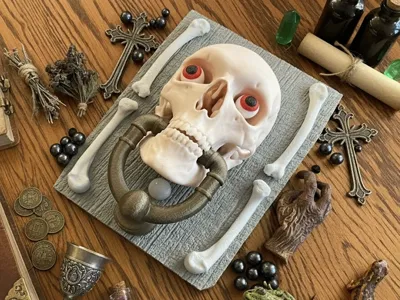
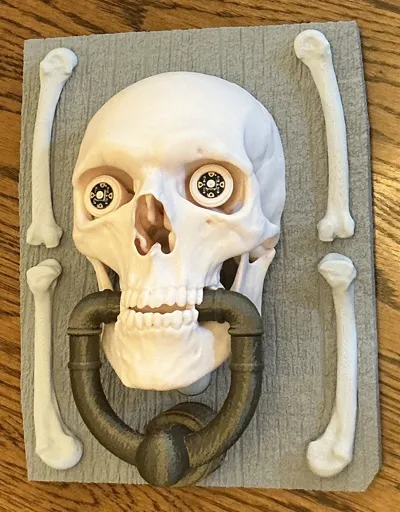
You can build this door knocker as a passive display, functional unit, or as a “haunted” animatronic door knocker operated by an Adafruit Prop-Maker microcontroller board. Since all the animatronic provisions are built into the model, those of a mind can display it this year and animate it for next. It's the same model. If mounting outside, might use some 3M Command or similar removable mounting tape to help keep it on the door so ghouls, ghosts, or goblins don't abscond.
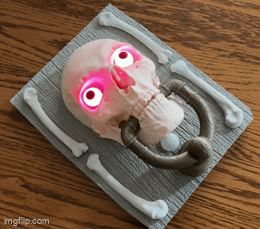
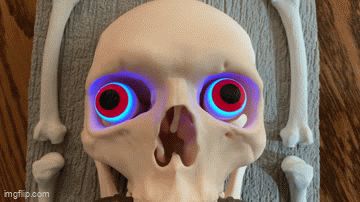
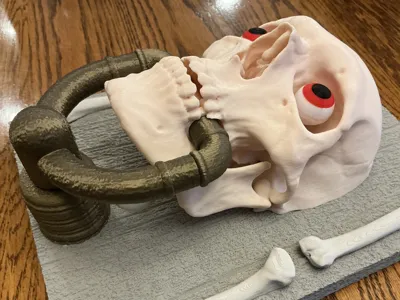
If built as an animatronic, the door knocker can play back sounds, animate the knocker movement, light-up RGB Neopixel eyes, and use a passive infrared detector to know if people are approaching or gone to trigger the animations. When the door it’s on opens or closes the accelerometer can detect that and play squeaky door noises. (Not yet in the code.) It runs on a small Li-Po battery and has an on-off switch. The skull is about ¾ full size.
I have mine loaded with 50 different sound files from various movies (Beetlejuice, Young Frankenstein, Poltergeist, Nightmare on Elm Street, Haunting of Hill House, Sixth Sense, and It) divided into greetings, loitering taunts, and leaving taunts, and special purpose sounds.
It only knocks the knocker when it sees new heat targets. But if the targets loiter there are taunts, and when they leave there may or may not be a taunt. Tap his head and he complains about messing up his hair. He also has a railroad crossing mode with a train horn and a Futurama hypnotoad mode. He works surprisingly well. But you’ll need to collect your own sounds — There’s legal issues if I distribute what I collected or they would be included. Details on collecting and formatting are in the programming zip file.
For static/passive display you just don't need/use the pushrod, servo spacer, or gear - or electronics. Just print and enjoy!
Disclaimers: The skull and bones models are Courtesy of the National Library of Medicine. This “Haunted Door Knocker” uses skull and bones models from an inmate who was convicted of murder and sentenced to death but donated his body to the Visible Human project - true story! The data set became license-free in 2019 and is quite high quality. (https://www.nlm.nih.gov/research/visible/visible_human.html). The National Library of Medicine does not endorse and is not in any way associated with this project other than making the data available. Sincere thanks for this data! The textures used in this model are credit to pexels.com and are license and royalty free. They also have no other connections to or endorsements of this model. Thanks to them as well!
Because of the detail in the bones and in the textures, the prints can take a while. The backplate print is over 11 hours (X1C) thanks to the wood grain texture but it looks pretty good in wood. The rest isn't too bad but the skull is an additional 7.5 hours.
The prints are pretty straightforward. Get it all printed and cleaned up and we can start assembly (and programming if going that route). Needle nose pliers are handy for getting all the tree supports out of the skull. I used all Bambu PLA. Beige for the skull and knocker actuator parts, gray and beige for the backplate, and bronze for the knocker parts. NOTE: The texturing on the backplate tries to lift the backplate off the build plate if the backplate inadvertently gets moved before printing. When you slice, double check that the back of the backplate prints as a single piece on the build plate. If there are 2 or more distinct regions, just use the Lay on Face tool in Studio to put it back on the plate properly and reslice.
More realism ALERT: There is another medical skull here (the uploader's - very cool) and the makers have had huge fun painting the skull and making it more realistic. Over there they discuss lots of techniques to weather it, paint it, and make it look more real, and have lots of photos to show the results. Besides enhancing the skull, the wood grain backplate can also have some fun with dark washes to highlight the “grain”, etc. https://makerworld.com/en/models/157167-human-skull-medical-scan-crane-humain
Building:
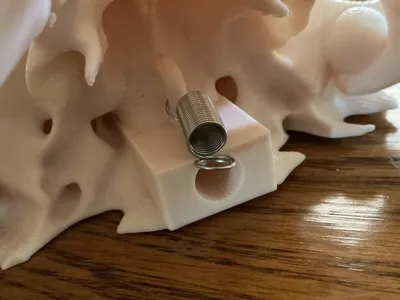
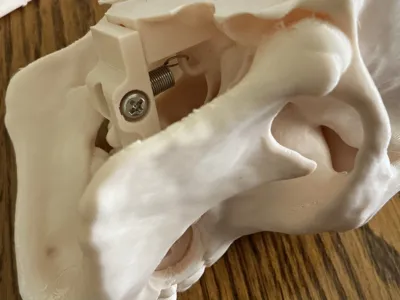
Animatronic & Static Display: The skull bits get assembled first. Open one end up a little of a 0.65x6.5x10mm extension spring and attach it to the skull loop above the pushrod exit (the rectangular part on the low back of the skull with the hole in it). Bend the spring loop back closed to secure it. Put the lever in position (note the position/orientation of the lever) and pull the opposite spring loop into the hole and capture it with an M4x16 machine screw. The spring is optional for static display but will let people pull and release it for a nice “thunk”.
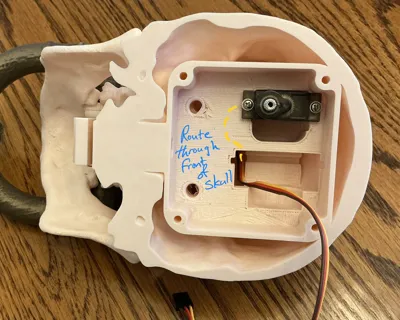
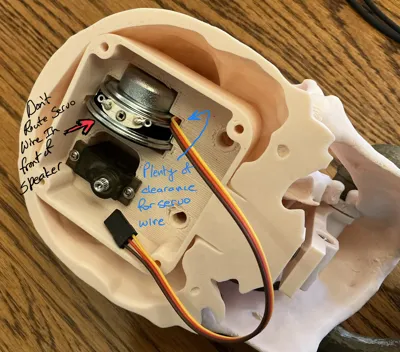
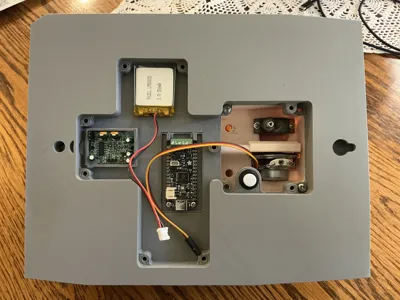
Animatronic Only: Mount a 90 degree micro servo in the recess for it using the screws provided with it but don't install the output arm yet. The output shaft should be at the lower end when it is secured into the bay as shown in the photos. Note the servo offset position. Be sure it's positioned as shown before securing it with the screws included with the servo. Note the servo wire routing - route the wire into the front of the skull and up through the speaker recess. See photos. It's only slightly tight with the wire there but it will go with finagling. There are pilot holes for the mounting screws. Those should line up with the servo mounting holes. There are photos showing the gear placement that show the original way I routed the servo wire next to the servo but this newer way is much better.
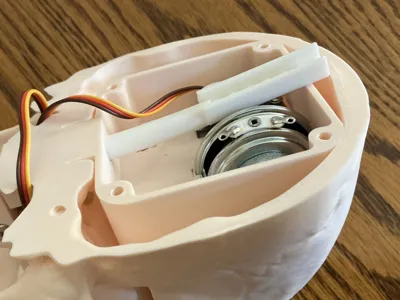
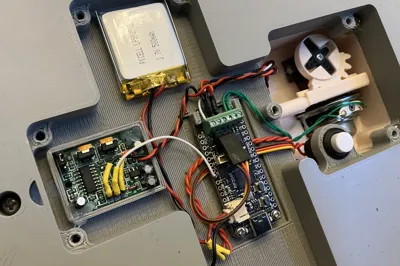
Animatronic Only: Insert the pushrod from the electronics bay into the tube as shown but don't install the servo output arm yet - we need the software to get the servo in proper position to install the output arm. The pushrod has a cut in it to clear the speaker and also need less bending getting the pushrod into position. See photos. Trim a servo output arm where it fits in the gear recess. The part of the output arm that fits in the gear has a round section that fits over the servo output shaft. Be sure it fits in the hole in the gear. It will be tight but the output arm needs to seat fully into the gear. When you actually position the gear on the servo output, you will place the little servo spacer in position, locate the gear properly, and secure it with a small screw supplied with the servo. But again, if you try fitting the gear to the servo now just to test (good idea), it has to come back off for programming. Secure the speaker in place with a dab of silicone on the magnet and route the servo wire as shown in the photos. Don’t pinch the wires but there should be no trouble routing them next to the speaker.
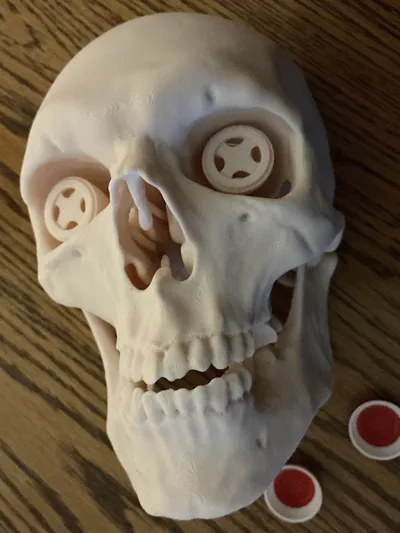
Animatronic Only: The eyes have printed-in eye stalks with recesses and wire paths for Adafruit Flora Neopixels. Those get +5V, Gnd, and Neopixel signal from the Adafruit Prop-Maker and the signal output of the left eye feeds the signal input of the right eye in a daisy chain. Solder light gauge wires to the Flora neopixels and thread those down the eye stalks and secure the Floras with dabs of silicone in the center of each eye stalk. Tape the wires out of the way for now. Solder wires to the speaker and slip it into position with a dab of silicone to hold it in place. See photos for details. Don't glue the eyeballs over the neopixels just yet - we need to test everything first.
Static Display Only: Glue the eyes on the stalks using your favorite glue.
Animatronic & Static Display: The knocker gets assembled into the skull by first setting the lever in proper position and using the cross pegs to attach the elbows at each side through the bearing circles in the teeth. They are a slightly tight fit but are free to move when properly seated. Insert the cross pegs into the elbows first then connect the elbows to the lever first. Once those are fully seated, you can seat the knocker hammer. See photos for proper positioning and be careful to orient the knocker properly. Be sparing with silicone or whatever glue you use - you don't want to gum up the action. Let the glue set up so the assembly is and stays coplanar.
Static Display Only : Make sure the knocker moves freely and no glue or silicone has made its way into the knocker bearing embedded in the teeth.
Animatronic Only: You should be able to test the action by pushing on the pushrod up by the servo. Don't go any farther assembling until the knocking action is free. Some plastic-safe lubricant may also help in the bearings in the bite region and the pushrod.
Animatronic Only: Attach some wires to the pushbutton and mount it to the backplate in the hole provided (it actuates from the back) and secure with its threaded retaining ring. See photos. Mount the Prop-Maker board in position in the backplate (see photos) with M2.5x6 screws. Mount the LiPo battery using some double-stick tape. Carefully bend the pins of the PIR sensor over some so the connector can fit under the backplate cover. Mount the PIR sensor as shown in the photos with dabs of silicone to hold it in place.
Animatronic & Static Display: Use four M4x12 machine screws to secure the skull to the backplate. Admire your work - It's pretty cool, no?
Animatronic Only: Connect the speaker, neopixels, and servo to the Prop-Maker and double check your work. Polarity doesn't matter on the speaker but it does on the neopixels and servo. Make sure they are connected as shown. You need to carefully bend the servo connection pins over a bit so the modular connector can clear the backplate.
Animatronic Only: If you left the gear in place on the servo, remove the gear before wiring up and connecting the battery. Wire up the battery and pushbutton switch so you have off/on control.
PARTS LIST for Static Display Door Knocker:
1 each 0.5x5x10mm extension spring (MakerWorld - BA005 https://us.store.bambulab.com/products/extension-springs)
5 each M4x10mm machine screws (knocker peg mount and skull to backplate mount)
PARTS LIST for Animatronic Door Knocker:
1 each 0.5x5x10mm extension spring (MakerWorld - BA005 https://us.store.bambulab.com/products/extension-springs)
1 each Adafruit Prop-Maker (https://www.adafruit.com/product/5768) - $19.95
1 each 3.7V 500 mAh LiPo battery (https://www.adafruit.com/product/1578) - $7.95
1 each Adafruit PIR Sensor (https://www.adafruit.com/product/189) - $9.95
1 each Speaker 4 ohm, 5W, 40mm diameter (https://www.adafruit.com/product/3968) - $4.95 (1 each)
1 each 180 degree micro servo w/clutch protection (Bambu Maker Supply PG001 - $5.49 or Amazon ASIN B0BWJ4RKGV 2/$8.88)
(https://us.store.bambulab.com/products/9g-servo-motor-with-clutch-protection)
1 each 12mm Self-Locking Latching Pushbutton (Amazon ASIN B075VBV4QH - $5.99/12)
Adafruit Flora Neopixels pack of 4 (https://www.adafruit.com/product/1260) - $6.50 (2 Flora neopixels required)
Wire, solder, plastic-safe grease, silicone seal, a USB-C cable and 500mA (minimum) USB-C power source
PROGRAMMING:
Programming Progress: V1.2 of Knocker is up! It adds a little better gating of events and a door creaking sound when the accelerometer detects the door opening or closing. The gating for the door swing is seeing a small acceleration tangent to the arc the knocker makes when the door opens or closes. You’ll get the most correct actuations if you jerk the door a little more at the start of movement. The program has a threshold that needs to be exceeded in the accelerometer z-axis to trigger the creak that can be adjusted in the code if it’s too sensitive or not sensitive enough.
The code is in the files section. When building it’s handy to refer to the photos to plug in the servo. That has polarity to it but can be plugged in either direction. And to be clear, the PIR signal wire connects to D12 on the Prop-Maker. The red/black power wires for the PIR pick up 5V and Gnd on the screw terminal connectors on the Prop-Maker where the neopixels also get their power. It was more clear to show them connecting on the right Flora neopixel but the better place is at the terminal block.
Get your sounds! I just used a USB sound card dongle and a cable to get audio off my TV and called up various movies to play the tasty bits while recording using a free Windows/Mac/Linux program called Audacity. You want to trim them to just what you want and save them as mono 16bit 11025 samples per second .wav files in 8.3 naming format. Capital first letters set when to use the clips - Gxxxxxx.wav for greetings, Txxxxxx.wav for taunts, and Lxxxxxx.wav for files to play as people leave.
Another reason to collect your own sounds (besides not getting me in trouble for copyright violations) is the tone you want to set for the target audience. While recording the ones I’m using it was striking the range of scary/horror/comedy and some could be offended, scared, or bored depending where you aim and your audience.
All the details you'd ever want to know about the Prop-Maker, programming it, and how to customize the software is at Adafruit.com. The resource for the Prop-Maker is at https://learn.adafruit.com/adafruit-rp2040-prop-maker-feather/overview. Adafruit is big into STEM and making electronics fun. Highly recommended! The Prop-Maker is an amazing set of features perfect for these kinds of projects.
And big big thanks to MaKim and PrinterMcGee for productive discussions and tips! Thank you!
License
You shall not share, sub-license, sell, rent, host, transfer, or distribute in any way the digital or 3D printed versions of this object, nor any other derivative work of this object in its digital or physical format (including - but not limited to - remixes of this object, and hosting on other digital platforms). The objects may not be used without permission in any way whatsoever in which you charge money, or collect fees.
Comment & Rating (3)