


Print Profile(2)


Bill of Materials


Description
Boost Me (for free)
A boost supports me and shows the special added value of a model. Thanks to all supporters.
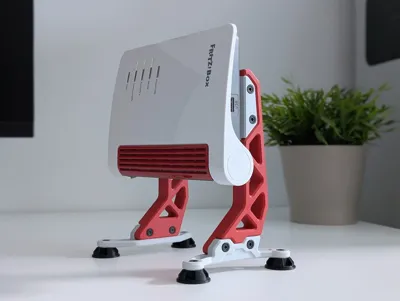
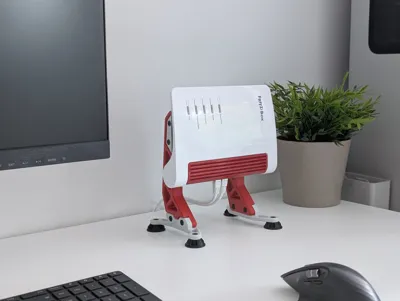
FRITZ!Box stand - Industrial
A brief history: Originally, I just wanted to design a simple stand for my FRITZ.Box router to improve the Wi-Fi signal and optimise cooling. It actually worked – but then the project escalated somewhat. In the end, it turned into an over-engineered stand with an industrial design.
I wanted to share the holder anyway, now it has become a bit more elaborate, but it also looks much better – I hope you share my opinion.
Required materials
- 8× M3 x 16 mm machine screws
- 4× M3 x 12 mm machine screws
- 12× matching M3 nuts
- Hex Screwdriver
- Filament of your choice (feel free to get creative with the colours!)
I used this screw set* for this model.
Customisable holderSince the project has already gotten a bit out of hand, I have also uploaded two customizable versions of the mount. One version is for the ventilation slots: this allows you to individually adjust the spacing between the slots as well as the material thickness.
The second mount is for the screw holes on the back: here, you can adjust the spacing between the holes and several other parameters.
Simply click "Customize" at the top, select a mount, and modify it to your liking; you can then download it directly as a 3MF or STL file.
Standard dimensions of the holder The bracket should fit most current models – I use a 6660 and 7530.

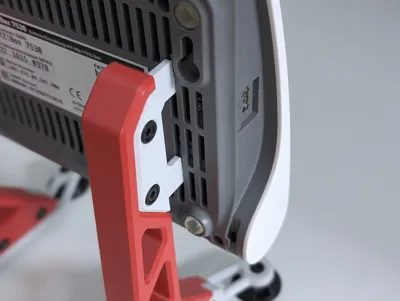
Standard dimensions for the screw hole mount The mount is designed for model 7530 and identical models.
 |
Finally, there are some brief assembly instructions that show you the correct order for setting up the Fritzbox stand – so that assembly isn't too fiddly.
Assembly
When assembling, pay attention to the spacers. There are two different types: one for the screw side and one for the nuts with a matching hexagonal recess.
#1 Holes
I printed the holes in the main arm and feet closed, which has the advantage of eliminating the need for supports and also producing a better print result. Since it is only a thin layer, you can easily cut the hole open with a sharp knife or use a suitable drill bit.

#2 The feet
When you start assembly, it is best to begin with the base, as this will make it easier to assemble the remaining parts. Use the two M3 x 12 screws for this.

#3 Holder
Then screw the bracket onto the main arm. Use two M3 x 16 screws for this.

If you use the hanging solution, you also screw it in using two M3 x 16 screws.

#4 Stand
Then screw the stand to the main arm. Use two M3 x 16 screws for this as well.

You will need to repeat the assembly process twice, once for the left and once for the right stand for the Fritzbox. - Done
It's quite a niche model, but I'm looking forward to seeing the first prints and your feedback with pictures – especially which colour combinations you use.
Note: Links marked with a * are affiliate links. If you buy something through them, I’ll get a small commission. The price stays the same for you – and you’ll help me keep sharing cool 3D printing content. Thanks a lot! 🙌

Changelog |
07.06.2026 I have added a parametric version for the screw holes on the back. |
12.10.2025 Released |

More models from me


Boost Me (for free)
A boost supports me and shows the special added value of a model. Thanks to all supporters.
Membership
The membership is intended for users who want to use my model commercially or as a small support for creators.
License
You shall not share, sub-license, sell, rent, host, transfer, or distribute in any way the digital or 3D printed versions of this object, nor any other derivative work of this object in its digital or physical format (including - but not limited to - remixes of this object, and hosting on other digital platforms). The objects may not be used without permission in any way whatsoever in which you charge money, or collect fees.
Comment & Rating (261)