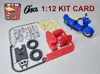
WFM OSA M52 1:12 KIT CARD


Print Profile(2)

Description
WFM Osa M52 – 1:12 Scale 3D Printed Model Kit
The WFM Osa M52 was a stylish and robust scooter produced in Poland during the 1960s by Warszawska Fabryka Motocykli (WFM). Known for its distinctive design, comfortable ride, and reliable two-stroke engine, the Osa M52 became a symbol of Polish urban mobility and remains one of the most recognizable scooters from Eastern Europe’s post-war era.
This 1:12 scale 3D printed model kit faithfully recreates the elegant lines and mechanical details of the original Osa M52. Designed for hobbyists and collectors, the model offers a higher level of precision and realism compared to smaller scales. Unlike our snap-fit kits, this version requires glue for full assembly, allowing for a more detailed and permanent build.
All components are 3D printed with fine surface detail, accurately representing the scooter’s frame, body panels, seat, and wheels. Once assembled, the model perfectly captures the character of the classic Polish scooter.
Features:
- Scale: 1:12
- Vehicle: WFM Osa M52
- Assembly: Requires glue (for a durable and detailed build)
Includes: All parts for the model + assembly instructions
In a few enjoyable steps, you can build a precise miniature of the legendary WFM Osa M52, a scooter that combined elegance, practicality, and Polish engineering spirit. Perfect for model builders, collectors, and enthusiasts of classic motorcycles.
The scooter can also be printed in 1:24 scale, but in this case I recommend using a 0.2mm nozzle for a better visual effect.
I am including a separate rear lamp that can be printed in multi-color.
Boost Me (for free)
If you like what I do, I would be grateful for supporting my work.
Membership
I am making this available for personal use. If you are interested in commercial printing, choose membership
Be sure to check out my other models.
Assembly instructions:
1. Remove the support from the rear fender. Glue the seat, taillight, passenger handles, and air vents to the rear of the body.

2. Glue the two parts of the headlight and the positioning pin together. Then, along with the OSA logo and speedometer dial, glue them to the front of the scooter.

3. Glue the headlight.

4. Connect the two parts of the scooter.

5. Glue the air vents, decorative strip, and handlebar post to the front fender. Insert them through the hole in the front of the scooter and glue the handlebar and handlebars together from above.

6. Glue the two pedal parts together and place them in the scooter.

7. Assemble the wheel and suspension parts (no gluing required). Both suspension parts must be aligned in the same direction.

8. Install the scooter wheels by inserting the suspension into the mounting holes.

9. Glue the exhaust pipe to the floor of the scooter and secure everything with a kickstand.

License
You shall not share, sub-license, sell, rent, host, transfer, or distribute in any way the digital or 3D printed versions of this object, nor any other derivative work of this object in its digital or physical format (including - but not limited to - remixes of this object, and hosting on other digital platforms). The objects may not be used without permission in any way whatsoever in which you charge money, or collect fees.
Comment & Rating (38)