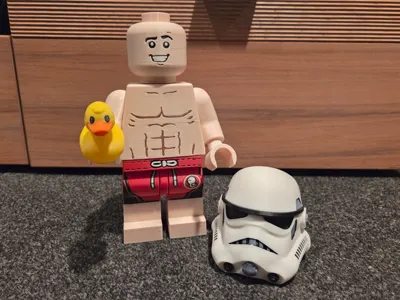
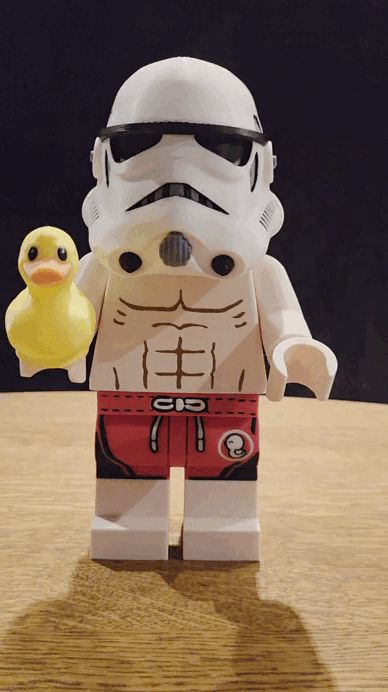
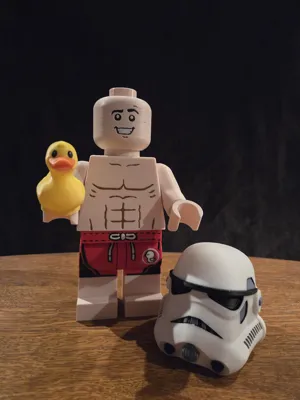
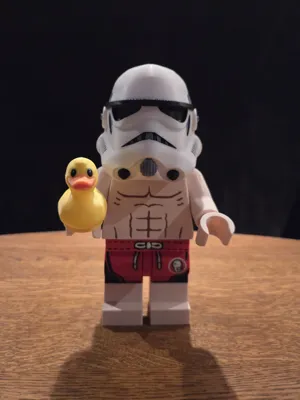
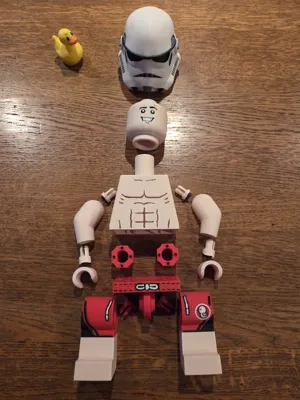
Building Block Megafigure Rubber Duck Stormtrooper 21cm


Print Profile(3)


Description
Hello Star Wars Fans,
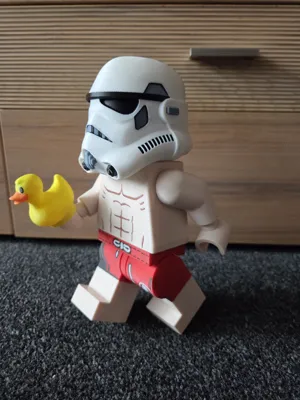
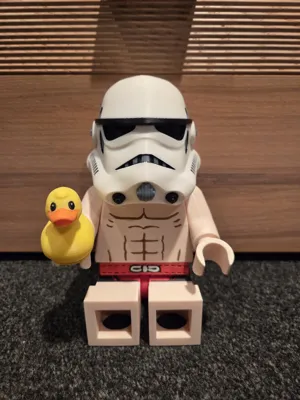
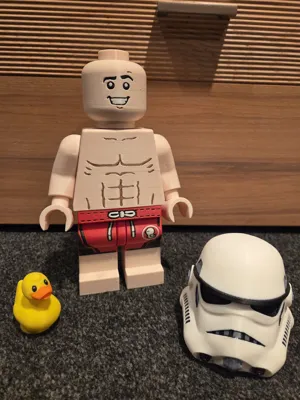
I have a cool 21 cm tall Stormtrooper building block figure for you here
A true enthusiast's figure, which I created out of pure passion and enthusiasm for this character. I hope that shows too. (-;
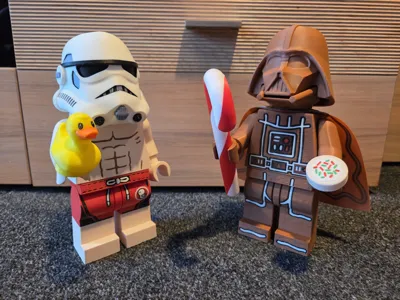
A rubber ducky-trooper, dressed only in swim trunks and a helmet
Ready for a relaxing bath in the hot tub
A note in advance: I have also designed a Christmas Darth Vader model: You can find it here: https://makerworld.com/de/models/1930800-building-block-megafigure-christmas-darth-vader-21#profileId-2072679
The basis of my profile is the fantastic, completely rethought and constructed blank brick figure by Julia Ebert here on MakerWorld, which I have, of course, linked accordingly. Many thanks at this point for providing this file
The original figure is specified at a scale of 10:1: I have scaled it down to 50% from this
I then uploaded the file to Fusion 360 and found that I couldn't easily sketch and emboss my desired motif onto some parts due to too many small geometries. In addition to the many geometries, the head also had a deeply stamped standard face, which I also couldn't use
So I went to the trouble of completely recreating the legs and head 1:1 from the original over several days
Now nothing stood in the way of my motif and I could sketch
I've really put a lot of love, time, and filament into this model, driven purely by fan passion to be able to set up and present this model
All parts were printed multiple times as prototypes to achieve the most visually appealing and precisely fitting result possible
I remixed, edited, and colored the helmet from another file from Printables until it now fits perfectly on my trooper's head. Of course, I also linked the original file
I found the base for the rubber ducky here on MakerWorld (also linked as a source). I remixed it and converted it into a building block version
What do you need for printing
Ideally an Bambu Lab AMS, a lot of anticipation, and some patience (possibly some super glue)
You will be rewarded for your patience with a fantastic result – I promise
Those with the creativity and talent to paint it themselves can, of course, print in a single color and save time
The surface structures are all minimally embossed, so they are still recognizable even when printed in a single color, which can make hand-coloring easier
The torso and hips are printed on both sides: abdomen/chest and back
Update: 5.11.25: I have created an additional print profile without a back design, so the torso can also be printed completely smooth when lying down. This saves time and filament but involves the compromise of missing the back print.
Many of you will be grateful for this, because if you place the figure on a shelf with its back to the wall, you won't see it anyway.
Decide for yourself whether you want to opt for the perfect design or the fast print.
A file for fans and enthusiasts like me: For printing, displaying, and simply enjoying,
The license explicitly prohibits selling the object
Printing Notes:
The orientation of the individual objects on the print plates is focused on quality to achieve the most perfect print result possible. If you want to change the orientation to potentially save time and filament, this may come at the expense of final quality, meaning you will have to make compromises
- Print the connectors and clips with 100% infill in object order (this saves some time). Theoretically, you can also add the connectors.
- The clips should be the same color as the body parts they will later be attached to. (Upper arms, hips/legs, and wrists = in my case, red, beige, beige.
- 6 of the 26 connectors should be printed in the same color as the hands so it doesn't show through. This is already preset in the print profile.

- If you anticipate problems with print bed adhesion, add a wide brim. The contact surface for the hands and arms is very thin.
- For the print plate with the hips, be sure to set the supports to manual tree support. I have already painted on supports. Check this in the slicer. Otherwise, you will have trouble getting the small supports out of the holes for the connectors. More details are illustrated below.
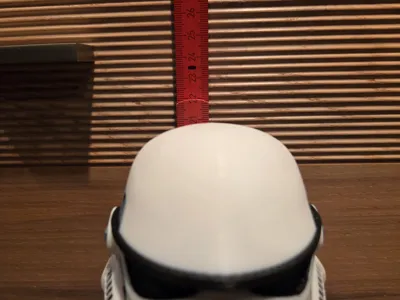
- You can reduce the infill of the helmet to save some time and weight. I also didn't want the head to be an absolute center of gravity. My colored helmet has 5% infill. However, for testing purposes, I printed several monochrome prototypes that were completely hollow, i.e., had 0% infill, and that also worked well. The underside of the helmet is almost completely supported due to its specific shape. This support interface will not really be visible later. However, I am rather perfectionistic and therefore recommend post-processing and smoothing the scar a bit later. I used some sandpaper and a rotary multitool. (But pay attention to the infill here, otherwise you'll quickly go through it).
- If you print the optional rubber ducky from the other attached print profile, I recommend printing it hollow with 0% infill to shift as little weight forward as possible when the trooper has it sitting on its outstretched hand. This setting is already preset in my print profile.
Assembly Notes:
I did not use any additional glue, the model can be completely assembled by plugging parts together. The connectors and clips are sometimes a bit tight, but that is intended.
If you give the model to your children to play with, I recommend gluing all parts. No glue is needed for use as a pure display model.
To facilitate assembly, I have illustrated and described each step

First, remove all supports, even those that are somewhat hidden. The supports from inside the torso require some time to break them out piece by piece and then pull them out. Pointed pliers also proved useful here
I have now updated the print profile again to support the hips with manually painted on support so that the small holes on the underside do not need supports, as these annoyed me greatly during my first printing attempts. Their removal was very tedious and difficult
Attached are 2 photos of my experiences with these tiny supports. But you can spare yourself that now


Now, step-by-step to the Mega Figure:
First, insert the small black connectors into the holes. These fit quite snugly, and that is intended – it's best to use pliers for this and ensure all connectors are inserted as deeply as possible, making them level.


Now connect the two smaller clips in the appropriate color to the hips.


Now connect the legs to the hips. The hips should already be movable, don't worry, there might be a slight crack when you first move them, but nothing will break.


Now attach the very large thick round hip connectors to the hips. They only fit into the torso in one direction – the side with the flattened inner hole must face outwards. It might be a bit difficult to attach. You might need some force. You can also use a small hammer or the handle of pliers to tap them in.


Take the arms and hands and connect them to each other; the longer rounded clips are needed for this, and ideally, connectors in the same color as the hands.


Now attach the remaining clips in the correct color to the upper arms and connect them to the torso.


- Now you can connect the finished torso to the lower part
- Attach the head and put on the helmet
Print the additional rubber ducky as an accessory from the other print profile and it's done.

I would be very happy if you would share your print result with me in a review. I love to see my work come to life with you
Likes, comments, and boosts are always welcome. Boosts in particular can make a big difference and reward me greatly
Another project is already in the works. Follow me so you don't miss the release
Boost Me (for free)
It took a lot of work, time, and filament. I really put a lot of fan passion into it. If you want to compensate and reward me. Press boost. Thank you
Reminder: This model is considered fan art and is intended for personal use only. We are not affiliated with any official brand, and the sale of digital files or physical copies (creations) is strictly prohibited.
This remix is based on


Comment & Rating (28)