Holy Grail One Filament Spool Dry Box | A Tribute


Print Profile(3)


Description
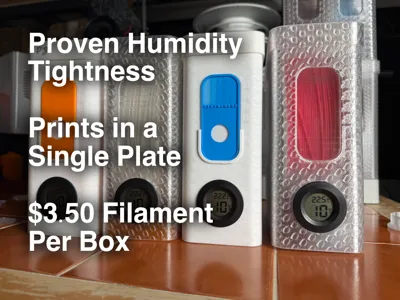
This isn't the holy grail of filament storage, it is merely a tribute. But after 46+ iterations, 240 hours of torture testing, humidity measurements steady at 10% for weeks, this might just be the filament dry box you’re looking for.
Boost Me (for free)
Boosts appreciated if this helped you at all
What Makes This Special?
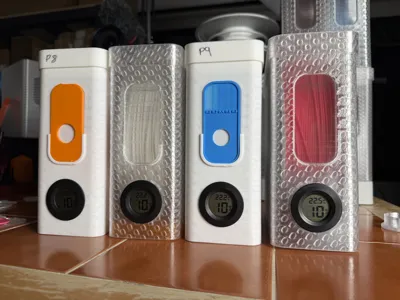
In short: 1) Real humidity data - 10% maintained for weeks while room fluctuated 38-60%, 2) $3.50 per spool stored (almost half the price of cereal containers), 3) 100% printable with no hardware required, 4) <15 hours print time (flat bottom), 5) Transparent walls to see contents, 6) Stackable design, 7) Integrated hygrometer slot, 8) Compatible with Chitu Systems E1 dryer (optional bottom)
| ✅ Must Haves - 7/7 COMPLETE | ✅ Nice to Haves - 8/9 COMPLETE |
| Keeps filaments dry (10% humidity over weeks - test still running) | ❌ Dry with PolyDryer (in progress) |
| Hygrometer slot | Transparent (completely see-through PETG) |
| Stackable (tested up to 5 high) | Cheaper than cereal boxes (almost 2x) |
| Know what’s inside | Pretty (it’s grown on me) |
| Cheap | Small |
| 100% printable (no additional hardware) | Quick to print (<7 hours) |
| Easy to print (minimal support) | |
| Just 1 plate! | |
| ❌ Print from it (not a dealbreaker for me – tell me if it is for you) |
Accessories:
- Dual spool version, for even better filament and cost efficiency
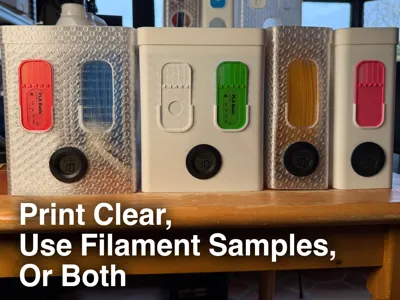
- Sample system that fit perfectly in the windows, great if you plan to print this in opaque materials like most PLAs
- Stacking shelving system allows you to stack these boxes, along with official Chitu boxes, and grab them from the middle
- I use the Chitu E1 Dryer, these hygrometers, and this desiccant; using these affiliate links supports my work at no cost to you.

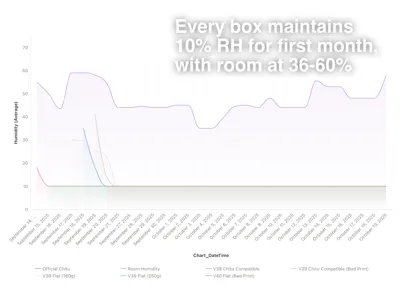
Dry Testing Results (please note all results on the graph at the moment or the dual spool version, but I’m confident that these will also be very humidity tight because they are based on the exact design, shrunk down, with minor changes to the lid to make it easier to take takeoff and put on. I’m running detailed experiments on the single spool version, and will share these when I have more results):
The boxes with less desiccant took slightly longer to reach 10% humidity, but once a box has reached 10% humidity, every box has stayed there for the first month+ of testing. I’ll be updating this as I get the chance to do more testing.
Dry Testing Methodology:
I tested 5 different prototypes and one official Chitu Dry box as a control. All prototypes were printed on a Bambu A1 using Bambu Clear PETG Translucent. These had a variety of configurations and contents to test long-term humidity tightness in a wide range of real world scenarios. Some prototypes had dried (n=1) and some had non-dried (n=4) spools, some had a small amount of desiccant (≤150 g, n=3) and some had a large amount of desiccant (>150 g, n=2), some had flat bottoms (n=3) and some had Chitu dryer compatible bottoms (n=2). Desiccant was placed in the middle of the spools using a printed insert and/or at the back of the container in a bag that came with my desiccant. This places it far away from the hygrometer, and ensures our humidity reading is actually conservative. Boxes were not opened during the testing period, to test humidity ingress at the joints.
FAQ:
- What spools does this support? It’s designed for up to a 200mm outer diameter and 74mm depth - though, due to the rounded corners, you can gain a bit of depth if the diameter is smaller. Comment if you use spools larger than 200mm
Why isn’t it the holy Grail?
Is this perfect? No. The worst part of the current design is probably the lid mechanism. It’s very tight, because this is what allows it to be incredibly humidity tight without additional parts like gaskets. Getting the lid off and putting it on is a bit of a dance - you have to take it off a little at the front, then the back, then the front etc until it’s off or on. It does loosen slightly over time as it gets used to the shape of the box, and you get better at doing this movement. Let me know in comments if: a) this is worth it as it is b) you’d prefer a looser lid, where you have to change desiccant slightly more frequently, or c) you’d prefer a looser lid, where you also have to print a TPU gasket to get the same level of tightness
In theory, the seal isn't as tight as mass produced designs (though I haven't measured any difference yet). It looks utilitarian, not fancy, but it's grown on me. $3.50 is only the filament cost, and doesn’t account for printer time or the hygrometer. It’s calculated with a $13.99 spool of PLA or PETG printing 4 boxes, giving $13.99 / 4 = $3.50 of filament per box. This is a typical, non-sale, bulk price for Bambu PLA or PETG Translucent, and similar to the price of other brands.
Tips for Optimising Transparency:
- Dry your filament and don’t let it get wet
- The transparency effect is very dependent on lighting, and that’s quite easy to fix. Ideally, it would have lots of natural light coming in from the front. If this isn’t possible, pointing the flash from your phone at it is enough to make it much more transparent, so much so that you can tell apart very similar spools
- All development and testing uses official Bambu Clear PETG Translucent - please see comments for results with several other types of filament
Detailed print settings:
- 0.4 mm nozzle
- Seam position “back“
- Arachne wall generator
- 1 wall loop
- Top surface pattern, bottom surface pattern, and internal solid infill pattern all aligned rectilinear, infill direction 0°
- 10% gyroid sparse infill
- Default tree supports. It actually prints surprisingly fine without supports, but do this at your own risk
KNOWN ISSUES:
- None at the moment
Changelog
The initial design process was detailed in my YouTube video. Changes since then:
- 5/10/25 - Small Fix: changed the flat bottom print profile, just because I had misplaced it too far in the corner. It was forcing supports to start on the inside of the box itself, when most can start on the plate.
- 15/10/2025 - Fixed worse transparency in one of the eyes, which was due to some slicer settings not transferring over to the file I released.
- 28/10/25 - Added sample holders in front of the windows, to allow you to print this easily and quickly using opaque materials like PLA, but still know what’s inside at a glance. The old boxes are still available please see the “legacy” print profiles.
- 28/10/25 - Added single spool version
- 8/11/25 - Made this slightly longer, which should fit slightly bigger spools, and brings size back in line with the dual spool version. Keeping the old version available as a legacy version
Check out all my prints:
- Holy Grail Filament Dry Box | A Tribute
- Holy Grail One Filament Spool Dry Box | A Tribute
- Holy Grail Filament Samples | Tribute to a Tribute
- The Grail Stack
- Form One - Ocean Inspired Vase
- Form Two - Ocean Inspired Pencil and Tool Holder
- Ultimate A1/Mini Timelapse Mod - ANY camera brand
- Gridfinity Base for MUJI 37×26 Drawers (Exact Fit)
License
You shall not share, sub-license, sell, rent, host, transfer, or distribute in any way the digital or 3D printed versions of this object, nor any other derivative work of this object in its digital or physical format (including - but not limited to - remixes of this object, and hosting on other digital platforms). The objects may not be used without permission in any way whatsoever in which you charge money, or collect fees.
Comment & Rating (348)