Runaway Reindeer – Where the Antlers Lead


Print Profile(1)


Description
Boost Me (for free)
Boost = fuel for the next design! If you’ve enjoyed my work, hit Boost and be part of the creative streak. Also, tap Follow to catch the next drop.
Membership
You can sell physical prints of this model as long as you subscribe to my Commercial License Membership.
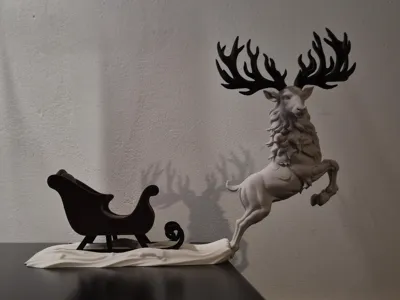
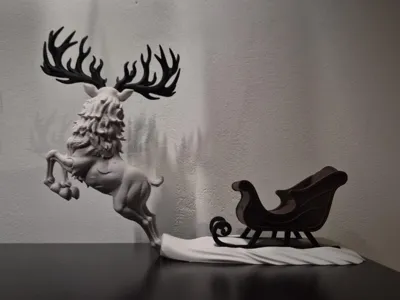
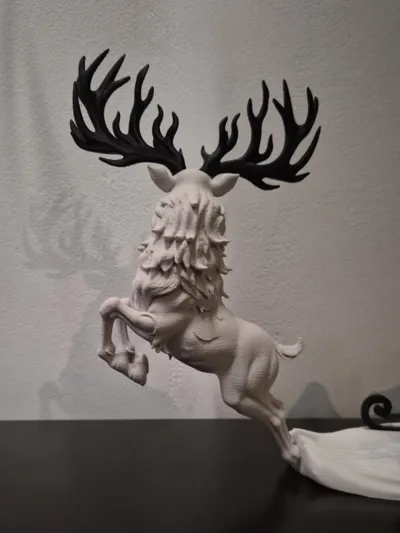
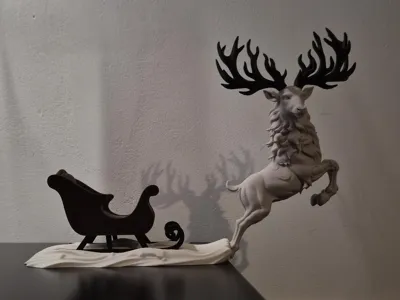
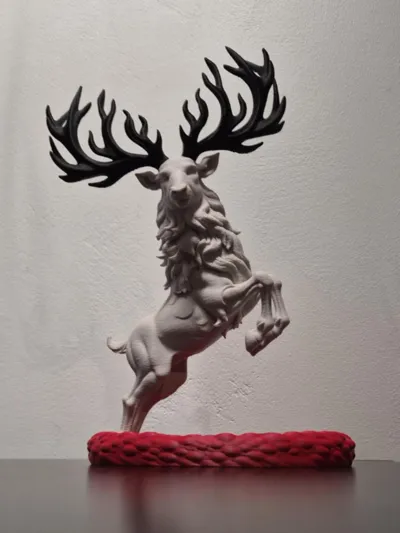
🦌 Runaway Reindeer – Where the Antlers Lead ❄️
This festive scene wasn’t planned… it escaped.
It all started as a wall-mounted reindeer… until the antlers took control. First, it broke free from its frame (literally… I had already made the frame and attached the back hooves), then landed in a bowl-shaped base. (Was it even a bowl? More like a canoe? 🤔) One frame-cut later, it leapt onto a snowy plain. Then came a sleigh.
Suddenly, it wasn’t just decoration… it became a story in motion.
This model includes:
- A bold, leaping reindeer with majestic antlers (printed separately)
- A stylized sleigh with separate runners for easy multicolor printing
- A flowing snow base that connects it all together
- No Santa… yet. But the reindeer seems eager to leave him behind anyway. 🎅
Perfect for holiday displays, shelf decor, or as a seasonal centerpiece.
Where the antlers lead, creativity follows…
Print Profile
- Layer height: 0.16 mm
- Infill: 5%
- Walls: 2
- Wall generator: Classic + Arachne mix
- Supports: Enabled (except bowl)
When removing supports, handle with care. Avoid yanking entire tree branches at once… instead, cut supports into smaller chunks with a sharp tool, then gently loosen. They’ll release almost effortlessly.
Some parts may benefit from a drop of glue to secure the snap-fit connections, especially if handled frequently.
Plates:
- Reindeer (fuzzy skin: distance 0.2, thickness 0.1)
- Antlers
- Snow base
- Sleigh
- Sleigh legs
- Bowl base

Note about raw STL files:
The snow base and bowl are not available as separate STL files… they’re only included combined with the reindeer. I couldn’t apply proper Mesh Boolean operations to cleanly separate those parts.


Key Printing Tips:
- Disable “Strength → Detect Thin Wall” → gives smoother, cleaner surfaces on detailed parts.
- Always check the slicing preview in Bambu Studio before starting the print.
- Support removal trick: Cut supports into small chunks first, then gently loosen → they usually pop off cleanly without damage.
- Some plates use lots of supports, if so → for reliable prints use these filament settings:
- Filament Overrides
- Z Hop When Retract: 0.6 mm
- Z Hop Type: Spiral
- Travel Distance Threshold: 1 mm
- ✅ Enable Retract When Changing Layer
- Also, disable these settings in Bambu Studio if Variable Layer height is used:
- Supports
- ❌ Disable Independent Support Layer Height
- Others
- ❌ Disable Reduce Infill Retraction
- I’ve found that a 0.15 mm top Z distance works best when printing with variable layer height.
- Supports
- Filament Overrides
Happy printing! Can't wait to see photos of your prints! If you're scaling, experimenting or encounter any issues, let me know → your input helps the next iteration. Please share your feedback for any rating below ⭐⭐⭐⭐⭐ so we can work on improving, thank you!
Boost Me (for free)
Boost / like / collect / follow if it made your day! 🚀
Membership
Now that you’ve printed this model, are you happy with the results? If so, why not sell it? With a subscription to my Commercial License Membership, you’re free to do so.
License
You shall not share, sub-license, sell, rent, host, transfer, or distribute in any way the digital or 3D printed versions of this object, nor any other derivative work of this object in its digital or physical format (including - but not limited to - remixes of this object, and hosting on other digital platforms). The objects may not be used without permission in any way whatsoever in which you charge money, or collect fees.
Comment & Rating (3)