Bambu Lab H2 Series Insulation Panels H2D/H2S/H2C


Print Profile(3)


Bill of Materials


- 3M VHB Tape (25 mm width) x 1: a few cm
- Polyurethane Spray Foam x 1:
Description
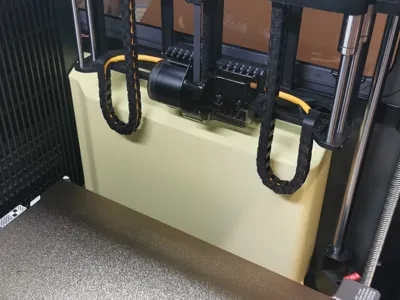
My printer is sitting in a fairly cold basement workshop, and it might lose a lot of heat to the outside. I've already added aluminum-foil-backed XPS sheets on the inside of the machine, which gave me slight energy-efficiency improvements, but I figured there must be a better solution that isn't ugly. Since the Prusa Core ONE reduces the volume with indented side panels, I thought, why shouldn't this be possible for the Bambu Lab H2 Series as well? So I went ahead and designed a solution for better heat retention.
This is a three-part print (no supports required), designed for easy mounting with M3 screws. It's optimized for use with temperature-resistant filament (ASA, ASA-CF or PC is a great choice).
Optionally, you can spray-foam the cavity for insulation, attach the printed parts, and you're done.
Key features
- Looks clean and neat, not like a hobo-style insulation ;)
- Does not obstruct airflow for the heater or auxiliary fan
- The filter can be changed without needing to disassemble the entire assembly
- Compatible with all H2-Series-Models
- left side is the same for alle, due to the Vortek system on the H2C the right side is different from the H2D and H2S


Why this is useful:
By insulating the side walls, you'll decrease the volume that needs to be heated, and you also reduce heat loss, thereby enhancing the performance and efficiency of your printer's heater system - all while retaining full access and airflow. I purposefully decided not to obstruct the windows or any other parts, so you won't have any impact when using your printer - just save some money on your energy bill and enjoy slightly faster print times, since the chamber heating does not take as long.
Printing & Assembly:
- When you plan to upgrade your H2D or H2S to a H2C later, i recommend printing the right side panel for the H2C right away - this will you give a slightly worse insulation, since it is a bit shorter, but you don't have to reprint it when you install the Vortek system
- There are no supports needed, bridges will maybe look a bit ugly from the inside, but nobody will see those
- After printing, break out the sacrificial support pieces from the "left top" part.
- Use some glue (UHU Hart works well for me) to attach the left bottom and top pieces together. The bottom piece has an undercut, so the seam should be virtually invisible if you work carefully.
- Optionally: Apply spray-foam inside the cavity and trim it flush - it doesn't need to look perfect. Keep in mind that these foams expand quite a lot. Make also sure, the foam is compatible for this application (use at least a product with a fire performance class of B according to EN 13501-1).
- Use 2 M3x6 button head screws on each side to mount the parts to the machine.
- The easiest way to install the parts is to raise the print bed to the top (be careful, don't crash the bed into the printhead!), then move the insulation panels into place.
- Move the bed down to the lowest position. This gives good access to install the screws.
- The panels are hooked behind the side panels and the black back housing. This is sufficient, but if they rattle, you can use adhesive strips in the front upper corner to secure them a bit. 3M VHB foam tape works great for that.


Filament recommendation:
- Since the parts are fairly large, a warp-resistant and temperature-resistant filament is recommended. ASA-CF works great for this application.
- If you use the laser version of the H2, you might switch to PC-FR for safety reasons.
Changelog
2025-12-12 v60
- add insulation Panel for H2C for Vortek compatibility
2026-01-03 v62
- added a full height insulation Panel for H2S right side (BETA, not fully tested)
Boost Me (for free)
Enjoying my models? Show your support with a Boost! Boosting not only adds a few extra points my way - it also helps cover the material costs that goes into prototyping each design. Every bit of support helps me keep creating fresh, high-quality models for you to enjoy! Thank you for helping keep the creativity flowing 💡✨
License
You shall not share, sub-license, sell, rent, host, transfer, or distribute in any way the digital or 3D printed versions of this object, nor any other derivative work of this object in its digital or physical format (including - but not limited to - remixes of this object, and hosting on other digital platforms). The objects may not be used without permission in any way whatsoever in which you charge money, or collect fees.
Comment & Rating (74)