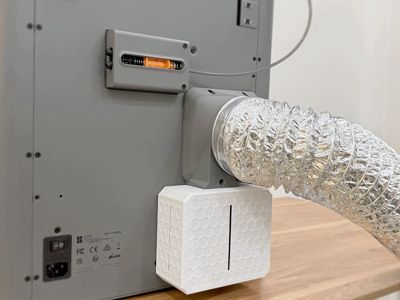
This is an external exhaust system for the P2S, designed to eliminate exhaust fumes and provide ventilation and heat dissipation
It features Print in Place components, no supports, good sealing, stable installation, and efficient exhaust
Features:
single plate printing, no supports
The overall design perfectly matches the P2S, with high space utilization and stable reliability
Adapts to 100mm diameter ventilation ducts, and can also connect to 80, 60, 50mm ducts via adapters
Integrated design for waste and exhaust channels, perfectly combining ventilation and waste management
Large capacity poop bin, quick-release design, with a visible capacity window
Fixed using self-tapping screws (M3X18) from disassembly; only two diagonal screws are needed for secure fastening
Multi-purpose use for direct exhaust, external extractor fan, or external purifier
Top and side exhaust port designs are also available in this project
*You can choose the exhaust port that suits you, then print a waste bin
Installation Method:
Please find the two M3X18 self-tapping screws from disassembly (used to fix the AMS) and use them for fastening; testing shows that two diagonal screws are sufficient for stable fixation
You can also use any M3 self-tapping screws you can find, up to 18mm in length, as they will not touch internal components
For ducts, aluminum foil or canvas ducts are recommended and should be secured with clamps
80, 60, 50mm Duct Adapters:
Adapters are used to fit 80, 60, 50mm ventilation ducts, also allowing for quick disassembly and installation of the ducts
Features a slow interference fit, achieving excellent tightness and sealing without glue, and making installation easy
Top and Side Exhaust Versions:
The exhaust unit is suitable for rear/top/left-right side versions, with the same installation method
The top exhaust and side exhaust versions are different; please choose the one that suits you
Available in 100mm and 80mm specifications, you can choose yourself
In the same print profile
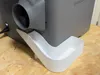
Waste Chute for the Exhaust System:
This waste chute is only compatible with the P2S exhaust system and is suitable for users who need to place the printer close to a wall. Compared to the default waste bin, the open structure of the waste chute will reduce negative pressure inside the chamber but will not affect exhaust discharge
Regarding Ventilation Solutions:
The simplest method is to extend the end of the duct out of a window: utilizing the internal air pressure of the machine for natural exhaust. Without internal backdraft, over 70% of exhaust fumes can be expelled
Use an exhaust fan in the middle of the duct to enhance extraction: with the duct end extended out of a window, active extraction will significantly boost exhaust efficiency and prevent backdraft. A standard 4-inch fan's capacity greatly exceeds the machine's intake, achieving 100% exhaust expulsion efficiency and drawing out some indoor air
Install an active air filter at the end of the duct: and discharge the filtered air outdoors or indoors. If the purifier fan is not turned on during printing, it may lead to heat buildup inside the printer and print failure. Therefore, the filter's operating conditions are quite strict, but this is suitable for scenarios far from windows
Without using this component, in a ventilated room, you can use the P2S riser to enhance heat dissipation
2025.11.17 Modification: After testing, two screws can also securely fix it, so the column in the waste channel was removed to ensure the waste channel is unobstructed
2025.11.17 Added: Added top, left, and right side ventilation duct directions; the exhaust unit is universal
2025.12.02 Added: Added fully enclosed waste bin and a new right-side ventilation port
2025.12.12 Adaptation: Newly released external air purifier (right image), perfectly compatible with the external exhaust port. Click to visit (International site)(Chinese site)
This user content is licensed under a Standard Digital File License.
You shall not share, sub-license, sell, rent, host, transfer, or distribute in any way the digital or 3D printed versions of this object, nor any other derivative work of this object in its digital or physical format (including - but not limited to - remixes of this object, and hosting on other digital platforms). The objects may not be used without permission in any way whatsoever in which you charge money, or collect fees.


Comment & Rating (424)