PC4 M6 CerealBox Output "Port" Improvement v2


Print Profile(1)

Description
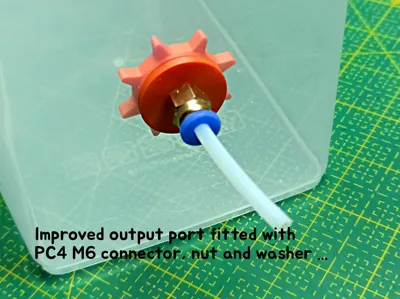
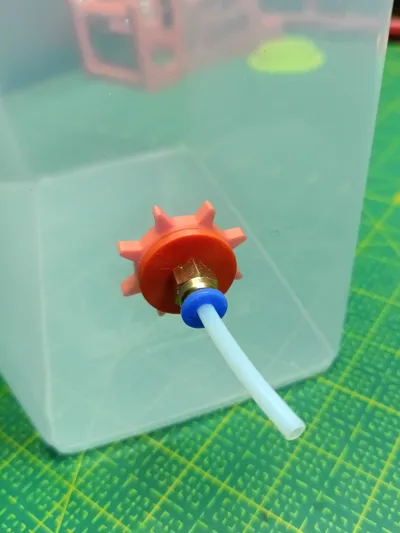
Enhance your "CerealBox" with a practical filament output - equipped with a PC4-M6 connector
Many people use "Cereal Boxes" to store filament and print directly from them. Most boxes have just a simple hole drilled through the plastic wall of the box. This is neither attractive nor practical (moisture penetration, stress on the box material, and potential damage).
This model turns a simple plain hole into an enhanced & practical "port". Equipped with a PC4-M6 connector for quick and convenient handling of filament and PTFE tubes. It also reinforces the wall around the hole and reduces the risk of the box cracking.
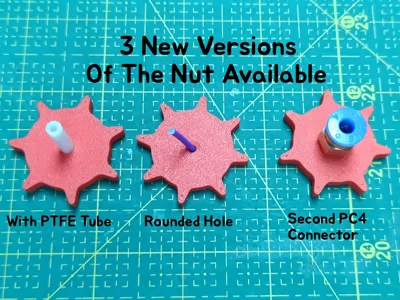
UPDATE & NEW MODELS AVAILABLE !!! |
This new version should address the issue with some "poorly manufactured" PC4Mx connectors. These connectors have sharp edges (on the threaded side) through which the filament passes, which can cause it to rub and become damaged when entering from this side. I have not encountered this problem with the connectors I have used, but I recently received one (thanks Tomas) that suffers from this problem...
For such a "bad" connector, the "simple nut" from my original model is not 100% suitable - the sharp hole in the connector is not covered in any way, and the filament gets (can get) rubbed and damaged.

Therefore, I designed three new nuts that should fix this problem. It is up to you to choose which one suits you best.
- Model 2A - PTFE tube: The nut (mounted inside the box) has a thread for the PC4 connector (which goes through the box from the outside) on one side, but on the other side, a piece of PTFE tube is inserted (just a really short piece is enough). The PTFE tube is pushed "all the way" to the screwed-in connector and covers its sharp edge. The filament first passes through the PTFE tube and then directly through the PC4 connector. The possibility of friction is mostly eliminated.
Tip: for a such purpose, a PTFE tube with a thicker wall is more suitable (it has a smaller/narrower inner hole - but still suitable for standard filament with a diameter of 1.7 mm). Thanks to the thicker walls, the edge of the PC connector is better covered.
- Model 2B - Small Hole: The nut (mounted inside the box) has a thread for the connector (which goes through the box) on one side and only a small hole (slightly larger than the filament) with rounded edges on the other side. The filament passes through this small hole then goes straight into the center of the screwed-in connector, and the possibility of rubbing against its edges is significantly (almost) eliminated. Personally, this solution is my favorite.
- Model 2C- Two Connectors: The nut (again mounted from inside the box) is thicker and allows another PC4 connector to be screwed in from the other side. In the nut, both connectors "meet at the stop" and there should only be a "smooth passage" without the possibility of rubbing against their edges. This solution is OK, but more demanding on the internal space - the second, internal PC4 connector protrudes more significantly into the box space - where there may not always be enough free space for it.

All new nuts (models 2A, 2B, and 2C) also have a modified, more friendly design - "wings" have been added to allow for better tightening and loosening by hand. The original old nut remains unchanged (purely circular shape), as I do not expect anyone will be using it (but it's still present in the print profile)
The Outer Washer and End Cap remains the same
As an extra bonus, the profile also includes a new version of the PTFE tube Endcap, which is attached to the outer washer. If you are like me (always putting things somewhere and then not being able to find them), you may find it useful that the cap simply cannot "run away." The washer is basically the same as in the original model.
It is remarkable how flexible a material such as PLA can be – however, after printing, it is advisable to carefully bend the individual links of the connecting strip and "teach" them their new “flexible role” :-)
Hope this update will work great ... Enjoy!
Comment & Rating (1)