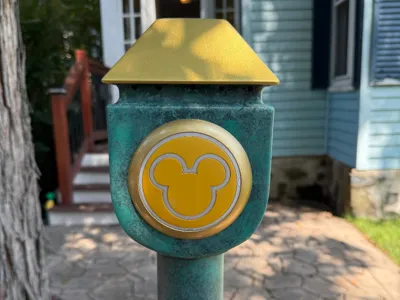
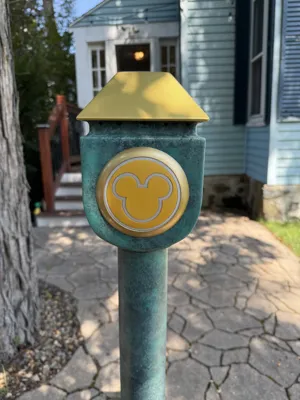
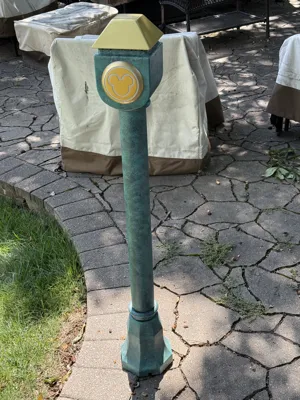
Disney Haunted Mansion Inspired MagicBand Reader


Print Profile(1)

Bill of Materials
- Creality PETG 3D Printer Filament 1.75mm 1KG x 1: https://a.co/d/7FSQKkb
- ELEGOO PLA Filament 1.75mm Translucent 1KG x 1: https://a.co/d/eBD48u2
- eSUN PLA+ Filament - Yellow - 1.75mm, 3D Printer Filament PLA Plus x 1: https://a.co/d/bFfKMNk
- eSUN PLA+ Filament - Green - 1.75mm, 3D Printer Filament PLA Plus x 1: https://a.co/d/0f6yphh
- RFID Module Mini NFC Reader Writer Kits 13.56MHz x 1: https://a.co/d/8RjPJ3M or https://a.aliexpress.com/_mMmHC4V
- BTF-LIGHTING WS2812B IC RGB 5050SMD Pure Gold Individual Addressable LED Strip 3.28FT 144LED x 1: https://a.co/d/b1vVJRC
- Gorilla Super Glue Gel XL x 1: https://a.co/d/2ASDr3u
- 2 ½" PVC Conduit x 1: Pipe between the base and housing
Description
Inspired by the MagicBand readers/tap points at Walt Disney World's Magic Kingdom, specifically the ones at The Haunted Mansion.
For the last few years a friend of mine has done a Halloween display inspired by Disney's Haunted Mansion. After 2024's display I mentioned it would be cool if he had MagicBand tap points. Little did I know that conversation would kick off a year long development process that involved 2 "research trips" to Walt Disney World and a cumulative hundreds of hours of 3D modeling, printing, and post print painting and finishing. Not to mention hundreds of hours in software and electronics development.
I am providing the 3D printable files for the housing, reader face, and the pipe base as well as assembly instructions. I can not provide the software and hardware instructions at this point as it is still very much in the beta phase. This is gen 1, gen 2 is already in development for 2026s display. I will share an updated model and instructions once we are sure we have a stable software and hardware version.
Face Assembly:
- Using Super Glue, glue Face Part 1, 2, 3, & 4 together.
IMPORTANT: Next align the triangles at the top of Face Part 3 and the Bezel as shown below.

- With the orientation correct, glue the bezel to the face pieces.
Electronics:
The software we used was custom written for us and ran on a Raspberry Pi for the RFID reading and used an ESP 32 board running WLED to drive the lights. As I mentioned above, I can not share the software at this time, but if you search on YouTube there are several other creators who have made readers like this using simpler systems and they include instructions.
The LEDs and RFID board we used are listed in the bill of materials. Those parts fit in the Light Shield part like this:


Make sure the LED strips are pushed all the way down and into the outside walls so there is room for the face to slide in.
Test fit the Light Shield and Face Assembly together to make sure the Face Assembly seats fully in the Light Shield.
Housing Assembly:
From the inside push the Light Shield through the opening in the front of the housing, making sure to line it up with the tab cutouts.
NOTE: it will be rotated slightly counter clockwise.
- Push the Face Assembly into the Light Shield from the outside, making sure to line up Mickey's face.
- With the Face Assembly and Light Shield fully together, push the two pieces back into the housing until the bezel is flush with the outside of the housing.
- With 2 hands,, hold the the entire assembly from the inside and outside and rotate slightly clockwise until the tabs on the bezel engage with the tabs on the housing front. Mickey's face should now be straight.
Pipe & Base Assembly:
- Push the pipe (in the bill of materials) through the hole in the top of the Base piece.
- Push the Reader Assembly on to the top of the pipe.
- Make sure the cable notch in the Base piece is facing the back.
Notes:
- There is ample room inside for electronics and power supplies.
- The power cord can snake down the support pipe.
- The roof fits on top of the housing and allows for easy access to the internals.

Disclaimer: The reader tech we used will read any 13.56 MHz RFID tag. That includes generic RFID cards and tags as well as Disney MagicBands. This is a fan made item and there is no affiliation with The Walt Disney Company.
License
You shall not share, sub-license, sell, rent, host, transfer, or distribute in any way the digital or 3D printed versions of this object, nor any other derivative work of this object in its digital or physical format (including - but not limited to - remixes of this object, and hosting on other digital platforms). The objects may not be used without permission in any way whatsoever in which you charge money, or collect fees.
Comment & Rating (28)