Realistic German WW2 Stick Grenade | All new v2


Print Profile(3)
![[New v2] AMS Version | Now with easy screw-on parts](https://makerworld.bblmw.com/makerworld/model/UScba17b64fd43b9/728068253/instance/2025-11-26_a76c7765e84588.png?x-oss-process=image%2Fresize%2Cw_100%2Fformat%2Cwebp)
![[New v2] Non AMS Version | Easy Screw-on Parts](https://makerworld.bblmw.com/makerworld/model/UScba17b64fd43b9/728068997/instance/2025-11-26_11b2758c84dee.png?x-oss-process=image%2Fresize%2Cw_100%2Fformat%2Cwebp)
![[Old v1] With Peg Assembly (instead of newer screw on)](https://makerworld.bblmw.com/makerworld/model/UScba17b64fd43b9/728045828/instance/b8c776bd0c87191b.webp?x-oss-process=image%2Fresize%2Cw_100%2Fformat%2Cwebp)


Description
Want more like this model? Check out these collections: Grenades | Artillery & Ammo | Life-size Weapons | Missiles & Bombs | and more (3)… |
Summary
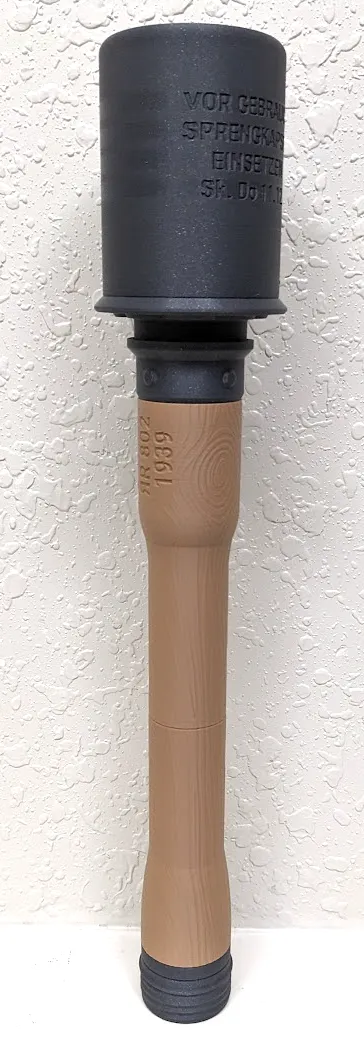
The grenade you've requested if finally here -- the iconic WW1 and WW2 M24 German Stick grenade, with high realism and high detail, including wood grain finish, markings, and screw on bottom with pull tab like the real thing.
Background: The M24 stick grenade, widely known as the "potato masher," was the iconic standard hand grenade of the German Wehrmacht during World War I and World War II. Its distinctive long wooden handle provided extra leverage, allowing soldiers to throw the grenade farther than many contemporary spherical grenades.
Bambu filaments used
- Matte Caramel
- Polymaker Metallic Chrome (Amazon link)
- Matte White (for the string grip/bead)
New Screw-on Version Assembly
1. First, slide the gray round piece (shown in orange below) onto the threaded grenade as shown below.

2. Next, screw the top wooden/brown piece onto the grenade as you see below.

[OPTIONALLY] You can use string or cord to include a fuze cord. See below for details. Simply knot one end of the string on the hook in the wooden/brown piece and then knot the other end to the round donut-shaped gray bead piece. You'll want to make sure the cord is long enough that it can pass through the other wooden brown piece and still be grabbed.

3. Then screw the two wooden brownp pieces together as you see below.

4. Lastly, screw on the cap as you see below.

Older v1 Peg-based Version Assembly

When you attach use the peg to combine the two stick halves (as shown below) you can optionally tie string to the loop and pass that string through the hole before you combine the two stick halves. You can then tie the little circular white bead to the end of the string for a pull cord that pops out when the bottom is unscrewed.

Boost Me (for free)
If you enjoy my work and would like to help support my ability to share more (and even better) models in the future, please consider boosting or buying me a coffee at the link below. Your support is what helps me have enough filament and supplies to do all the print testing required for my models to be high quality and easy to assemble. It takes a mountain of test prints for each model. Thanks :-)
| Here's a link to my Buy Me a Coffee page, thanks for the support! |
( ! ) Do not sell my prints — I have not authorized selling prints. If you sell my prints on Etsy, Amazon, eBay, etc, I will find out.
This 3D print is intended for decorative purposes only and is not suitable for children. Small parts may present a choking hazard and edges may be sharp. By printing this 3D print, you assume all liability for any harm to yourself or others resulting from its use.
License
You shall not share, sub-license, sell, rent, host, transfer, or distribute in any way the digital or 3D printed versions of this object, nor any other derivative work of this object in its digital or physical format (including - but not limited to - remixes of this object, and hosting on other digital platforms). The objects may not be used without permission in any way whatsoever in which you charge money, or collect fees.
Comment & Rating (194)