Search models, users, collections, and posts
Blobifier_X_deep_clean - Printer Nozzle Deep Cleaning - Nozzle Scrub
IP Report


Print Profile(1)

Blobifier_X_deep_clean
Designer
37 min
1 plate
Open in Bambu Studio
Boost
2
1
0
0
1
0
Released
Description
Content has been automatically translated.
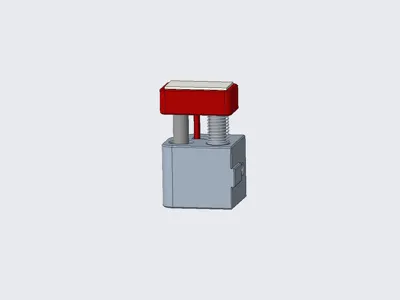
Blobifier_X_deep_clean
Deep nozzle cleaning device for Klipper printers, which, when combined with a nozzle wiping device, allows for deep cleaning of the nozzle before printing begins, eliminating the hassle of manual cleaning and ensuring precise Z homing and leveling
This can be considered an upgraded feature for Blobifier_X (it can also be used independently, of course), so the following upgrade instructions are provided
- Blobifier_X code updated to V2.2
- MANUAL_STEPPER_FIX adapted to the latest version of Klipper
- Added nozzle deep cleaning (nozzle polishing) function: BLOBIFIER_X_DEEP_CLEAN, used for deep cleaning the nozzle before printing starts, eliminating the hassle of manual cleaning and ensuring precise Z homing and leveling. Please call as needed
- Adjusted BLOBIFIER_X_PARK logic, fixed a bug where BLOBIFIER_X_PARK did not execute as expected when the print head was in a specific position
- !!!!!!!!!!Note: The use of the nozzle deep cleaning function changes the method of Z homing. Please use it only after clearly understanding how it works. For details, please refer to the bottom section of this file!!!!!!!!!!
Blobifier_X_deep_clean Usage instructions
Bill of materials
- ∅5x35 or 30 cylindrical pins x2
- ∅5x∅7x12 bushings x1
- 0.4x7x15 spring x1
- 20x10x1.5 silicone pad x1
- M3x16 screw x1
- M3x8 screw x1
- M3x4x5 heat-set insert x1
- M3 hex nut x1
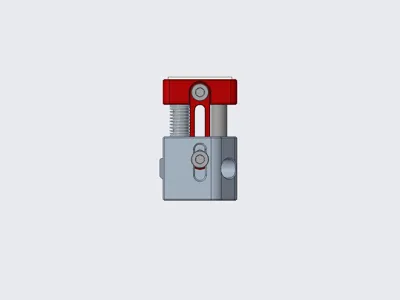
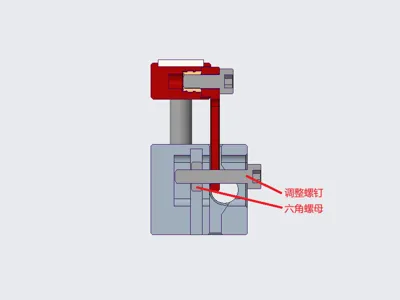
Installation instructions
- The model is simple, just assemble it as shown in the pictures
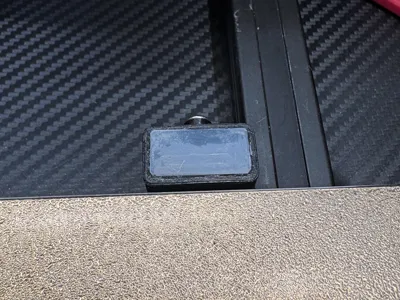
- The silicone pad is affixed inside the groove on the top surface of the tray
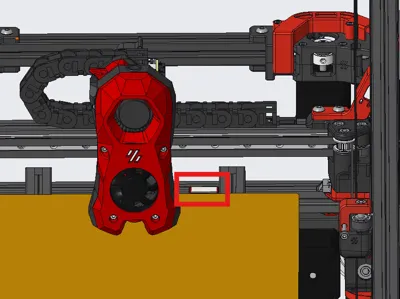
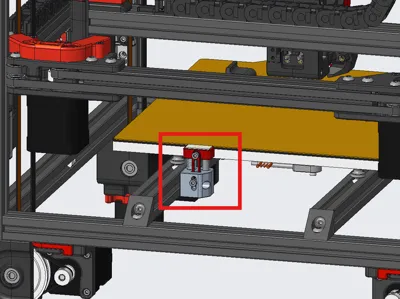
- Install this device on the edge of the heated bed, as close to the heated bed as possible, ensuring the tray can move up and down smoothly
- After installation, use the rear screw to adjust the tray height so that it is 0.5-1mm above the bed surface
- For debugging methods, please refer to the comments in the code

Documentation (1)
Other Files (1)
blobifier_x V2.2代码.zip
License
This user content is licensed under a Standard Digital File License.
You shall not share, sub-license, sell, rent, host, transfer, or distribute in any way the digital or 3D printed versions of this object, nor any other derivative work of this object in its digital or physical format (including - but not limited to - remixes of this object, and hosting on other digital platforms). The objects may not be used without permission in any way whatsoever in which you charge money, or collect fees.
Comment & Rating (0)