Snowball launcher V2


Print Profile(5)


Bill of Materials

Description
Snowball Launcher V2
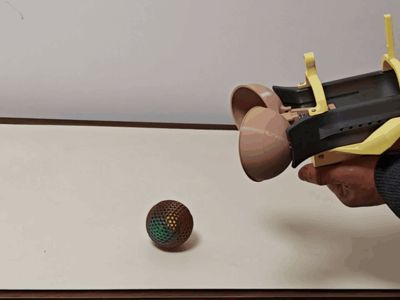
A semi-automatic snowball launcher that makes and launches snowballs simultaneously The design concept is identical to the previous generation (see competition cover 😊), but with an enlarged snowball size and additional optimizations
To use it, simply insert it into the snow, charge it, aim, and then launch
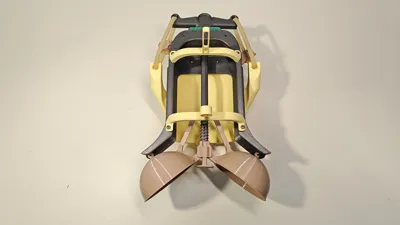
During the spring charging phase, the hemispheres gradually close to form a snowball; upon release, the linkage mechanism rapidly opens the hemispheres, completing the snowball's projection
A decorative projectile sight is provided; if there are issues with snowball launching, please remind me
To be compatible with A1 mini, I have limited the length of the rail; a version with a longer acceleration distance may be released in the future

Modeled by: bilibili@粮亦丰
Requirements: Please credit when reproducing or using, commercial use is strictly prohibited
Important Update 2026/1/19: Released V2.1, using the same parts Moderately reduced snowball diameter, increasing range Optimized in multiple locations, such as the chute, grip, etc

Update 2025/12/14: Strengthened the pulley structure and optimized the shape of the TPU buffer pad The print profile has been updated

Parts to prepare in advance:
- A stainless steel spring with a wire diameter of 1mm, outer diameter of 12mm, and length of 40mm Other springs can be chosen, but the spring force should not be too weak
- Several M3 screws, 10mm in length is sufficient
- Rubber elastic band, I used the 6mm outer diameter * 4mm inner diameter version, which can be modified as needed
- Rubber band lock (if needed)https://makerworld.com/zh/models/2032025
New version image description:


Old version instructions:


1. Assemble the moving mechanism The linkage structure mostly uses print-in-place designs, so it is recommended to use tougher filament Press firmly to connect the linkages, then secure with M3 screws after adding the flat block The pulley is fixed using any 1.8mm filament

2. Assemble the frame Assemble the several parts with M3 screws in a straightforward manner, use a rubber elastic band with 6mm outer diameter * 4mm inner diameter, an optional connector aid is provided, it is recommended to print a TPU buffer pad, if not available, other buffering materials can be used instead

3. Complete the assembly
License
You shall not share, sub-license, sell, rent, host, transfer, or distribute in any way the digital or 3D printed versions of this object, nor any other derivative work of this object in its digital or physical format (including - but not limited to - remixes of this object, and hosting on other digital platforms). The objects may not be used without permission in any way whatsoever in which you charge money, or collect fees.
Comment & Rating (271)